
Three Hikes in One Day in Virginia’s Shenandoah National Park
Here are three hikes you can take on in one day’s visit to Shenandoah National Park, including a bonus secret sunset spot:

The always stunning Appalachian Mountains from Shenandoah National Park.
In January, I noticed I had a three-day weekend without any work obligations. Naturally, to me, that means an adventure needs to be planned. I set my eyes on Shenandoah, a place I spent a day in years ago and always hoped to revisit.
Shenandoah, and Virginia in general, often feels overlooked. A hidden gem of a place, like the New River Gorge in West Virginia.
I rarely have the opportunity to visit a national park in the off-season, and of course took total advantage. From Massachusetts, Shenandoah is a 7.5 hour drive, or about eight with a gas and bathroom break stop. I took the more scenic route through the middle-of-nowhere Pennsylvania to take advantage of the lack of traffic on a Friday afternoon start of the long weekend.
Since I was planning so last minute, I didn’t set any plans for my time there. My best kept secret for lodging is booking a cabin stay at a KOA. It felt meant to be when there was one vacant cabin left at the Harrisonburg/Shenandoah KOA. Of course I had to book it. With my rewards points, my three-night stay was very affordable.
These cabins are my favorite because they’re rustic chic. It’s a definite upgrade from a tent (or sleeping in my car if we’re honest), but it’s not lavish by any means.
After my long drive, I slept in. I prepared some coffee and breakfast on the porch of my cabin, and promptly ate it inside because it turns out, Virginia gets cold. Like New England cold.
I packed several layers thinking I would not need them, but ultimately used a lot of my cold weather gear when I went hiking. Always read what park rangers in Shenandoah National Park post about the most up-to-date information on alerts and conditions in the park. Skyline Drive can be entirely (or partially) shut down due to icy conditions.

Shenandoah National Park Wildlife
The only memory I really have from my first trip to Shenandoah is a rocky summit hike I did with dad, but this was quickly overshadowed by my first bear sighting. We caught sight of a bear cub about twenty yards from us and hastened our pace back to the parking lot. Lo and behold, momma bear was on the road.
It was truly a spectacle. That I enjoyed from inside our car because I did not need to be any closer to the bear than I already had been.
It was time to make new memories in Shenandoah, so I embarked on a few hikes. Here are three hikes you can take on in one day’s visit to Shenandoah National Park:
1. Bearfence Mountain
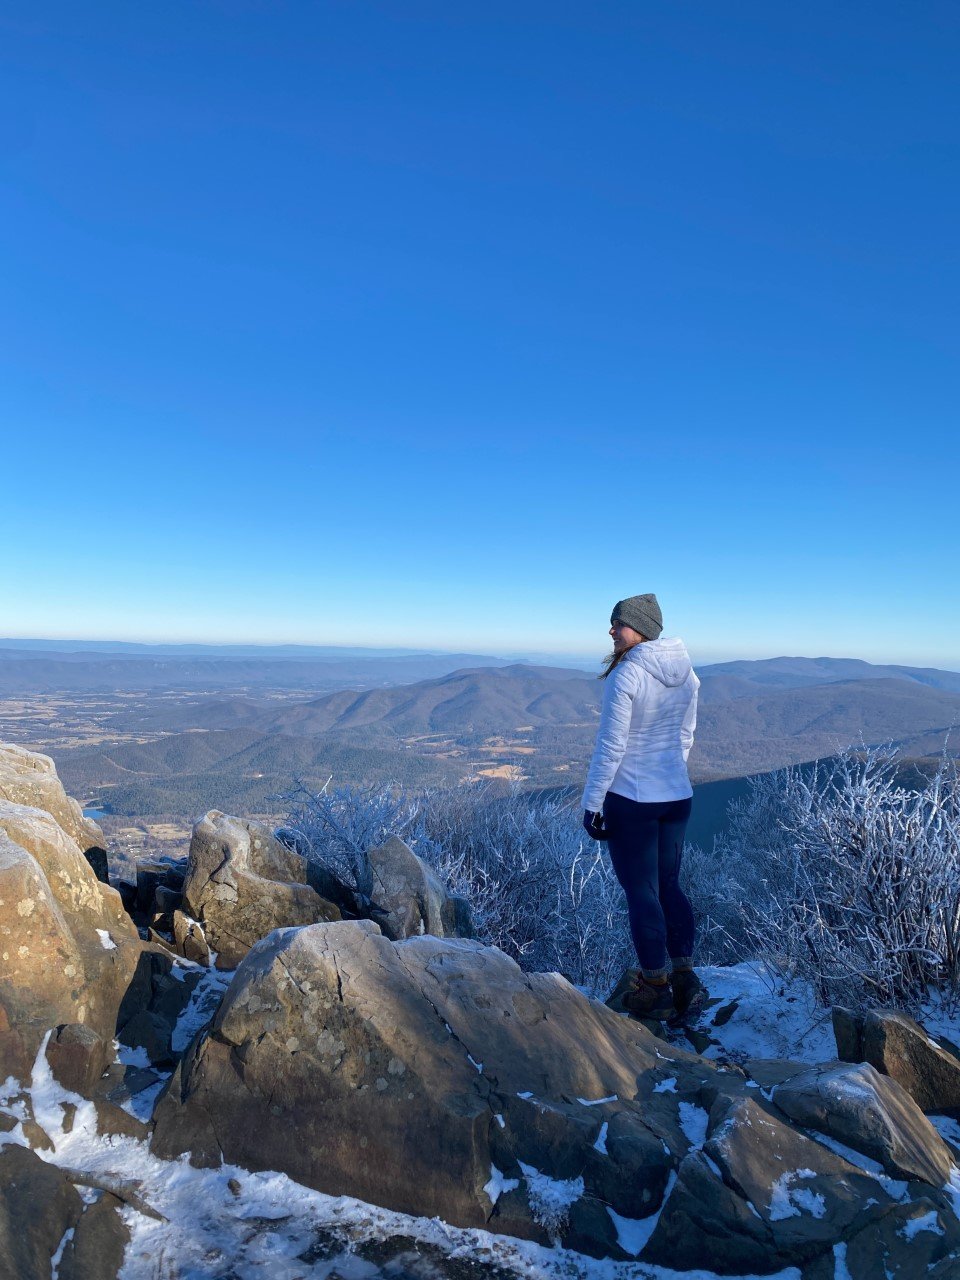
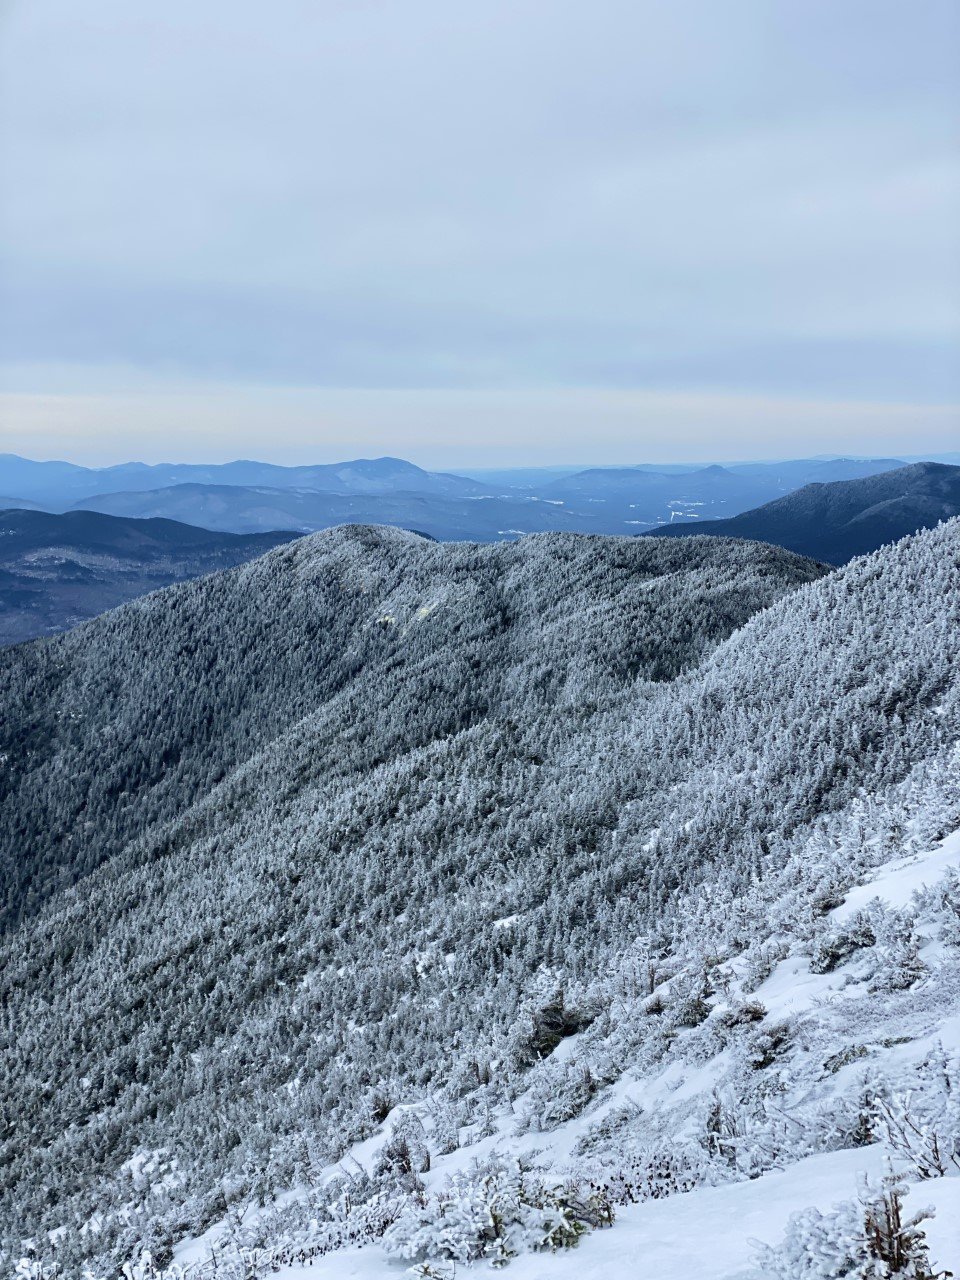
I took full advantage of the off-season and arrived to the park before sunrise to start my day with the sun atop a summit. The best spot to catch sunrise is Bearfence Mountain. Here’s a secret: you don’t have to make it past the icy ledges to the actual summit for breathtaking, 365-degree views.

The first light on a winter morning without a car or other hiker in sight for a couple hours in the park.
I was the only one in the parking lot, at milepost (MP) 56.4 when I arrived at 7 A.M. As soon as I turned off the ignition and crossed the road to the trailhead, I remembered this was the hike I did with my dad seven years ago. The one where I saw the momma bear on the road. A fitting mountain name for this hike. As much as I love seeing wildlife, I was hoping I wouldn’t come across a bear this time around.
The trail was icy, and as always, I’m racing against the sun. I made it up about .3 miles and around 275 feet of elevation when the wind really kicked in at one of the false summits. I was alone and cold, but couldn’t wait for the sun to rise.
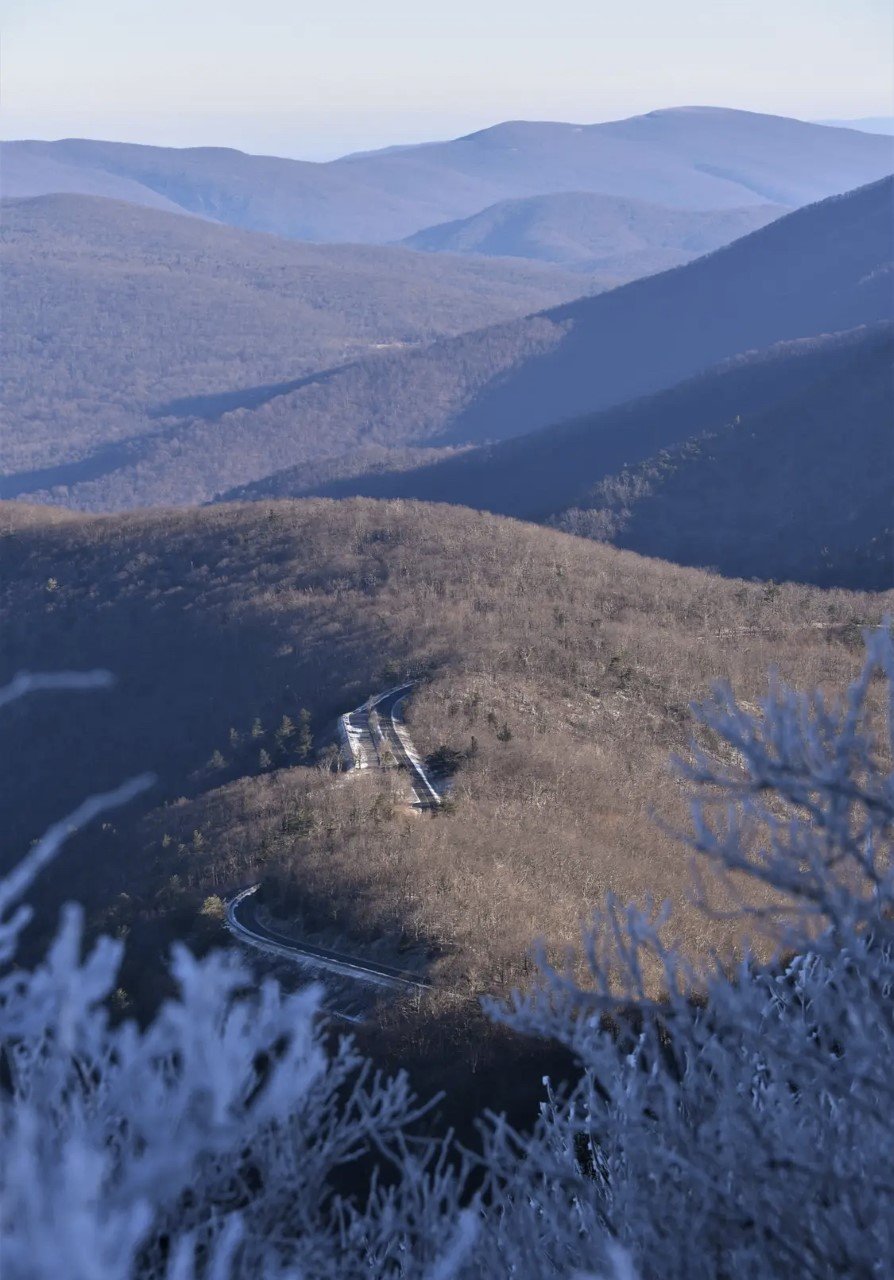
The summit was a bit further out, along a little more of a rocky, iced ridgeline. I decided it was best to camp where I was and enjoy the start of the day from where I was. This hike is also one of the few hikes in all of Shenandoah National Park where you catch a glimpse of Skyline Drive from a bird’s-eye-view. I love a good road photo surrounded by nature.
But what I truly loved, was feeling like I was the only person for miles on this mountain watching the sun rise. Sunrises really are the best.
When I could no longer feel my fingers, despite my gloves and hand warmers, I headed down the same way I went up. Confident as always, I ate it on one of the last steps before I made it to the road. Just Shenandoah reminding me to humble myself.

The route from Strava
Here’s the route I took. At the end of the trail, I looked at the trail map and realized there is a way to avoid the icy, rocky ridgeline that I stopped short of by hiking on the Appalachian Trail instead. Next time (and if I wake up early enough)!
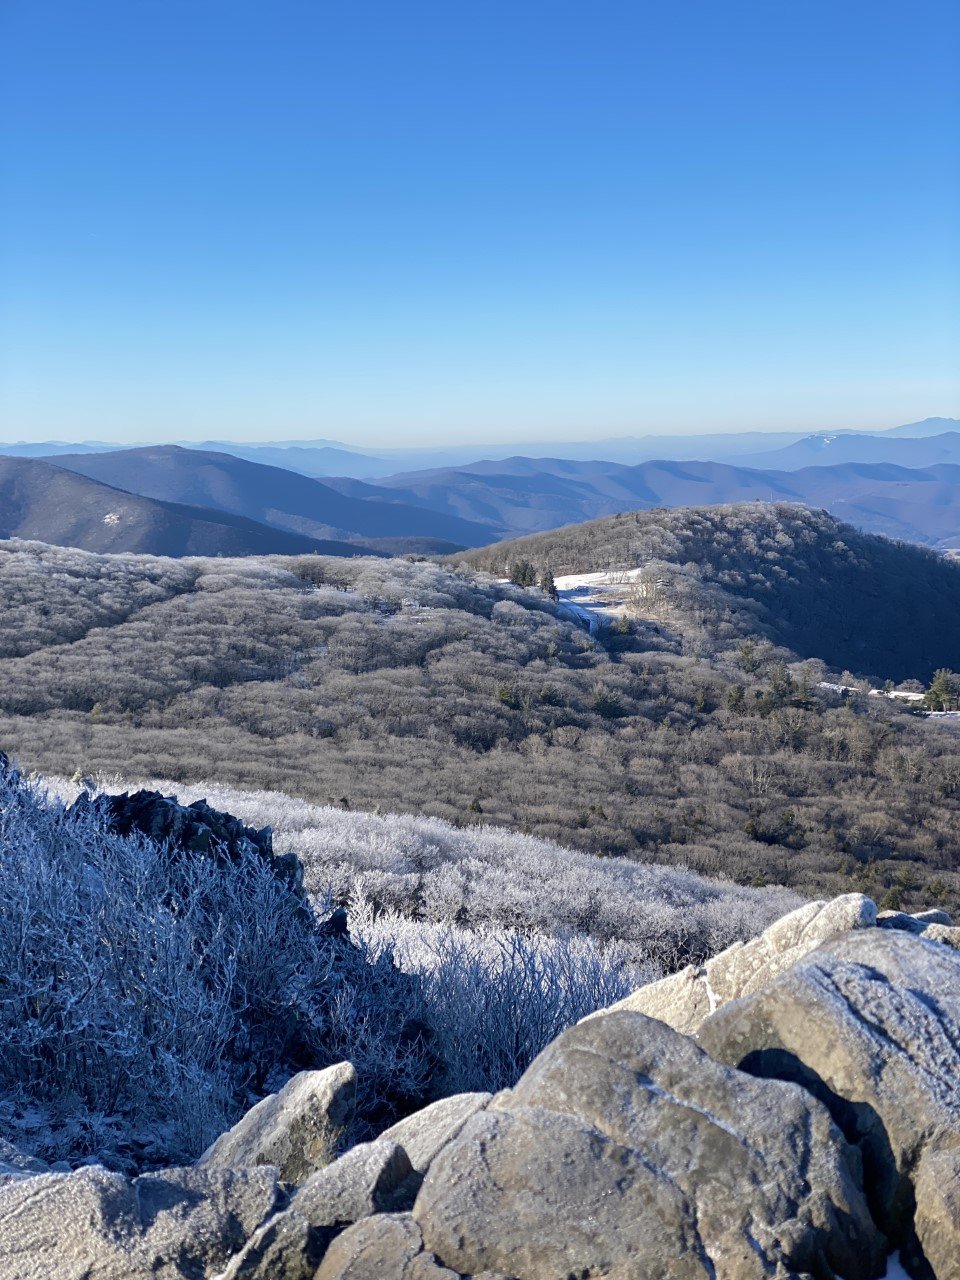
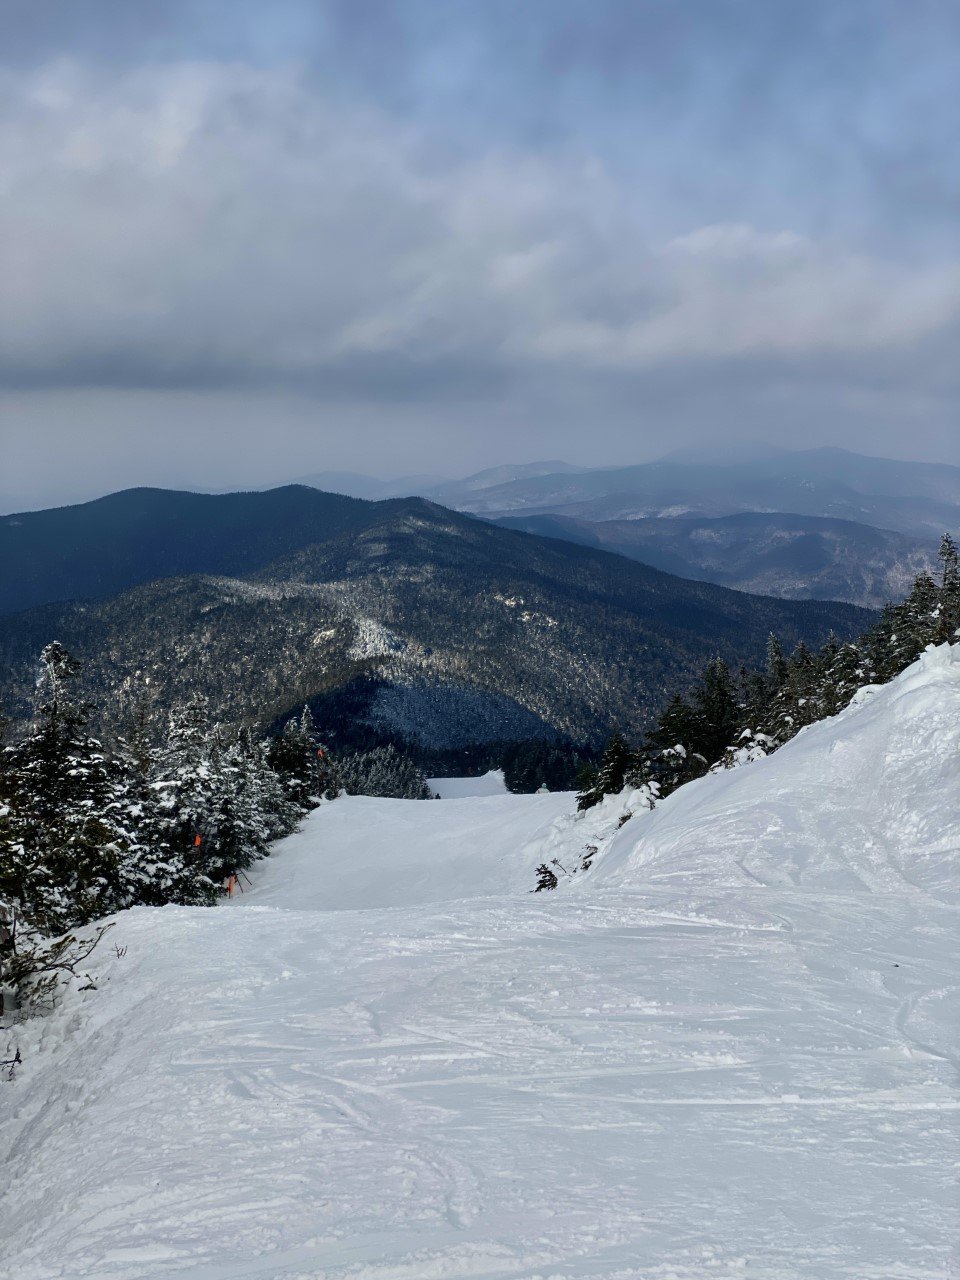
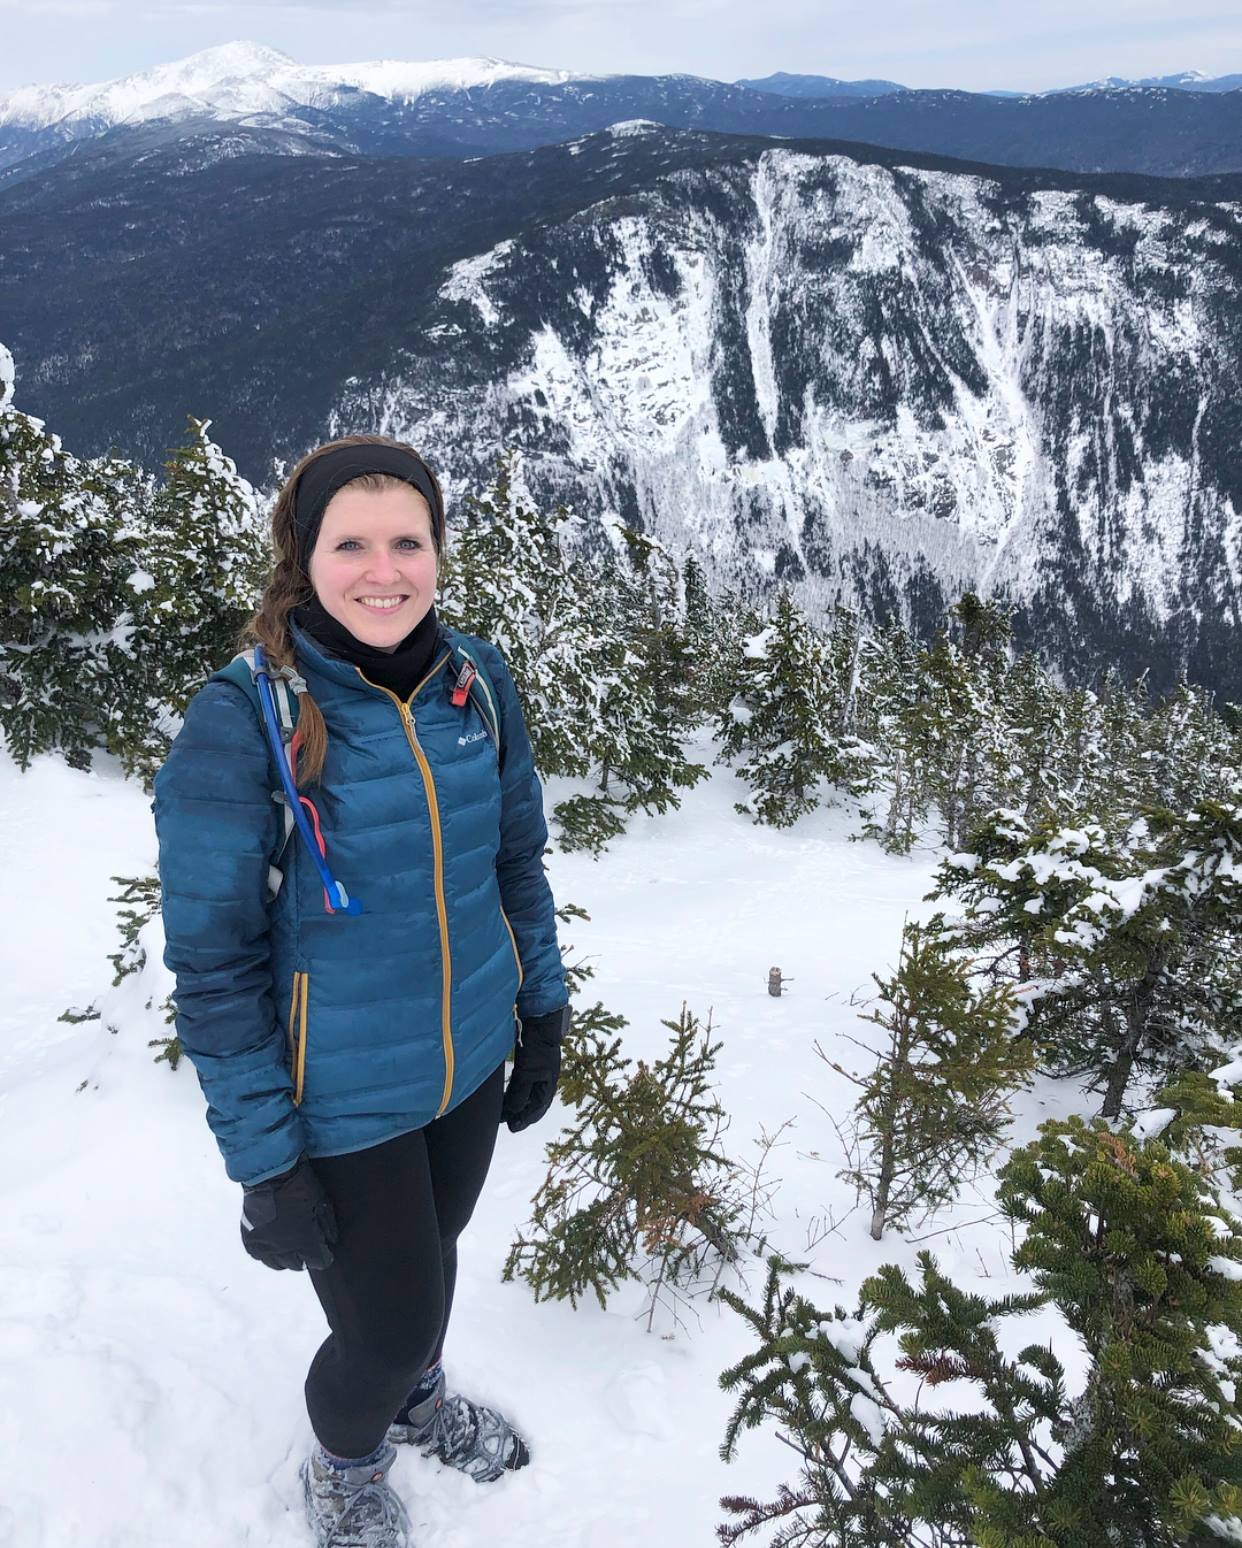
2. Hawksbill Mountain
When you finish soaking up the first light to hit the Appalachian Mountains of Virginia, it’s time to head to a Shenandoah favorite, rightly so.

Shenandoah really has it figured out with all of its rocky ledges.
Right off Shenandoah National Park’s main park road, Skyline Drive, is the trail for Hawksbill at MP 45.6.

The route for Hawksbill Mountain
This hike was so nice I had to do it twice. One of my favorite aspects about it is that the summit reaches over 4,000 feet. I didn’t know any hikes further south from Massachusetts hit 4,000 feet, considering Massachusetts’ highest peak, Mt. Greylock, comes in at 3,490 feet.
In about one mile and only 500 feet of climbing, I was met with a windy, icy summit reminiscent of New Hampshire’s wintry peaks.
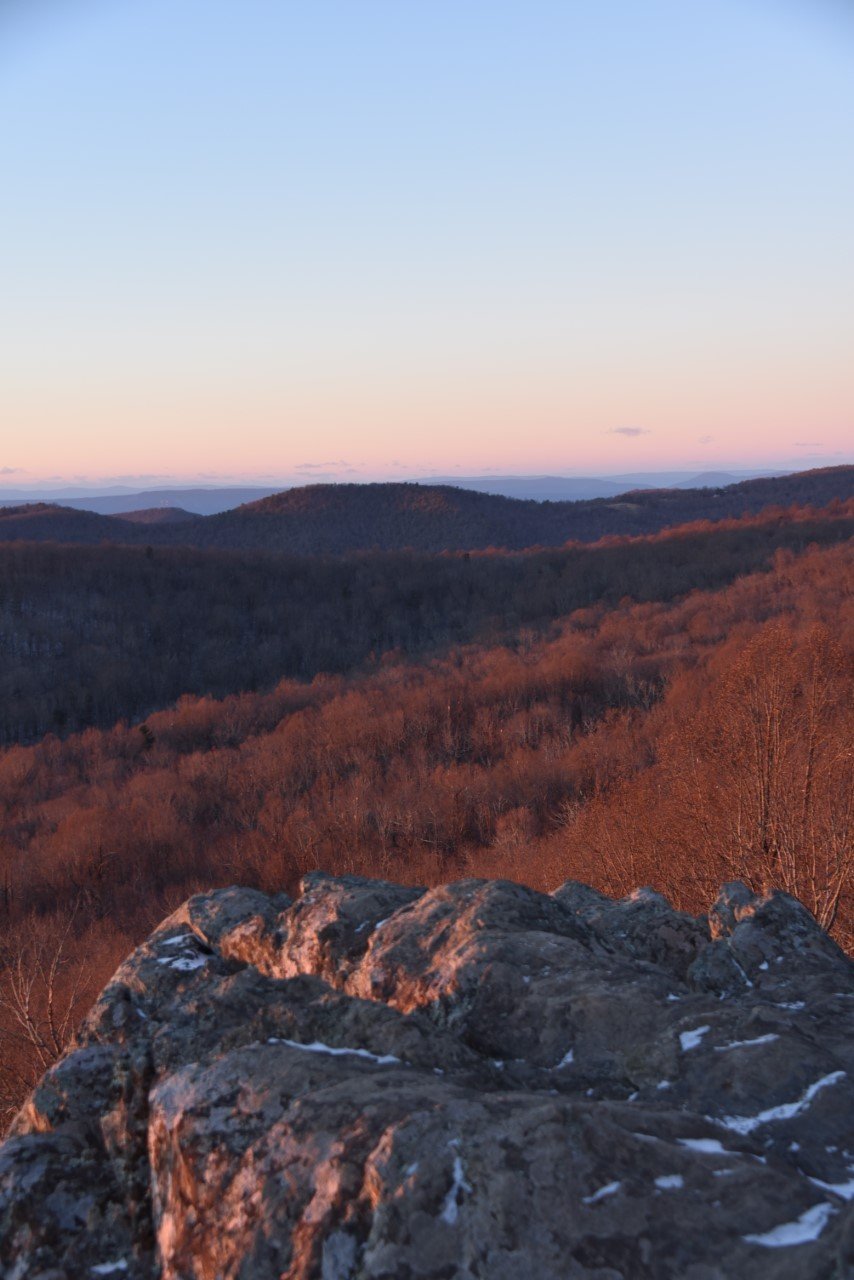
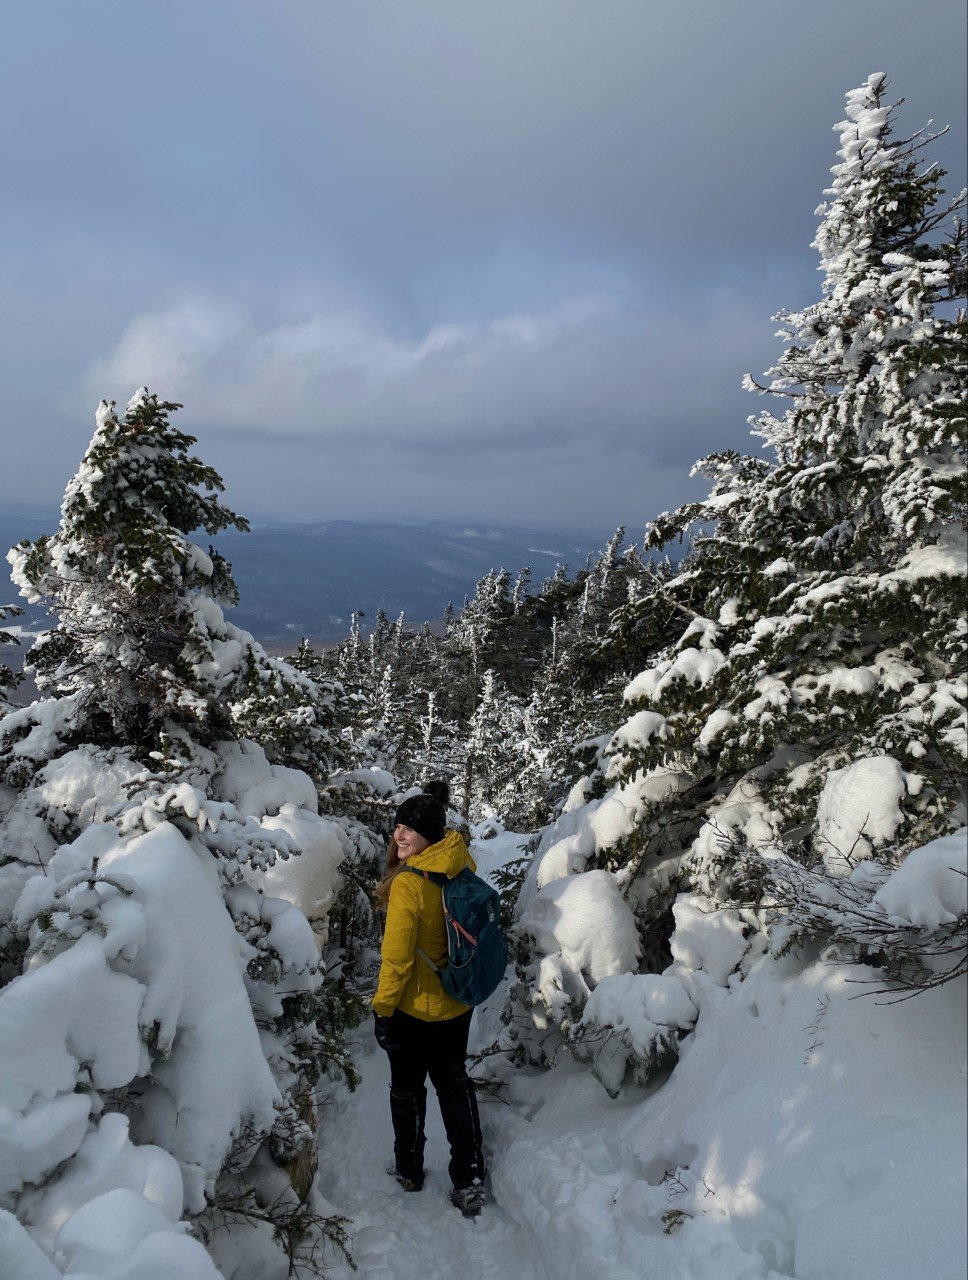
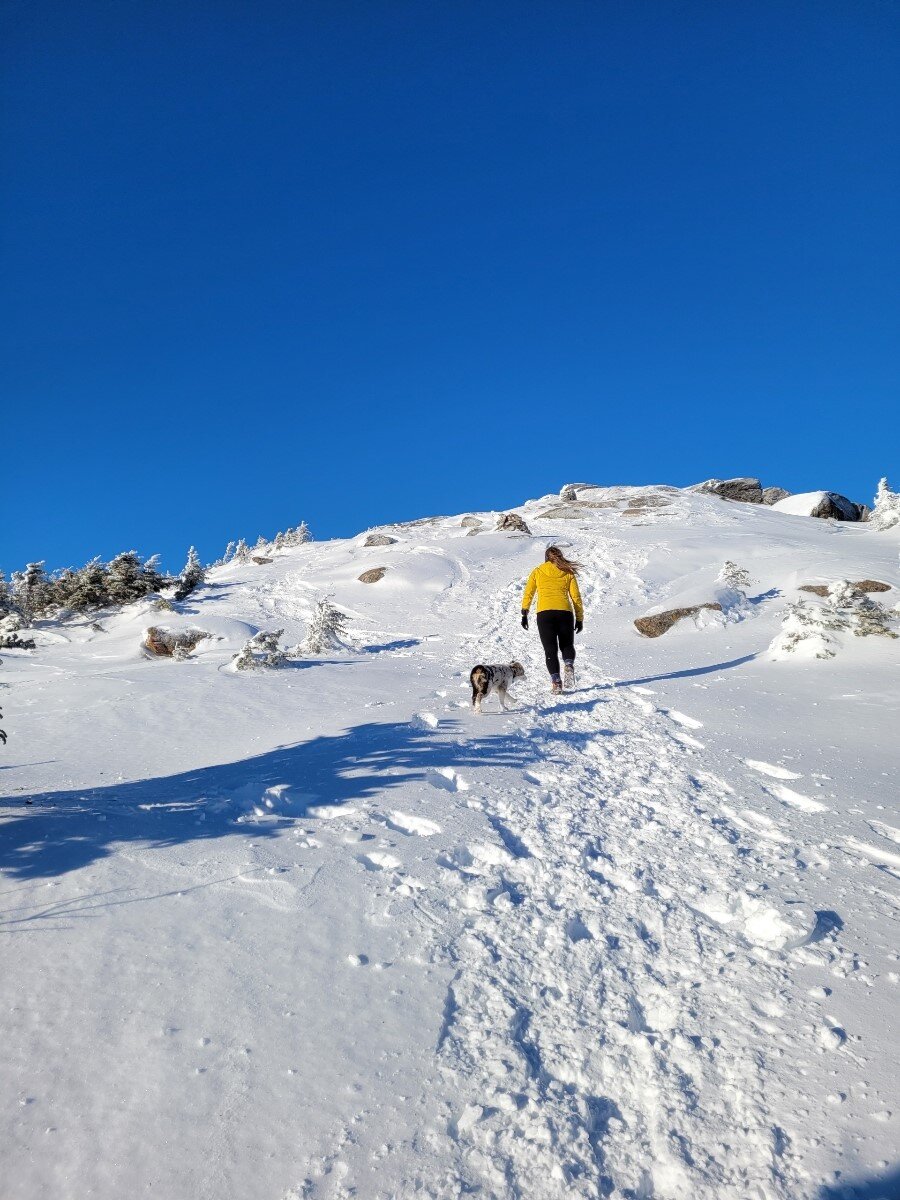
3. Stony Man Mountain
Stony Man was a quick jaunt, but worthwhile to see the Appalachian Mountains from a different perspective.
As the day begins to near the late afternoon, it’s time to make moves to catch sunset. You have two incredible options for sunset: one is to hike up Stony Man Mountain for jaw-dropping views of the Appalachian Mountains. Another, if you’re tired (or short on time), is to pull over at one of the overlooks and take a hidden trail to a secluded ledge. More on both options below.
A great trail leading right off of Skyline Drive is Stony Man Mountain. The parking lot is at MP 41.7. I had little to no service in the park, so I relied on the park map provided to me by the park rangers upon entering the park, as well as downloaded trail maps from AllTrails. There is also a Little Stony Man, so be sure to go for the big guy. This hike traverses the Appalachian Trail, which I loved, because it again reminded me of home back in New England.

The Strava route for Stony Man Mountain
A speedy three-quarters of a mile to the summit with roughly 300 feet of climbing brought me to this scenic spot. The other major perk of the off-season? Parking lots, trails, and summits entirely to myself. I loved every minute of it!
I would hike up Stony Man for sunset because it is short, has ample parking, and of course, the views.
Bonus Sunset Spot: The Point Overlook (MP 55.5)
If you’re short on time, or exhausted from a day full of hiking, check out MP (milepost) 55.5. Pull over and park at The Point Overlook right off Skyline Drive. You’ll find a stone wall with an empty space in it. Walk through that empty spot down the trail, roughly 300 feet.

You’ll be greeted with a rocky ledge all to yourself. I parked at The Point Overlook with two other cars, but neither party ventured on this hidden path. It’s definitely worthwhile, especially if you are short on time to run up a mountain.
Which hike is making it to your list? Would you take on all three in one day?
If you enjoyed learning about this national park, then you’ll love exploring these:
3 Hours in Kentucky’s Best-Kept Secret: Mammoth Cave NP
Two Must-Do Experiences in Florida (No, Not Disney)
The Best Time of Year to Visit White Sands National Park, New Mexico
3 Colorado National Parks To Visit (That Aren’t Rocky Mountain!)
7 Lessons I Learned Road-Tripping Across the U.S.
Visit America's Newest National Park: The New River Gorge, WV

Hiking Esther Mountain in the Adirondacks
On my hike up Whiteface, we took a slight detour in the wrong direction. When we approached the trail sign for Esther, and read, “path not maintained or marked,” we trudged on to Whiteface. After all, I wasn’t chasing the 46er list.
Joke’s on me because three years later…

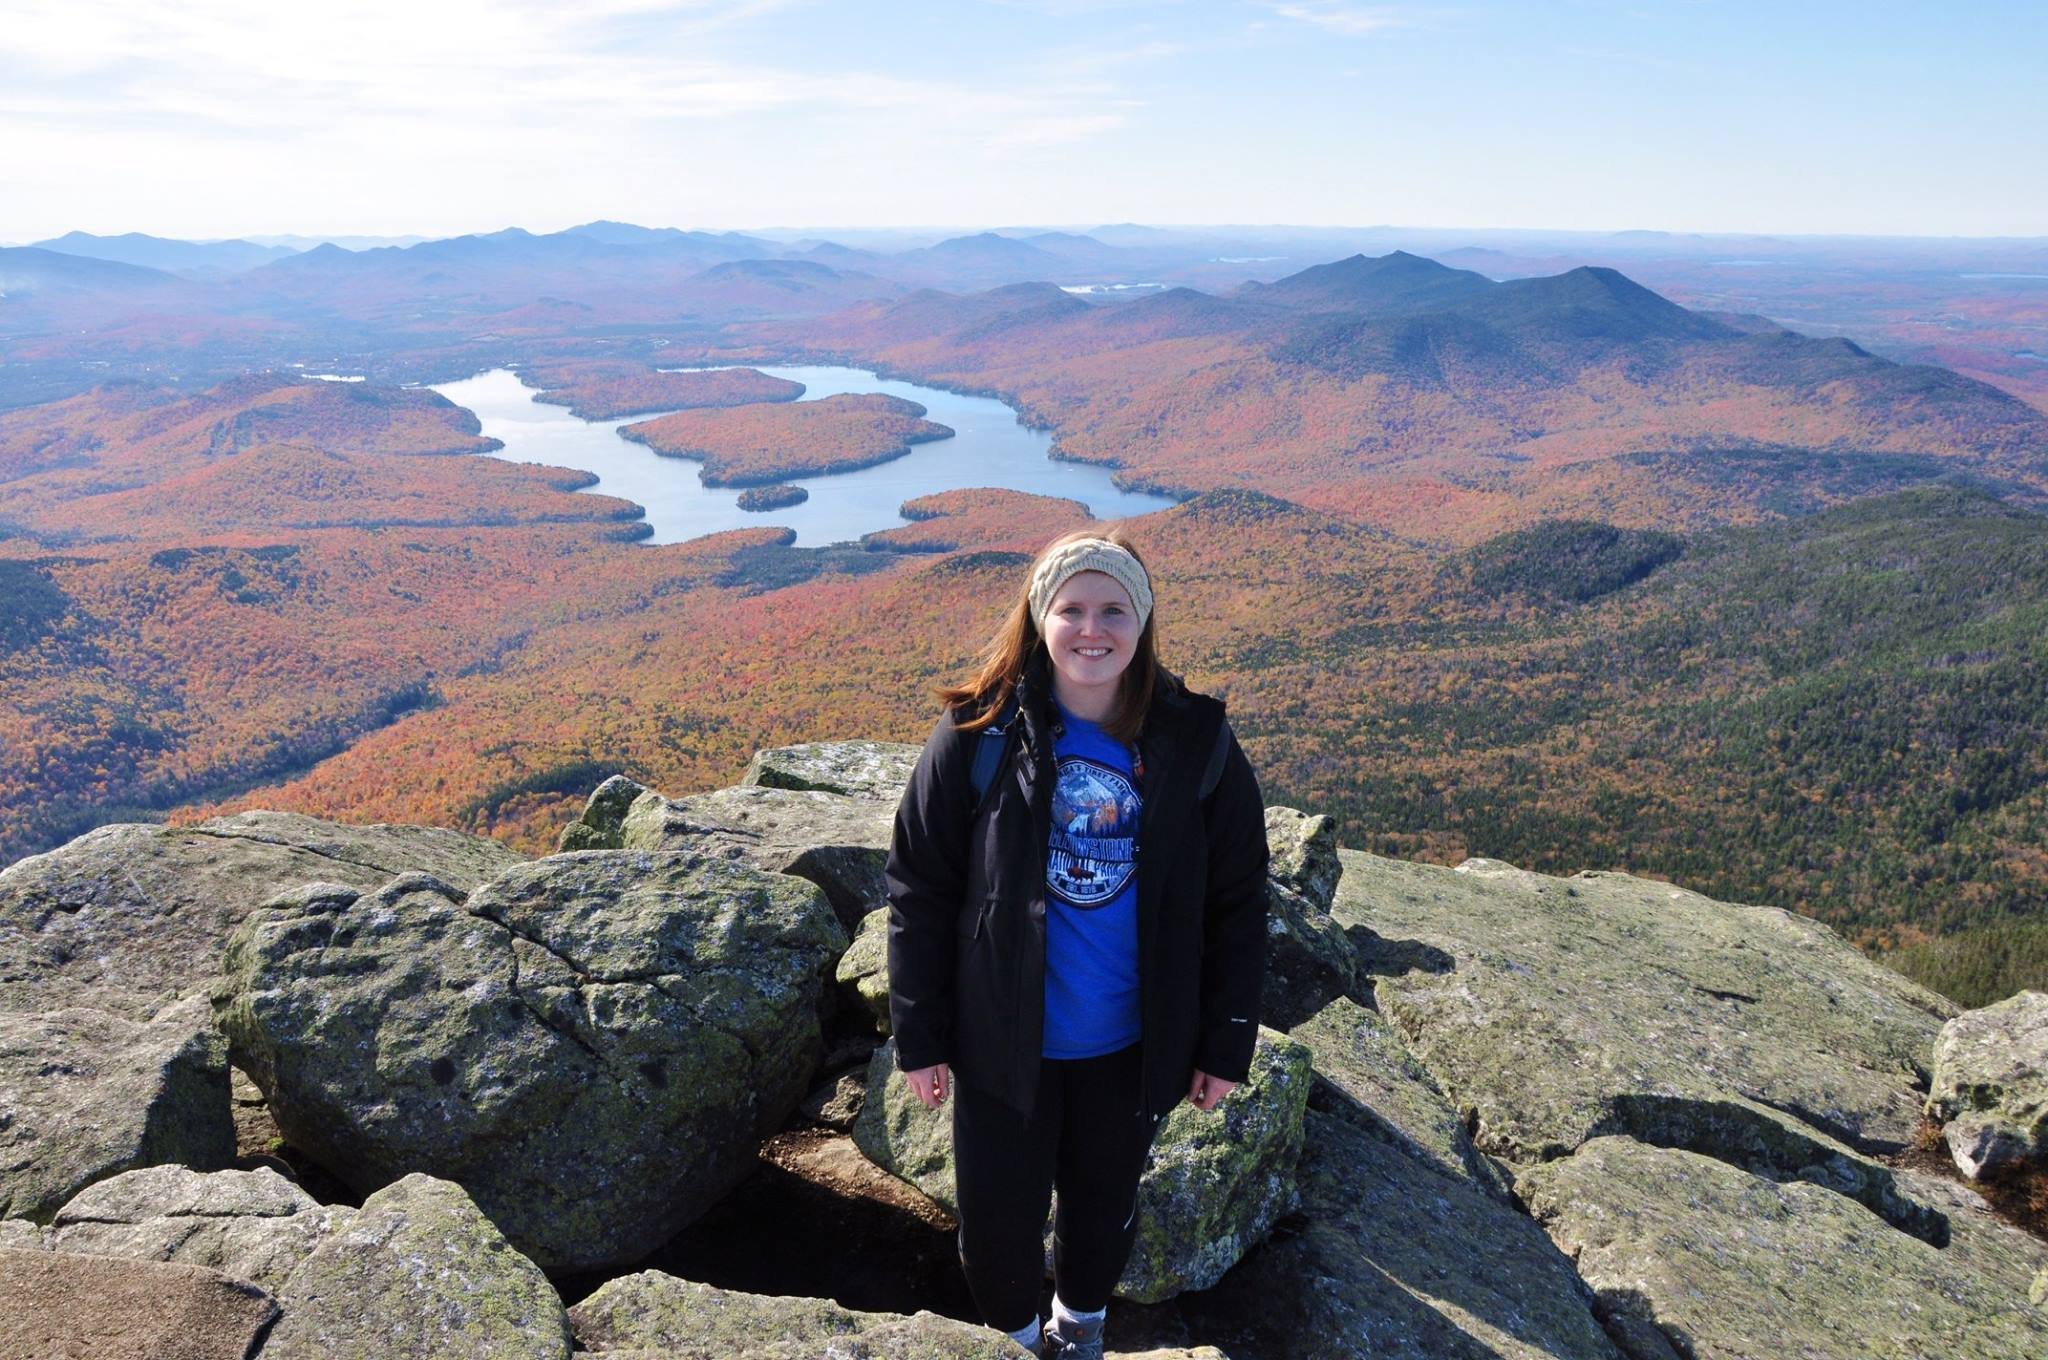
I first discovered the Adirondacks from one of my best friends in college who was living in Hawaii at the time. She sent me a picture of Whiteface’s stony summit path and said, “you have to go there.” Naturally, I drove four hours the next morning (luckily it was the weekend), drove the road up Whiteface, and indulged in the best foliage I had ever seen. Still possibly the best foliage in all my years living in New England since.
I mean look at those colors. I took the photos of Whiteface Mountain below back in October 2016. I had only survived the Franconia Ridge the summer prior and had no idea the mountains and views in store when I’d move to Massachusetts the following year.

Little did I know that five years later I’d hike up the very mountain that first introduced me to the Adirondacks.
Whiteface Mountain in October 2020
Featuring a naive me, thinking I wouldn’t take on the Adirondack 46 at some point.
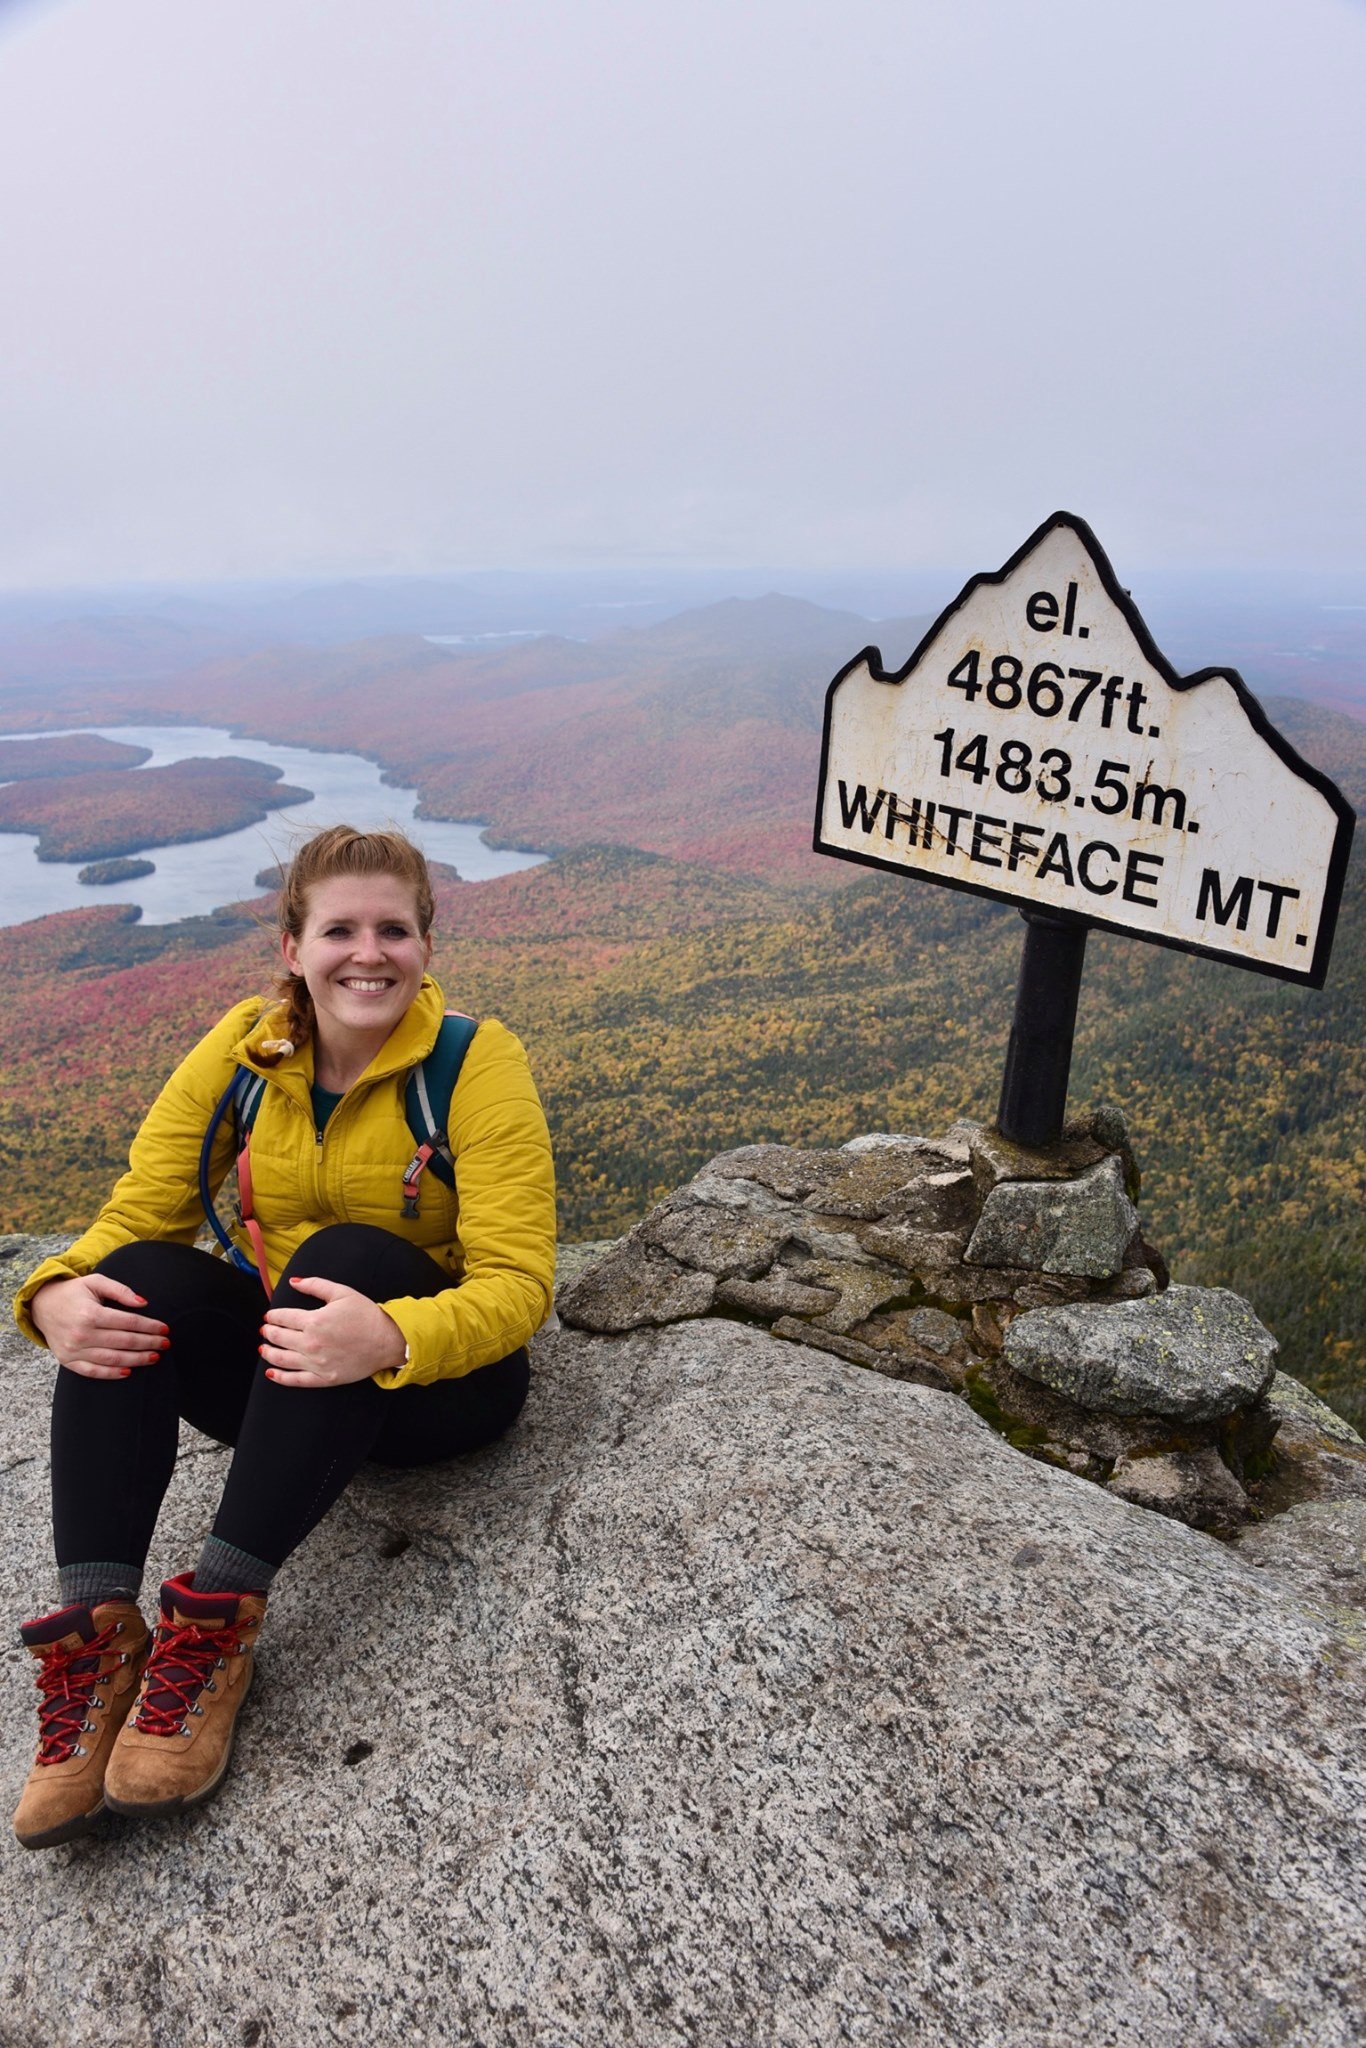
It also comes in at 4,867 feet, making it one of the highest peaks in the Adirondacks. Of course this places Whiteface on the 46er list (New York’s 46 highest peaks). Along one trail to Whiteface is a short detour to Esther Mountain.
On my hike up Whiteface, we took a slight detour in the wrong direction. When we approached the trail sign for Esther, it read, “path not maintained or marked.” Dejected from the detour, we trudged onward to Whiteface. After all, I wasn’t chasing the 46er list. I was there to spend time outside, and see the foliage. Not push on to a viewless summit in uncharted terrain.

Joke’s on me because three years after my Whiteface ascent, I decided I wanted to tackle the 46 highest peaks in the Adirondacks. So here I was with a free Saturday and a craving for a good climb. The weather was sunny and the temperature was moderate. I made a go for it!
Last weekend, I parked at the Atmospheric Sciences Research Center at 110 Marble Mt Ln, Wilmington, NY 12997. Plenty of parking here, but be sure to not park at the center itself. The trail is indicated with a visible sign.
From the start of the trail, it’s a lovely (short-lived) flat path before the 2,000 foot climb begins. A real-world, snow-covered stair climber. What more could you wish for?
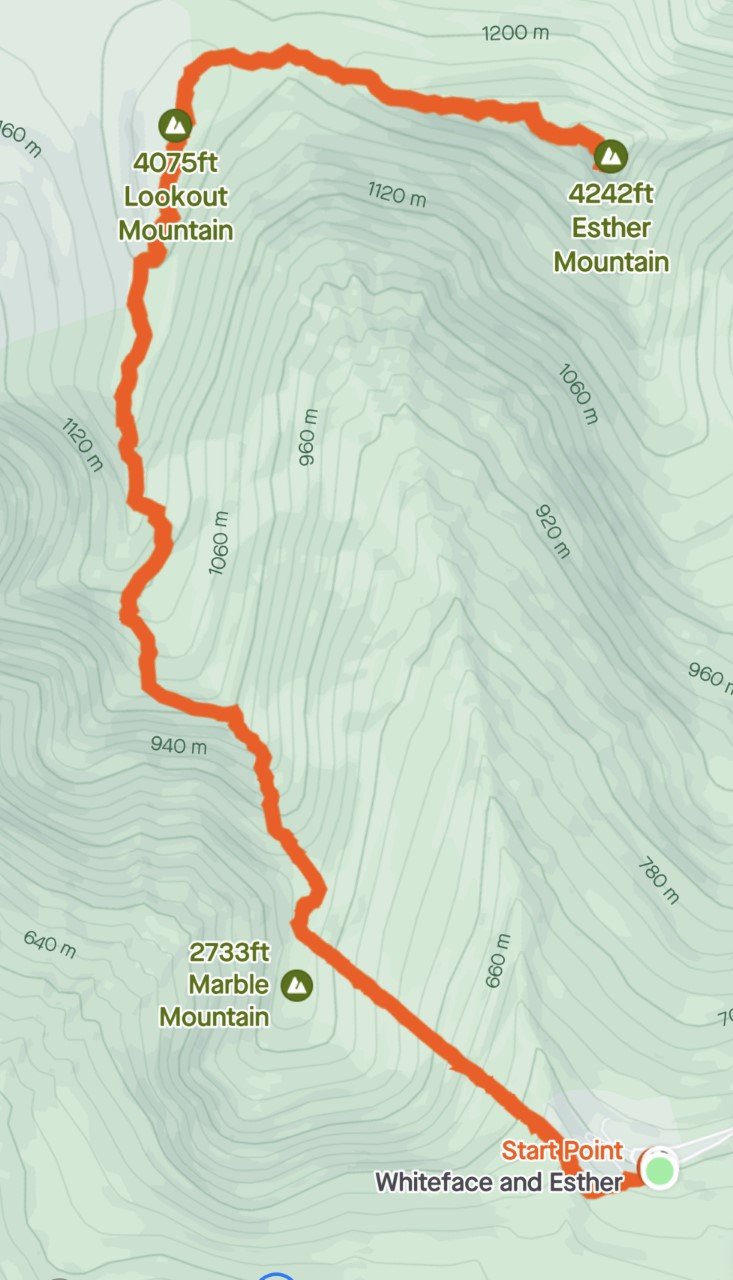
Trail Route from Strava
An out-and-back 6.3 miles with about 2,800 feet of elevation gain.
The great part in summer is that the sunshine is covered for this brutal, sweaty climb. The best part in winter when all the tree branches are bare, is that the sun shines just enough to warm your uncovered face, while the rest of your body is fired up.
I love a good climb, and Esther was no different. At about .8 miles, you reach Marble Mountain, roughly 2,700 feet. A great break spot, complete with rocks to sit on and a view worth gazing at. When you’re done, the next leg of the trip continues to climb (shocking, I know), up to Lookout Mountain at 4,075 feet.
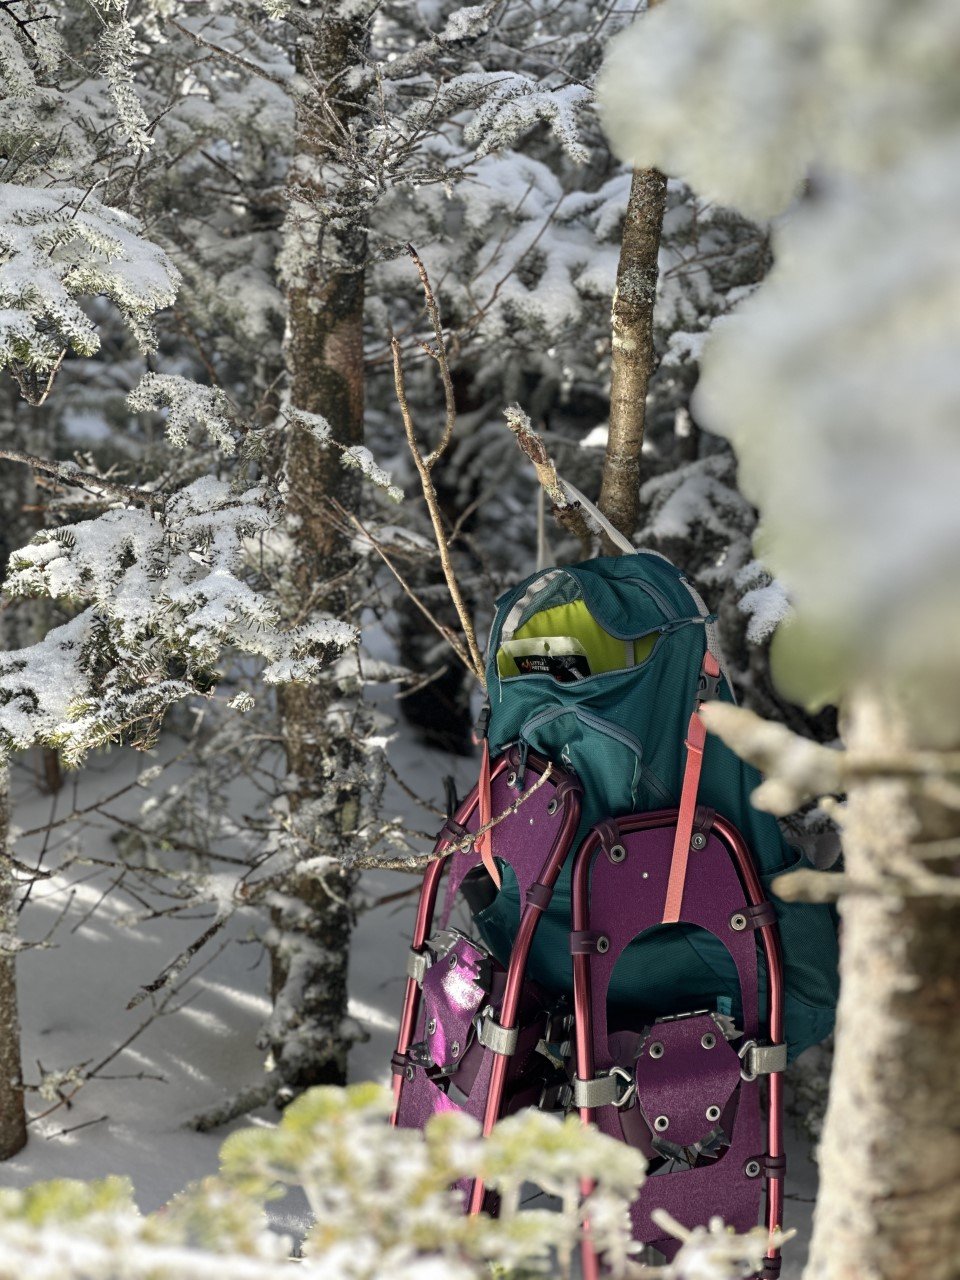
Snowshoes are actually required in the Adirondacks during the winter with more than 8 inches of snow.
The trail was very packed down, so I used microspikes on the ascent. I thought I’d try out my new snowshoes on the descent and they were incredible. These Winter Walker snowshoes from L.L.Bean are super affordable and did me well on a 4,000 footer! They are currently on sale too!

Esther Trail
The iconic Esther sign I referenced earlier is at this point, where you can either turn left for Whiteface, or head right, to the “not maintained” path. The beauty of winter (and several snowshoers before you) is having a very clear path outlined for you. I never faltered from the trail.
After a bit more climbing (several hundred feet), I soaked up the summit to myself. Everyone I have talked to Esther about always brings up the summer mudfest, or the lack of summit views. I’m not sure if it was because this was my first hike back in the Adirondacks after months away with marathon training, or if there were several feet of snow that elevated me, but I loved the far-off views of Whiteface I saw.
I’m a little biased because I also love winter hiking. A lot. I spent about an hour on the summit wanting to enjoy the perfect day before I headed down.
When I reached my car, I clocked in about 2,800 feet of climbing in 6.3 miles of going out-and-back on the Marble Mountain trail to the Esther trail.

The mountain is apparently named after Esther, a fifteen-year-old girl who was the first known person to summit. Turns out, she hiked up here just for the love of hiking. How fitting considering that was the exact way I felt all day up there. Hiking up Esther Mountain in the winter is definitely the way to go.
This was my 21st peak of the 46. Here’s to many more summit smiles!
If you enjoyed this trail review, check out these mountains:
Cascade and Porter Mountains in the ADKs
Twins, Zealand, Bonds Traverse in the Whites

The Best Local Hike in Western Massachusetts
Everything you need to know about the best local gem hike in Western Mass…

Tekoa’s rocky ledge viewpoint is Western Massachusetts’ best-kept secret. Read on to find out how to get here.
One of the top reasons on my list for wanting to move to Western Massachusetts was for the outdoor adventuring. Growing up in a suburb of Dallas, hiking looked like going to local park and exploring the woods. It was a great way to pass a Saturday afternoon (and who can complain about time spent outdoors/), but I craved more. I wanted longer trails. Elevation gain. Summit views.
Western Mass has this hidden beauty that only those who visit will ever uncover. Most people who visit Massachusetts frequent Boston or the Cape. There’s a running joke up here that Worcester is Western Massachusetts to Bostonians. Very few take the scenic drive out to what I consider to be the real gem of the state.
I may be biased, but Western Mass has it all—from outdoorsy adventures to breweries, to easy access to day trips. In the six years I have resided here, I frequent many of the same trails. In the last year, however, I discovered countless new ones. My all-time favorite? Tekoa Mountain. And here’s why.
Tekoa is something special.
It’s not easily accessible. It’s not a walk in the woods like many Western Mass favorites. It’s immersed in nature. Untouched, it feels like. Overgrown at times. Rarely do I see other hikers on this mountain despite its beauty.
I first stumbled upon it on a solo drive to upstate New York. Everyone driving to that area of New York on the Mass Pike crosses over a bridge that showcases encompassing valley views. Yes, that bridge you see way down there in the images above.
If you’re able to glance long enough, you notice a rocky ledge on the upper righthand side. After I caught sight of it for the first time, I made a mental note of the town I was driving through (Russell, MA), and researched it as soon as I could. Want to know what I found?

Nothing.
No trail maps, no trail reviews—nothing on AllTrails, and that says something.
I found a few comments about a steep route up that involved a sketchy parking situation that I was not keen on venturing into. I put off the search for a couple years and decided to try again last fall. I lucked out after some digging and found a legal parking spot. With a little trial, some error, and a sprinkle of wrong turns, I finally found my favorite outdoor gem in Western Massachusetts and it sure was worth the wait.
Everything you need to know about hiking to the ledge atop Tekoa Mountain:
Parking – This is the trickiest part. The safest parking I found is along a residential road that ends with a gate that the town needs access to. There is room for about five cars to avoid blocking the gate. I plug in 48 Reservoir Road, Westfield, MA into Google Maps. This is technically in the town of Montgomery, but it will show up as Westfield. Once you’re on this quiet road, drive to the end. Park there. Again, be sure to not block the gate.
Cost – Free!
Distance – About 5 miles out-and-back with a little over 1,000 feet elevation gain. There is an option to make a loop at the summit for a sunset view and different vantage point of the valley (with a little bushwhacking involved). If I could do it as a beginner bushwhacker, so can you! Sunset technically can’t be seen from the ledge, so this loop is great if you want that sunbeam shining through.
Difficulty – The reason this hike is my absolute favorite (and a Western Massachusetts hidden gem) is because most people think they need to travel a far distance for a tougher hike. I was one of those people, so I totally get it. What I love about this hike is that it’s local, peaceful, and has a climb. I love those short, easy hikes as much as the next hiker, but there’s something to be said for putting in the work and getting the payout once you reach the summit.

The route I take (logged on Strava) is above. From the parking to the viewpoint as an out-and-back.
Trail Details – After parking on Reservoir Road, follow the road behind the gate for a little under half a mile. It’s a steady, slight climb on a wide, gravel road. Veer left at the half mile mark and you’ll approach a gorgeous view atop a bridge of the Tekoa Reservoir. The calming stream and serene surroundings provides a great opportunity to catch your breath and enjoy the scenery.
When you’re ready, continue onwards and upwards. You’ll reach a Y intersection. Take the right, even though there’s a very official-looking sign on the left (it’s an informational sign). It’s not the direction you want for this hike.
Coming up is one of the best parts of this hike: the climb. After you turn right, you’ll follow along Moose Meadow Brook until you’re about a mile in. Here’s where I’ve gone astray far too many times. As you approach a mile, keep your eyes peeled for a left turn off the road into a dirt trail. It’s easy to miss if you’re deep in conversation, trail running, or just enjoying your hike. You’ll know you went too far if you cross another scenic bridge at a mile in. This bridge is great, but it means you missed the turn.
Once you’re in the woods, a gorgeous, well-trekked walk along a stream before the climb kicks in around a mile and a half in awaits you. This is one of my favorite parts of this hike because I have yet to come across anyone on this trail. It’s just the sound of the stream, the chirping of birds, and me. And my thoughts of bear encounters flooding in, of course. The first big climb of the hike flattens out for a tenth of a mile before beginning the final ascent to the ridgeline. Continue following the yellow markers. Though I usually see chipmunks or squirrels on this hike, I saw a bear for the first time here in May.

Tekoa in Winter
After one lovely dumping of snow, I knew I had to get out on the trail up Tekoa. It definitely did not disappoint. Snowshoes would have been a smart choice considering how infrequently traversed this trail is.
Depending on the season, the trail here is not maintained well. Be sure to bring bug spray or wear long pants to avoid any fun bug or plant reactions.
Once you finish that second, steep climb, you will find your trail opens up like a T. There are red markers here to remind you to take this trail back. Take a left and follow the yellow markers until you reach the summit. There are a few rolling hills and some rusty car parts along the way.
The viewpoint is approached from a wide clearing at the top with distant views of Springfield to your left. Take the trail to the right of the rock pile to reach the iconic, rocky ledge view you may have seen from the Mass Pike.
As always, please leave no trace. Whatever you bring onto the hike, please take back out with you to ensure this local gem stays beautiful for everyone.

You really cannot go wrong with any season you choose to accomplish this hike in. From foliage in the fall, to snow-capped hills in the winter, to the luscious greenery of spring — the constancy of a great view remains unchanged.
Tip: This is an incredible spot for sunset, and though the trail itself is not maintained well in terms of overgrowth, the trail markers have reflective stickers on them. For someone who is easily distracted in nature, I found these stickers so helpful with my headlamp even while trail running post-sunset.
What makes your favorite hike your favorite? Are you adding Tekoa to your list of must do hikes in Massachusetts? I’d love to know!
If you’re looking for more New England hikes and gems, you’ll enjoy:

Hike the Vermont 5 4,000 Footers Challenge
New England hikers love a good list. Check out Vermont’s 5 highest peaks:

New England hikers love a good list. There’s the 48 in New Hampshire, the 14 in Maine, and the 5 in Vermont. If you’re extra adventurous, there’s the 46 in the Adirondacks in New York to complete for the Northeast list.
After finishing my 48 in the White Mountains in New Hampshire in 2020, I focused my efforts on smaller mountains in Lake Placid with the Lake Placid 9. In 2022, I reset my focus on 4,000 footers.
I decided to tackle the Vermont 5.
I actually hiked one of the Vermont 4,000 footers back in 2016 and then never hiked in Vermont again, despite several visits to the state’s charming towns. I ran races around hilly Stowe and set my eyes on Mt. Mansfield, but hadn’t hiked it yet.
At the start of 2022, I realized I could easily hike the four remaining 4,000 footers. Here’s how I took on the Vermont 5 in winter:
1. Camel’s Hump (4,083 ft)

I technically hiked this one in November before the official winter season, but let me tell you it sure felt like winter! My first year in New England, my friend invited me to Burlington, VT for the weekend and told me to pack hiking gear. This looked like my thickest cotton and basic hiking boots. I’m serious. Check out the pictures in this post if you don’t believe me.
We took the Monroe Trail out-and-back for six miles and around 2,500 ft gain. The views were absolutely breathtaking (could’ve also been the wild winds that took my breath away). I was hooked on winter hiking after this one. 360-degree views of the Green Mountains with a nice decent.

2. Killington Peak (4,235 ft)
This peak may have a reputation for incredible skiing and stunning views, but I couldn’t tell you if either are true after my hike. I was the only hiker on New Year’s Day at the parking lot. Excited to spend the start of the year outside, but nervous about the conditions.
As I embarked on the Bucklin trail, my worries dissipated. The trail was a moderate climb. Slowly and steadily, I ascended. Surprised by the sweat dripping down in the crevices of my arm as I gripped my backpack straps on my way up. Equally surprising? The hail that began to hit me like Monday morning’s alarm. I reminded myself that this was what winter was in the mountains of New England: a three-course meal ensuring your tongue had a little taste of everything. And I sure was hungry for it.
I spent very little time at the summit considering the hail, along with the incoming text informing me of the weather advisory in the area. It was also a complete wash, so that didn’t quite entice me to stay for the view. The way down was a speedy one. I ended with 6.85 miles logged and 2,559 ft of elevation gain on the out-and-back trail.
3. Mt. Abraham (4,006 ft)
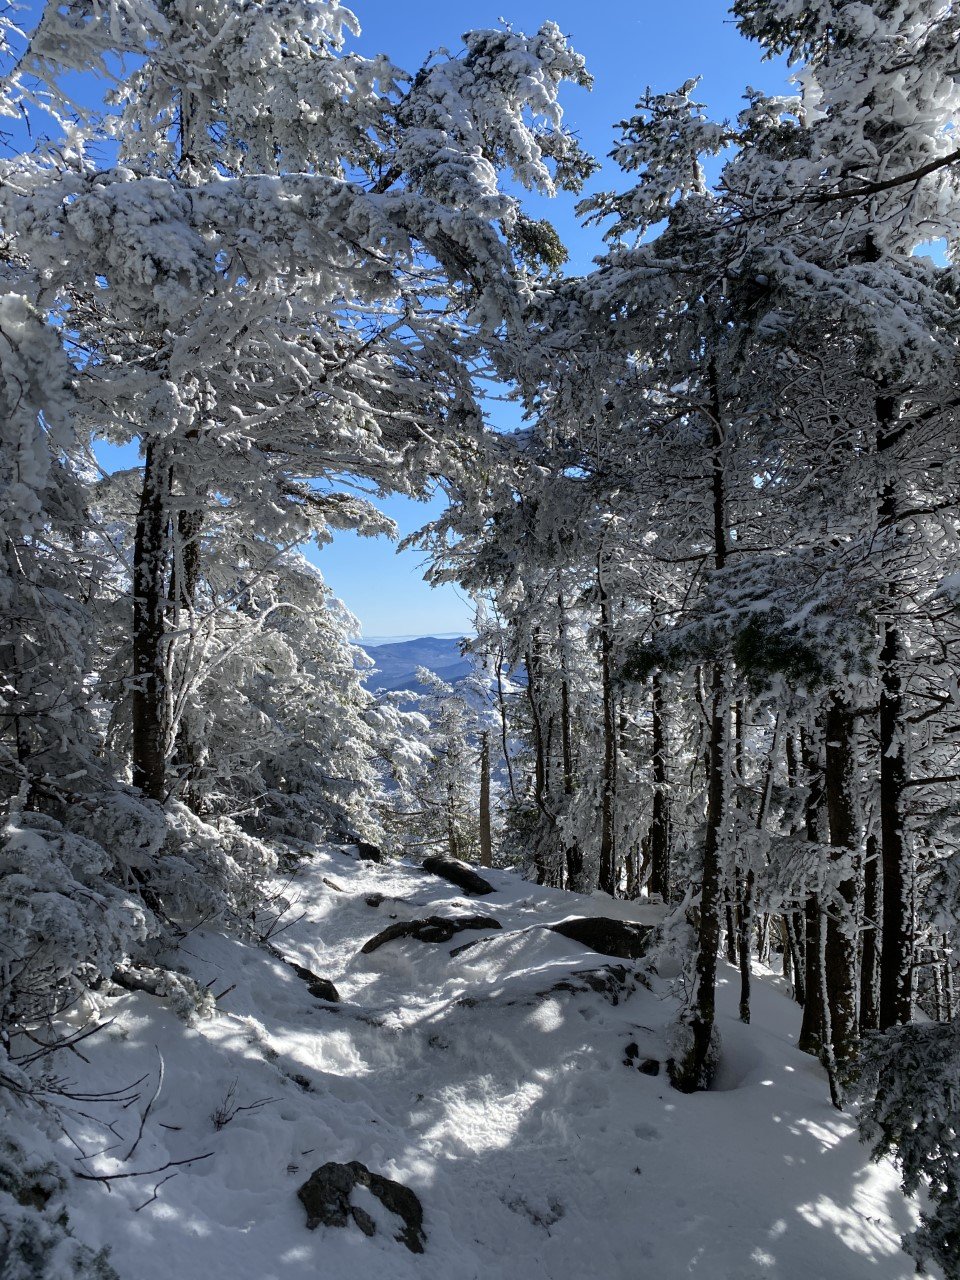
I spent this winter eyeing the forecast like it was another one of my part-time jobs. With full-time teaching and marathon training on my schedule, there were only a handful of days that even allowed for a Vermont day trip. Let alone a day where the winds weren’t treacherous. Pro tip: I use Mountain Forecast to plan out my hikes. On the website, type the mountain you’re hoping to climb, and it gives you everything you need to know to make a smart decision: temperature, wind chill, wind miles per hour. All of it for the summit. I can’t tell you the number of times I went hiking when I was a beginner that I’d rely on my iPhone’s weather app and solely look up the small New Hampshire mountain town my hike started in.
I learned pretty quickly that the weather in town isn’t necessarily on the same communication channel. While it’s sunny and warm in town, it can easily be the complete opposite atop the summit.
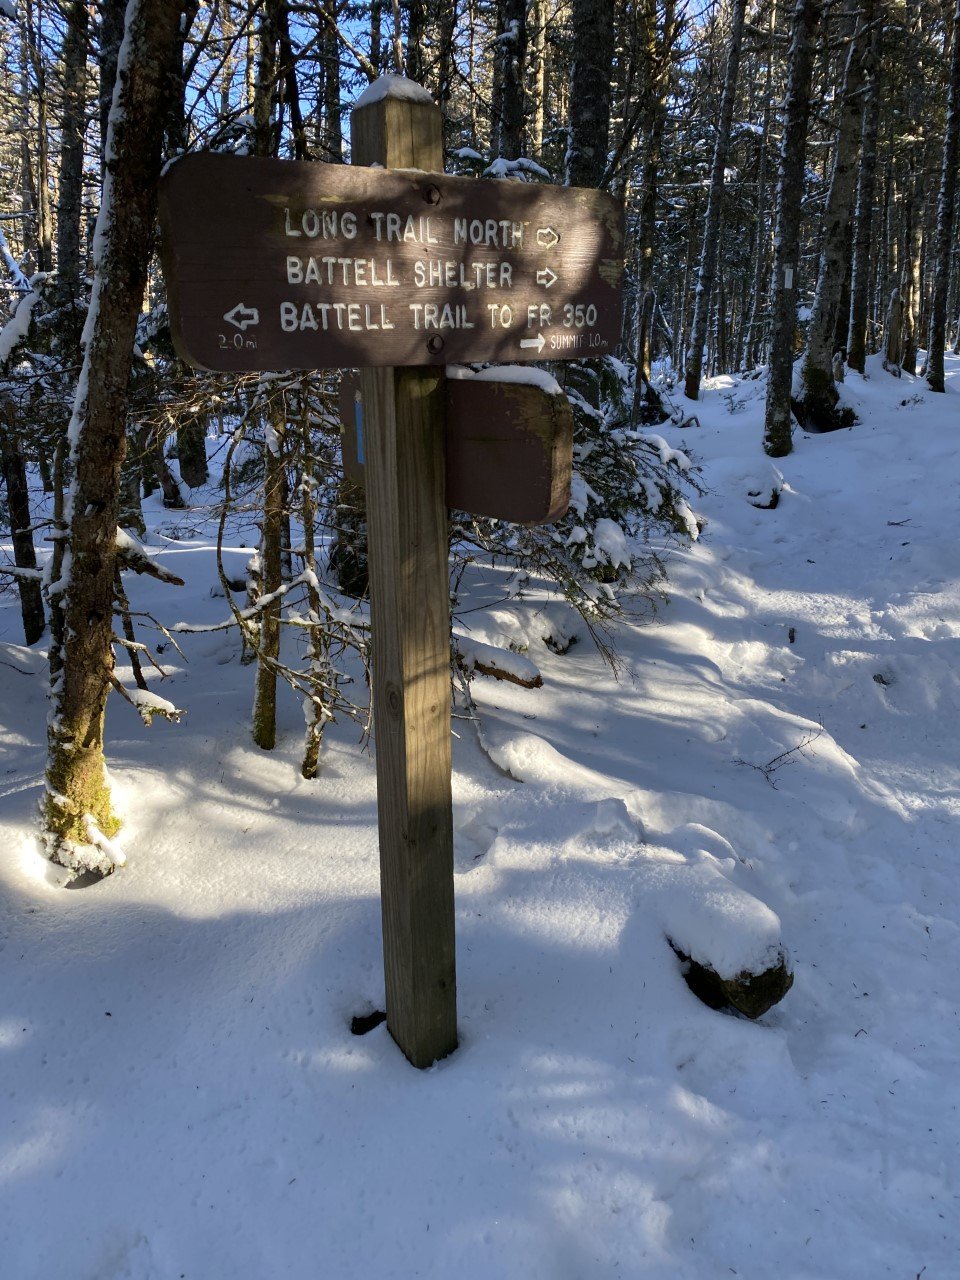
I found easy parking along Elder Hill Road, but I assume it was due to winter dissuading the average hiker from weekend adventuring. From Elder Hill Road, the Battell trail is quick to spot. Another speedy one thanks to packed down snow, I took Battell to the end when it formed into the Long Trail.
Lincoln Gap Road has a shorter distance hike to the summit, but in winter this road is closed. Regardless, Battell is roughly a six mile out-and-back. The summit offers scaping views of the Green Mountains. There is an old airplane (remnants of a crash) along the summit ridgeline, but with all the snow at the time, I didn’t come across it. Always need to leave a reason to revisit though, right?

Summit views from Abraham.
With the parking lot in sight, I logged 5.84 miles and 2,700 ft of climbing total.
4. Mt. Ellen (4,083 ft)
When I parked on Jim Dwire Road, I thought I would be the only one out on the trail today. I almost missed the trail sign because it blended in so well. There were a few cars parked on the side of the road that indicated I was indeed, in the right place. A small dirt road on a residential street, why would I find anything strange with that?
As I made my way to the tiny sliver of trail from the trail sign, I thought about the week before when I was on the opposite side of these mountains. After such a great day meeting Abraham, I could hardly wait to meet Ellen. However, Abraham didn’t relay the memo to Ellen to pack down the fresh, fluffy powder for me.
It took me quite some time to make my way to the summit as I didn’t have snowshoes. I called Ellen just about every name other than her own as I struggled to the summit. The sun was setting soon and the temperature was dropping. I made it to the summit, only to be met with skiers swiftly speeding past me.
After a moment to enjoy the view, I raced against the daylight (usually a losing battle in winter) to return to my car before the sun called it a night. At 7.11 miles roundtrip and 2,700 ft ascended, I can confidently say I met Ellen, but she wasn’t my favorite.
5. Mt. Mansfield (4,393 ft)

Mt. Mansfield for the big finale felt fitting. As the tallest peak in the tiny state of Vermont, I wanted a clear day at the summit. I watched the forecasts and my training plan schedule, and finally found an opening in March that let me head up Mansfield.
I parked on Mountain Road in Underhill State Park and began my steady climb along another road that isn’t maintained in winter. The road was a decent climb, but quiet. I took the CCC road with a quick shortcut thanks to the Eagles Cut trail to get me onto the trail I set out for: Sunset Ridge.
Sunset Ridge is definitely a gem of a trail. There is plenty of exposure on the trail with a little rock scrambling. Normally I love that, but with some wild winds, I was nervous about taking this trail down. Sunset Ridge joins with the Long Trail near the summit for a totally exposed view of the Green Mountains, including a nearby ski lift. I had the trail that day (and the summit) to myself, and it felt like such a great way to finish off hiking the highest peaks in Vermont.

When it came to descending, my heart sank contemplating returning Sunset Ridge with how windy and exposed it was. However out of the two trails (Sunset Ridge and Laura Cowles) from Underhill State Park, Sunset was less steep.
A seasoned hiker told me to take Laura Cowles (the steeper, tougher trail) down and I’m so glad I listened! I was originally worried of exposure descending Laura Cowles, but that trail, from the summit, quickly turns forested. Before I realized, I made my way down to the road and logged 6.6 miles and 3,130 ft of climbing.
Have you hiked any of Vermont’s highest peaks? Would you take on the VT 5?

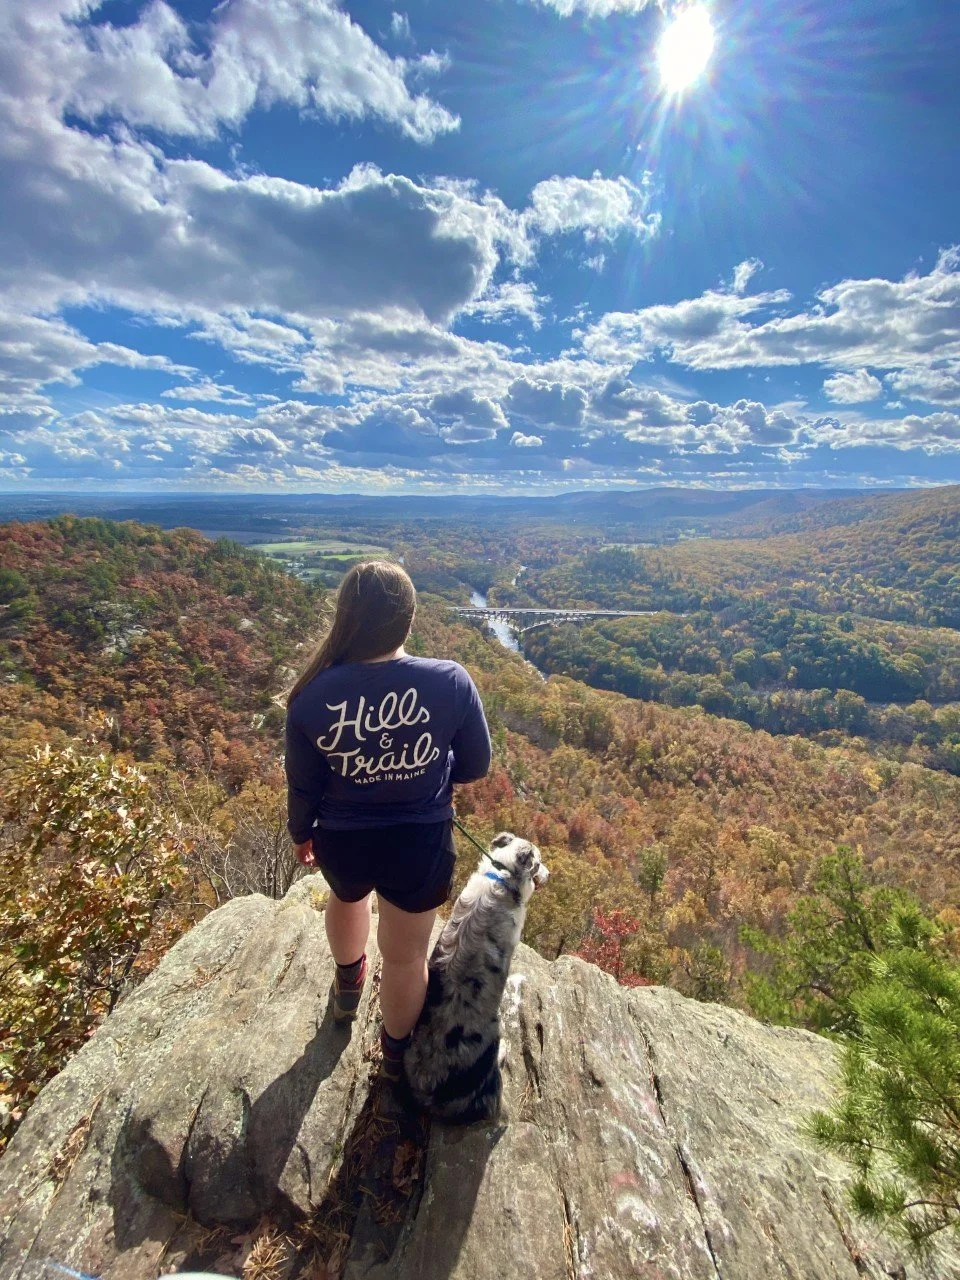
Tips for Winter Hiking With Your Pup
Once I got a dog, I knew with the right measures, she’d be able to enjoy the outdoors too. Here is what works for us when we hit the trail:

The first thing people tell you when you move to New England is that winter is brutal. Obviously I didn’t grow up here, so I didn’t have the experience of shoveling for hours in the morning or having to walk to school in freezing temperatures. That might be why winter is such a beauty to me.
As someone who grew up without a single snowflake (except that one time Dallas turned into a winter wonderland), the winter season is a novelty to me each year. I keep wondering when I’ll turn bitter toward the season, but it hasn’t happened yet. Here’s why I think it hasn’t: I discovered winter activities.
Hiking is one of my favorite things to do, so I had to try it out in winter. Once I got a dog, I knew with the right measures, she’d be able to enjoy the outdoors too. Here is what works for us when we hit the trail:
Tip 1: Know your dog’s capabilities.
You know your pet best and know what they can handle. I never underestimate a dog’s ability given that most love being in the wild (and I’ve seen a Dachshund hike the same mountains my Aussie does), but obviously there are limits based on breed and size.
From a young age, my pup was conditioned to the trails. At three and four months she was trained on short, local hikes with little to no elevation gain. Slowly, she worked her way up. She can crush any mountain and elevation gain. It didn’t come as a surprise when she started to take on 4,000 footers in New Hampshire and New York. But we definitely didn’t venture off on one before we knew she was ready.
If you don’t have the White Mountains in your backyard, there are still ways for you to mimic an intense hike without the massive peaks. Here’s how:
Find a long trail, ideally with decent elevation gain. You can add difficulty in three ways: (1) do the trail twice (or more), (2) add a backpack to your dog’s back with water bottles inside, and (3) hike in various weather conditions or seasons.

Tip 2: Pick an appropriate hike.
Whether you’re starting off hiking with your dog, or you and your dog are more seasoned out there, the hike you pick is the most important decision you’ll make that day. If you aren’t capable of carrying your dog, or know that with their fur (or lack there of), they’ll be cold, pick a shorter hike where you can stay in control.
Of course you can never be too prepared for the mountains, but you can always aim to expect the unexpected.

Tip 3: Pack these necessities.
Even though dogs are wild animals and thrive out on the trail smelling all the smells, there are still steps to take to ensure your pup’s well-being is taken care of. I pack the following items for my dog and consider them necessities:
Dog first aid kit
You never know what your pup may step on or get into, so it’s best to have a first aid kit handy in case of emergencies, which are more common in the winter.
Backpack for her to carry
I have this backpack for Koah and it’s adjustable to her body. She’s had it from a young age and we conditioned her with an empty backpack, then slowly added weight evenly for her. It’s very easy to put on her and has a piece to attach a leash!
This comes particularly in handy for long, winter hikes when energy is expended and dogs need water and food. The perk of winter hiking is that there is usually a plethora of snow for dogs to eat to keep their bodies hydrated.
Collapsible food and water bowls
These foldable bowls are an absolute must. They are easy to wash and very lightweight. Tip: If your pup is picky, try to help the adjustment to these bowls by using them at home too. They are also great for travel!
Two towels
I don’t know about your dog, but it feels like mine actively seeks every opportunity on a hike to bring back as much dirt and mud as possible into my newly vacuumed car. If that sounds familiar, bring one towel for the post-hike mess. I love that my dog enjoys herself on a hike, but I try to clean
Dog food and treats
My dog rarely eats during a hike, so even though I pack food for her, she usually opts out. I bring treats to maintain training on the trail and provide her fuel in a more efficient way since she doesn’t eat on a hike otherwise.
Waste bags
Part of leaving no trace in the woods is picking up your pup’s waste. Always keep an extra bag or two on you (or in your pup’s pack).
Leash
As much as I love letting Koah run free in the woods, most trails require dogs to be leashed. Keep this in mind when passing other hikers on the trail.
Personalized collar
Like I said before, expect the unexpected. You never know if your dog may get lost, or get loose from your leash. I purchased this collar and personalized it with my dog’s name and my phone number in case she ever gets away from me. Again, it has never happened to me, but it’s best to plan ahead.

Are you ready to take on the trails with your pup this winter? If you don’t have a furry friend, but still want to tackle the mountains in winter, explore my recommendations for gear below!

My Winter Hiking Gear Must-Haves
Here are my gear must-haves if you’re wanting to avoid some of the harsh icy parts that winter comes with…

One of my first hikes toward my NH 48 goal. This was the summit of Mt. Tecumseh. What I loved about it is the view you get when you’re standing atop several feet of snow! I hiked this same mountain the following summer and it’s a noticeable difference without the added snow height boost.
I love the winter. And that’s saying something as a gal born and raised in Texas. It snowed once growing up and my brother and I went all out. We built an igloo (it’s surprisingly warm inside!). Sneak a peek at high school me below loving the couple days at home we had with the famous Texas snowfall in 2010.

The highest recorded snowfall, still to this day in Texas, was that year with 11-12 inches.
Since then, I knew I wanted to live in a place with season. It took me a few years (alright it took six), but I made it to New England. Ironically, I’ve lived here for six years now and can’t see myself anywhere else.
As much as I love hiking in the fall and taking in the views, winter truly warms my heart. The solitude of the trails. The easily accessible parking. The lack of sweating trekking up. Snow-capped mountain peaks for miles. Honestly, even a stroll on a local trail with no views offers the same solace I yearn for because of the trees wearing white sweaters along every step I take.
Over the years, I’ve gotten bolder and more confident in my winter hiking abilities. It started with short hikes and grew into longer, 4000-footers ones. I’ve made my fair share of mistakes (hiking with a friend who wears glasses and having her glasses break halfway up a trail – sorry Victoria!), and definitely froze my butt off one too many times.

The icy summit of Camel’s Hump in Vermont.
Nonetheless, winter is a beauty if you give her a chance. Here are my gear must haves if you’re wanting to avoid some of the harsh icy parts that winter comes with:
1. Layer on the layers.
It is always easier to take layers off, than add them on. I avoid cotton because once you sweat or take a dive or slip into the snow, you’ll be wet. A feeling you’ll grow to despise on longer hikes.
I strongly recommend the following:
Fleece-lined leggings (or pants!)
Tank/short sleeve shirt
Long-sleeve shirt on top (ideally thermal)
Warm jacket with a hood
Thick socks
Another pair of socks when the first gets soaked (trust me)
Winter gloves
Ear warmer headband (or a hat!)
Neck warmer you’d wear skiing (works well for hiking and runny noses too!)
I usually warm up pretty well on a hike once the elevation gain kicks in. I also carry a backpack large enough to fit in the long-sleeve or jacket I have on when I’m overheated and take it off.
2. Get a good grip with microspikes.
Think of these like gnarly spikes for your hiking boots to dig deep into ice and snow to give you a better grip. I bought mine at a small outdoorsy store in Burlington, Vermont over four years ago, but they’re at any outdoors store, and of course, Amazon for convenience.

These microspikes saved me on the summit of Mt. Moosilaukee. Everyone always boasts incredible views from this mountain, but my experience was a tad different. My trooper of a father came to visit and I took him up this mountain in April for his first 4ker. Naturally, we were met with a white-out and wild winds.
3. Get the gaiters.
I remember one of my first hikes in the Whites. A male hiker passed me by with his poles and with it being summer, he was wearing shorts. As I stared at the ground to watch my own steps, I noticed he had these odd-looking socks covering his ankles.
I asked him what was on his ankles. He informed me they were gaiters and help keep dirt and small rocks from getting into his boots. I was stunned – this man was a genius! That night after my hike, I googled “gators,” as a true Southerner would.
Naturally, all my results came up showing the alligators in the wild and in the suburbs of Florida. Something was off. I retyped, “winter gators for hiking” and Google lovingly corrected this English teacher with “gaiters.” These are intended for winter use and I was so pumped to no longer have ice ball clumps on my socks. It’s tiring (and super cold) when you have to constantly bend down and remove these rock hard clusters of ice off your socks. Only to have them rejoin your socks for the ride up the mountain minutes later.
Then, I looked at the price of gaiters. As much as I love hiking, it’s not a cheap hobby if you’re embracing it in all four seasons. Winter hiking isn’t a joke. It took me a few years after learning about gaiters to finally invest in them. These are the ones I purchased from EMS.
Can you tell I’m hiding the coldness of frigid feet behind this smile on a hike to bag Mt. Tom, Field, and Willey? Gaiters would’ve came in handy as the ice clumped on.
4. Heat the hands (and toes!)
Hot Hands are a brilliant invention. I mentioned gloves and warm socks earlier, but that doesn’t always cut it. I buy my Hot Hands in bulk at Costco so I’m never without a pack on those chilly days. You open the pack, shake them up, and that’s it!
Tip: When you place them in your boot to warm your toes, make sure you place it between your sock and shoe. They are very warm and shouldn’t touch your actual skin!
If you’re environmentally conscious (which I’m starting to look at more after staying in a sustainable tiny home last weekend in Vermont), REI came out with a biodegradable version of Hot Hands. Check them out here. Once you’re done embracing their warmth, you can cut the warmers open and compost the minerals on the inside. The packs themselves will still need to be thrown away.

Do you feel ready to walk into the wintery woods? What other gear items do you think are a must? Let me know!

Hiking Cascade and Porter Mountains in the Adirondacks

Winter in the mountains is surreal. Growing up in Texas meant only seeing snow once or twice, and it was mostly ice. I am absolutely enamored by the winterscape in the northeast. From snow-capped peaks to the crunch of spikes in snow on the trail, to the summit sunsets that are more frequent with shorter daylight times. Selfishly I also enjoy having trails to ourselves and not heavy crowds.
This past week, we ventured up to the Adirondacks, a magical gem in New York that feels like New York’s best kept secret. It’s a long drive for many, and it’s not a national park, so it’s not extremely well-known. However, for hikers in New England, it’s a popular destination. Like the New Hampshire 48, there’s a list of 46 high peaks in the Adirondacks that results in accomplishment (and a patch, of course) if completed.
I’ve hiked a couple, but never in winter. Winter in the Adirondacks feels otherworldly to me because of my few trips up there. My first trip up was five years ago. One of my best friends who lived in Hawaii at the time sent me a picture of the Adirondacks and told me I should go. I made a day trip that weekend, which became the first of an annual fall foliage trip.
This trip, however, would be the first attempt of a winter trek in these vast mountains. We set our hearts on two of the 46: Cascade and Porter. After arriving in the early afternoon to a nearly empty parking lot, we set out on the 2.4 mile ascent to Cascade along the Cascade Mountain trail. The trail was packed down and clearly labeled. Right before the summit of Cascade, at about 2 miles, there is a y on the trail. One direction leading up to Cascade (head toward “privy”), and the other about .6 miles to Porter. We headed up Cascade first.

One of my favorite parts of winter hiking is the lowered probability of getting lost because you only have two options: follow the trail another hiker sweetly packed down for you, or dive into feet of untouched snow. Seems obvious.

The wind was brutal at the summit, so we descended almost as quickly as we made it above treeline. Beautiful bluebird days can be deceiving weather-wise since we were met with 20 mph winds producing a negative windchill experience atop Cascade.

Afterwards, Porter was a fast and beautiful jaunt with views of Cascade. I love ridgelines because you get to see how far your hike has taken you.
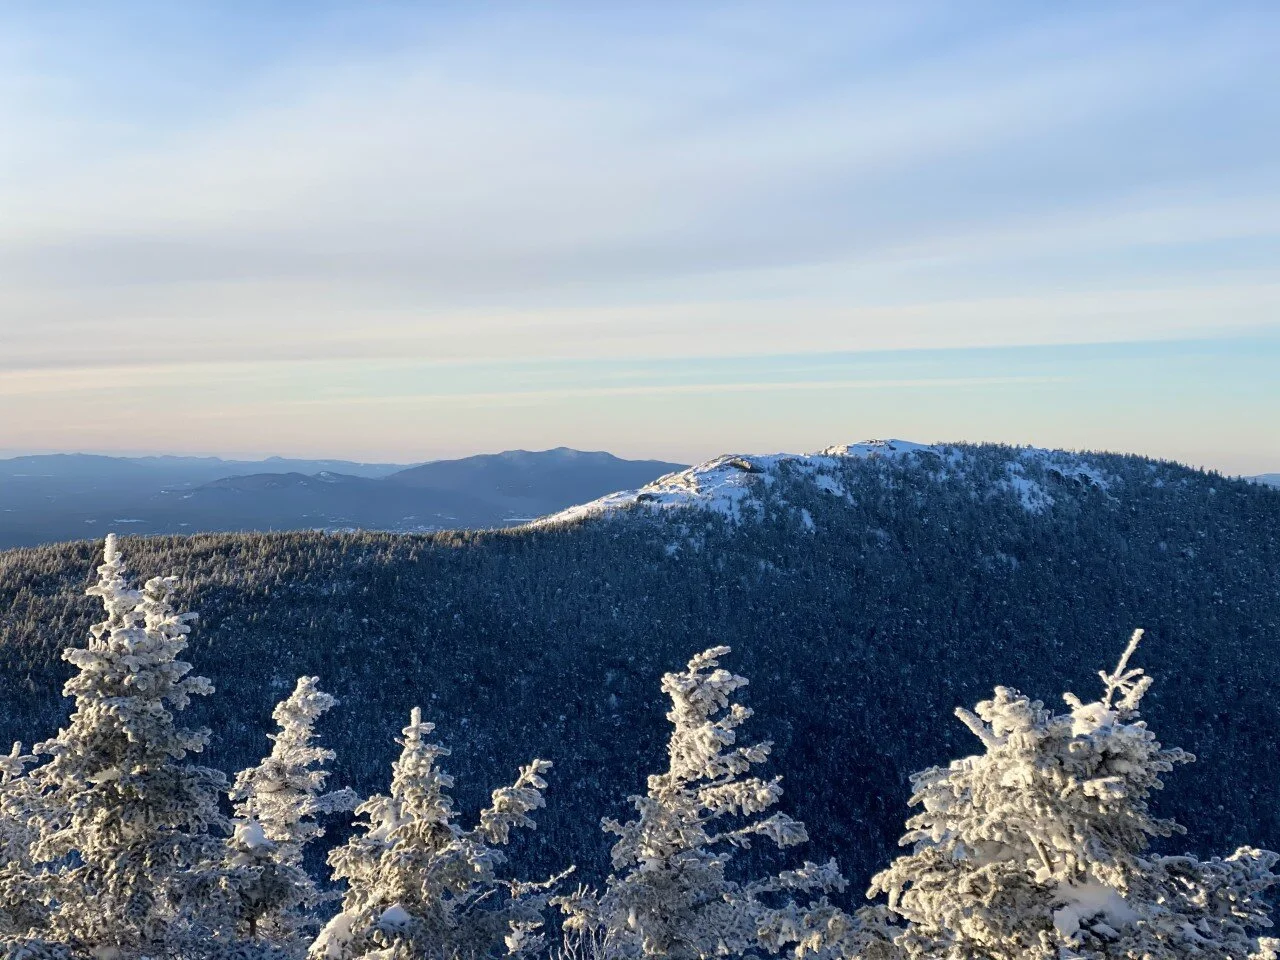
Cascade Mountain trail to the summit of Cascade Mountain (view from Porter Mountain).
We headed down Porter the way we came up and the rest of the hike was a swift and smooth descent. It was also our dog Koah’s first two of the 46! After this trip, I’m already starting to plan the next. The 46 just might be the next hiking challenge we take on.

Should the ADK 46 be our next list to take on? Have you hiked any of the 46 high peaks?