
Three Hikes in One Day in Virginia’s Shenandoah National Park
Here are three hikes you can take on in one day’s visit to Shenandoah National Park, including a bonus secret sunset spot:

The always stunning Appalachian Mountains from Shenandoah National Park.
In January, I noticed I had a three-day weekend without any work obligations. Naturally, to me, that means an adventure needs to be planned. I set my eyes on Shenandoah, a place I spent a day in years ago and always hoped to revisit.
Shenandoah, and Virginia in general, often feels overlooked. A hidden gem of a place, like the New River Gorge in West Virginia.
I rarely have the opportunity to visit a national park in the off-season, and of course took total advantage. From Massachusetts, Shenandoah is a 7.5 hour drive, or about eight with a gas and bathroom break stop. I took the more scenic route through the middle-of-nowhere Pennsylvania to take advantage of the lack of traffic on a Friday afternoon start of the long weekend.
Since I was planning so last minute, I didn’t set any plans for my time there. My best kept secret for lodging is booking a cabin stay at a KOA. It felt meant to be when there was one vacant cabin left at the Harrisonburg/Shenandoah KOA. Of course I had to book it. With my rewards points, my three-night stay was very affordable.
These cabins are my favorite because they’re rustic chic. It’s a definite upgrade from a tent (or sleeping in my car if we’re honest), but it’s not lavish by any means.
After my long drive, I slept in. I prepared some coffee and breakfast on the porch of my cabin, and promptly ate it inside because it turns out, Virginia gets cold. Like New England cold.
I packed several layers thinking I would not need them, but ultimately used a lot of my cold weather gear when I went hiking. Always read what park rangers in Shenandoah National Park post about the most up-to-date information on alerts and conditions in the park. Skyline Drive can be entirely (or partially) shut down due to icy conditions.

Shenandoah National Park Wildlife
The only memory I really have from my first trip to Shenandoah is a rocky summit hike I did with dad, but this was quickly overshadowed by my first bear sighting. We caught sight of a bear cub about twenty yards from us and hastened our pace back to the parking lot. Lo and behold, momma bear was on the road.
It was truly a spectacle. That I enjoyed from inside our car because I did not need to be any closer to the bear than I already had been.
It was time to make new memories in Shenandoah, so I embarked on a few hikes. Here are three hikes you can take on in one day’s visit to Shenandoah National Park:
1. Bearfence Mountain
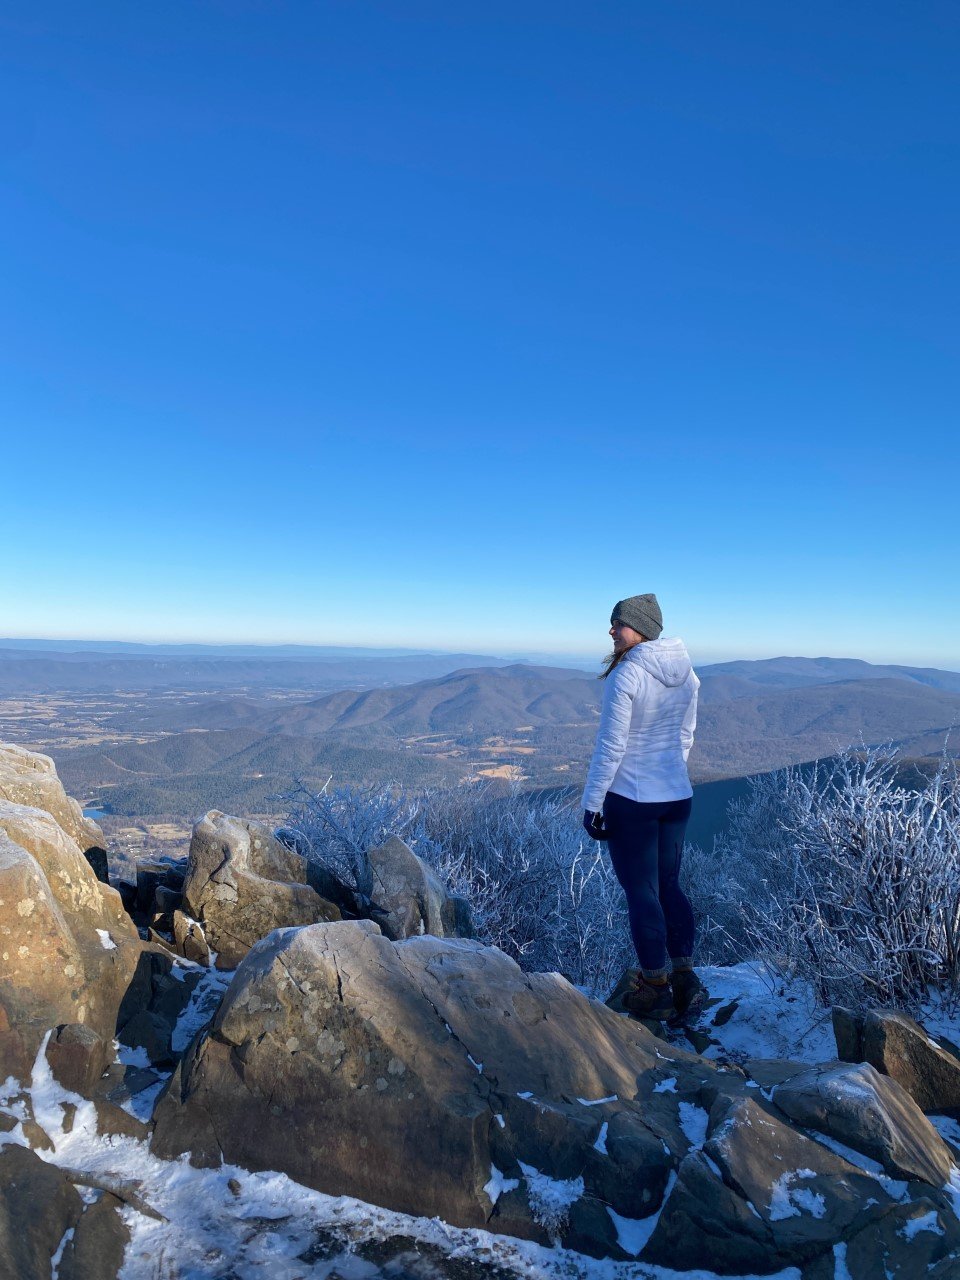
I took full advantage of the off-season and arrived to the park before sunrise to start my day with the sun atop a summit. The best spot to catch sunrise is Bearfence Mountain. Here’s a secret: you don’t have to make it past the icy ledges to the actual summit for breathtaking, 365-degree views.

The first light on a winter morning without a car or other hiker in sight for a couple hours in the park.
I was the only one in the parking lot, at milepost (MP) 56.4 when I arrived at 7 A.M. As soon as I turned off the ignition and crossed the road to the trailhead, I remembered this was the hike I did with my dad seven years ago. The one where I saw the momma bear on the road. A fitting mountain name for this hike. As much as I love seeing wildlife, I was hoping I wouldn’t come across a bear this time around.
The trail was icy, and as always, I’m racing against the sun. I made it up about .3 miles and around 275 feet of elevation when the wind really kicked in at one of the false summits. I was alone and cold, but couldn’t wait for the sun to rise.
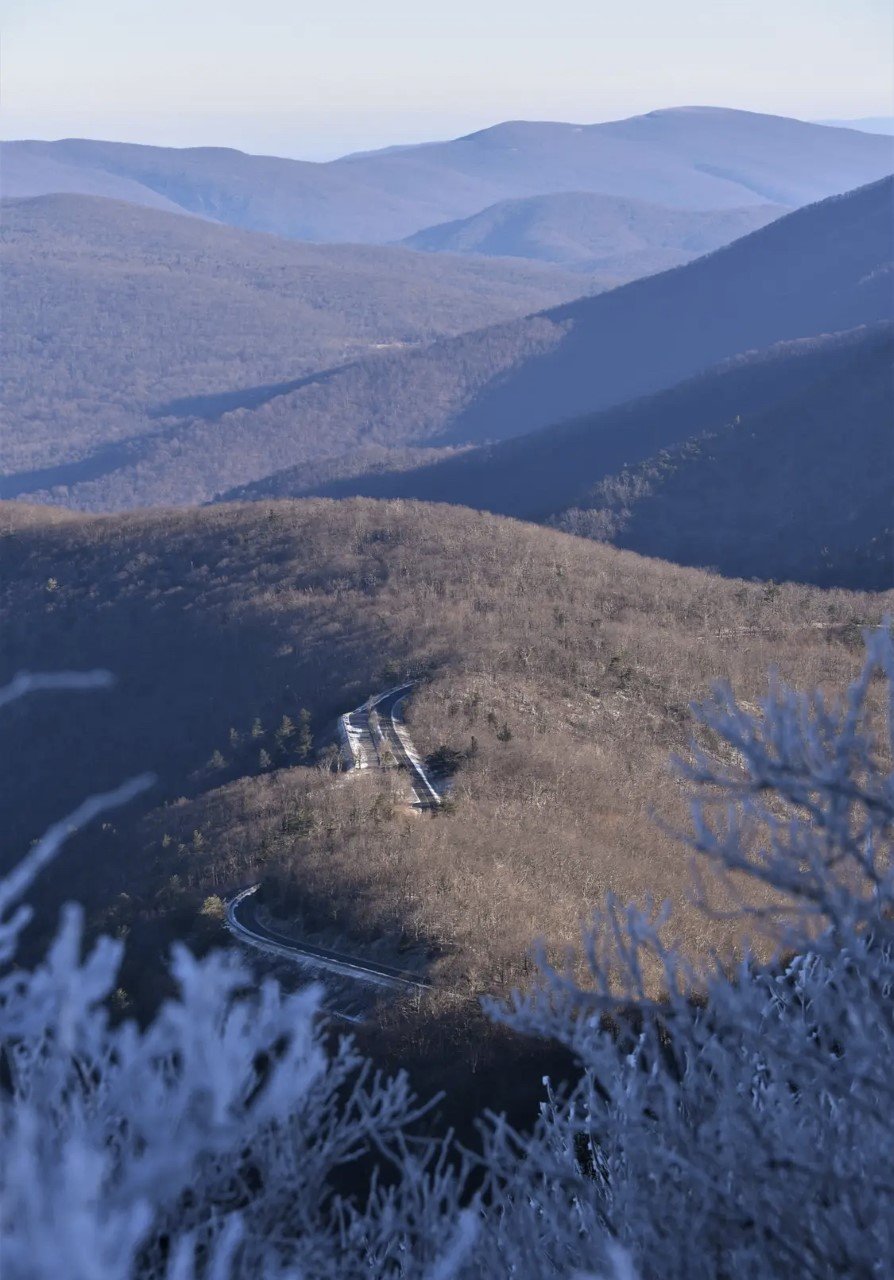
The summit was a bit further out, along a little more of a rocky, iced ridgeline. I decided it was best to camp where I was and enjoy the start of the day from where I was. This hike is also one of the few hikes in all of Shenandoah National Park where you catch a glimpse of Skyline Drive from a bird’s-eye-view. I love a good road photo surrounded by nature.
But what I truly loved, was feeling like I was the only person for miles on this mountain watching the sun rise. Sunrises really are the best.
When I could no longer feel my fingers, despite my gloves and hand warmers, I headed down the same way I went up. Confident as always, I ate it on one of the last steps before I made it to the road. Just Shenandoah reminding me to humble myself.

The route from Strava
Here’s the route I took. At the end of the trail, I looked at the trail map and realized there is a way to avoid the icy, rocky ridgeline that I stopped short of by hiking on the Appalachian Trail instead. Next time (and if I wake up early enough)!
2. Hawksbill Mountain
When you finish soaking up the first light to hit the Appalachian Mountains of Virginia, it’s time to head to a Shenandoah favorite, rightly so.

Shenandoah really has it figured out with all of its rocky ledges.
Right off Shenandoah National Park’s main park road, Skyline Drive, is the trail for Hawksbill at MP 45.6.

The route for Hawksbill Mountain
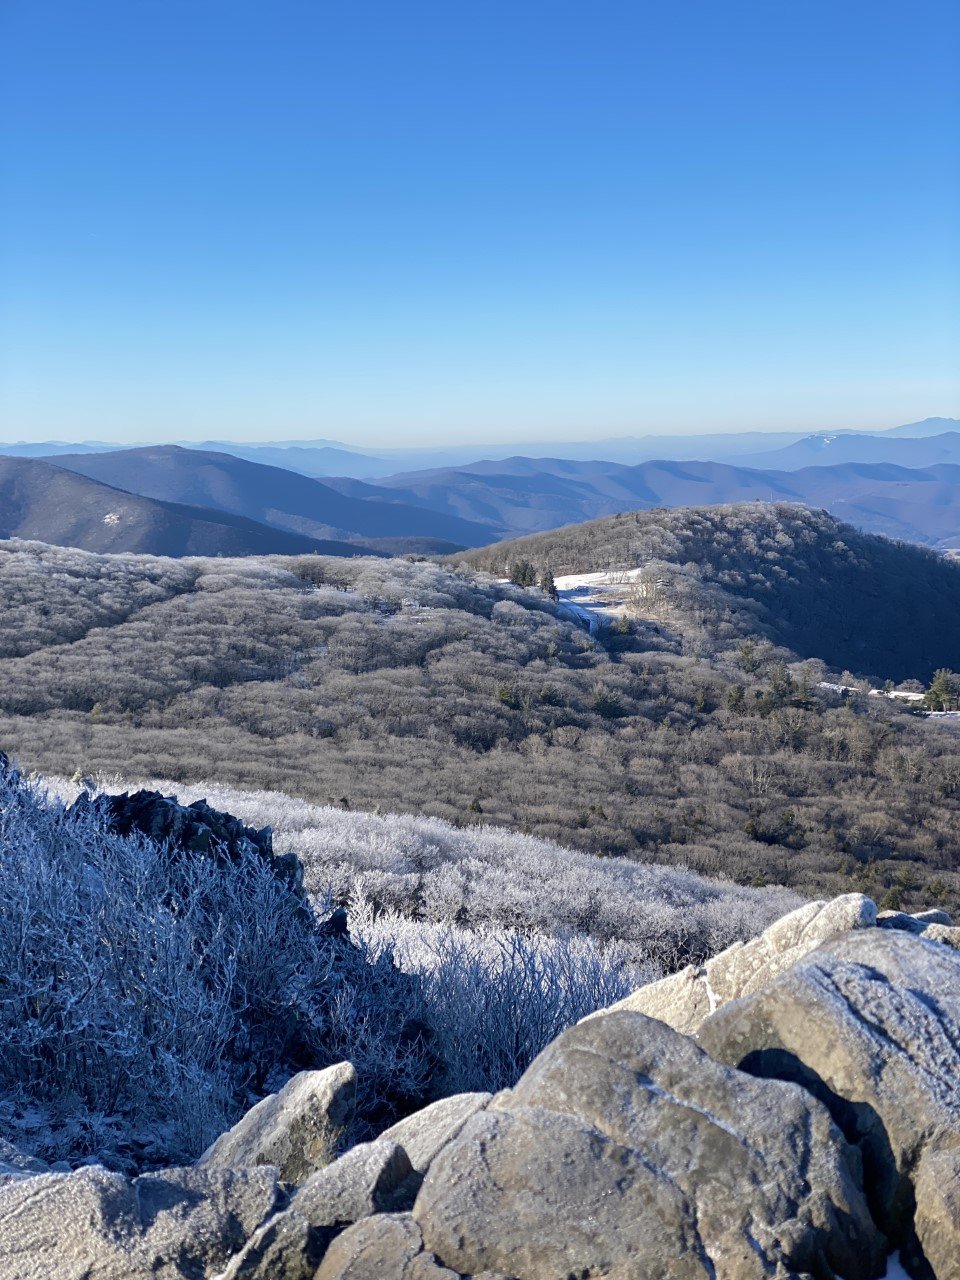
This hike was so nice I had to do it twice. One of my favorite aspects about it is that the summit reaches over 4,000 feet. I didn’t know any hikes further south from Massachusetts hit 4,000 feet, considering Massachusetts’ highest peak, Mt. Greylock, comes in at 3,490 feet.
In about one mile and only 500 feet of climbing, I was met with a windy, icy summit reminiscent of New Hampshire’s wintry peaks.
3. Stony Man Mountain
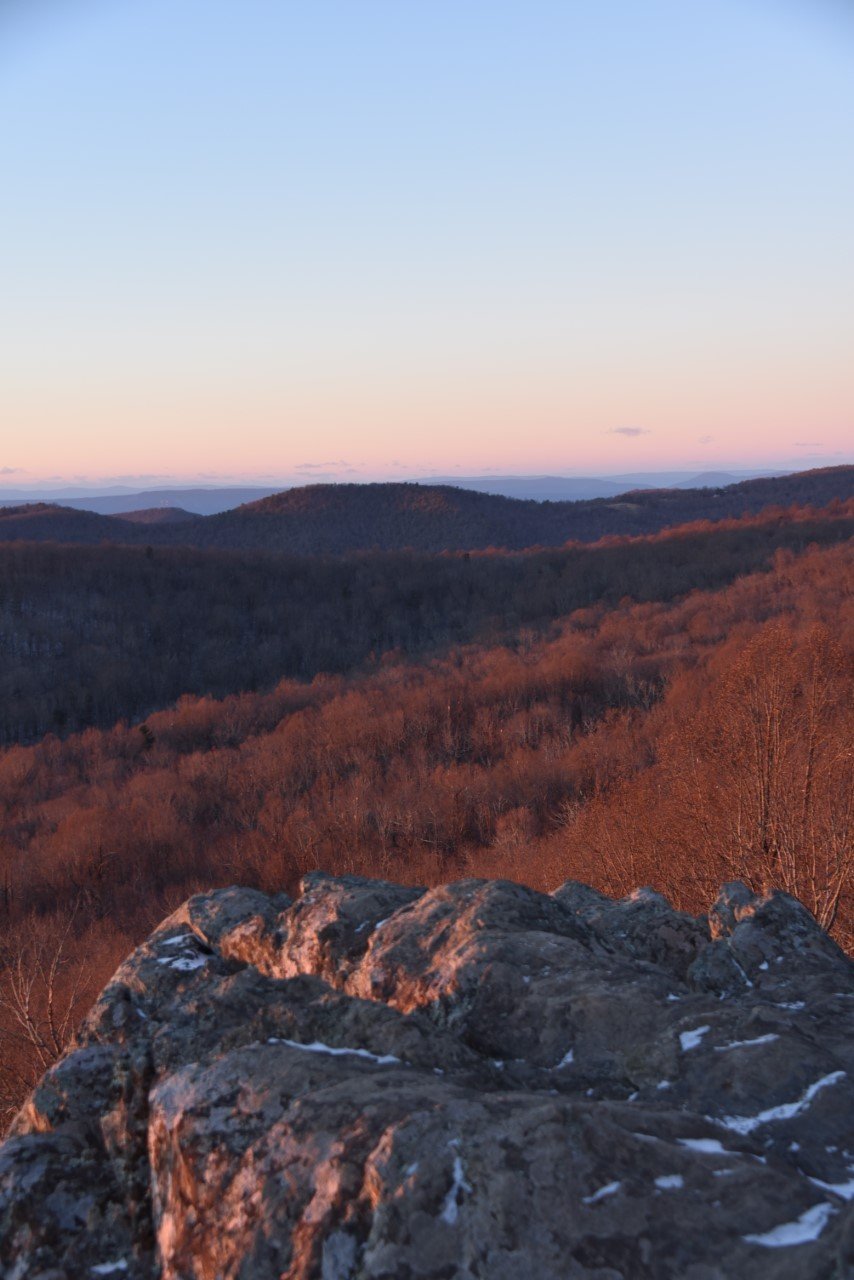
Stony Man was a quick jaunt, but worthwhile to see the Appalachian Mountains from a different perspective.
As the day begins to near the late afternoon, it’s time to make moves to catch sunset. You have two incredible options for sunset: one is to hike up Stony Man Mountain for jaw-dropping views of the Appalachian Mountains. Another, if you’re tired (or short on time), is to pull over at one of the overlooks and take a hidden trail to a secluded ledge. More on both options below.
A great trail leading right off of Skyline Drive is Stony Man Mountain. The parking lot is at MP 41.7. I had little to no service in the park, so I relied on the park map provided to me by the park rangers upon entering the park, as well as downloaded trail maps from AllTrails. There is also a Little Stony Man, so be sure to go for the big guy. This hike traverses the Appalachian Trail, which I loved, because it again reminded me of home back in New England.

The Strava route for Stony Man Mountain
A speedy three-quarters of a mile to the summit with roughly 300 feet of climbing brought me to this scenic spot. The other major perk of the off-season? Parking lots, trails, and summits entirely to myself. I loved every minute of it!
I would hike up Stony Man for sunset because it is short, has ample parking, and of course, the views.
Bonus Sunset Spot: The Point Overlook (MP 55.5)
If you’re short on time, or exhausted from a day full of hiking, check out MP (milepost) 55.5. Pull over and park at The Point Overlook right off Skyline Drive. You’ll find a stone wall with an empty space in it. Walk through that empty spot down the trail, roughly 300 feet.

You’ll be greeted with a rocky ledge all to yourself. I parked at The Point Overlook with two other cars, but neither party ventured on this hidden path. It’s definitely worthwhile, especially if you are short on time to run up a mountain.
Which hike is making it to your list? Would you take on all three in one day?
If you enjoyed learning about this national park, then you’ll love exploring these:
3 Hours in Kentucky’s Best-Kept Secret: Mammoth Cave NP
Two Must-Do Experiences in Florida (No, Not Disney)
The Best Time of Year to Visit White Sands National Park, New Mexico
3 Colorado National Parks To Visit (That Aren’t Rocky Mountain!)
7 Lessons I Learned Road-Tripping Across the U.S.
Visit America's Newest National Park: The New River Gorge, WV

Two Must-Do Experiences in Florida (No, Not Disney)
I’m the first to admit I did not see Florida’s potential. As I researched, I realized…
I’m the first to admit I did not see Florida’s potential. After a family road trip to Disney as a kid, I crossed this state off my checklist and called it a day.
Little did I realize that the National Park Service designated three parts of southern Florida as national parks, which meant I needed to make another trip (or two) down to explore. As I researched, I realized what a beautiful area southern Florida is. And how underrated it is considering Miami and Orlando get all the attention.
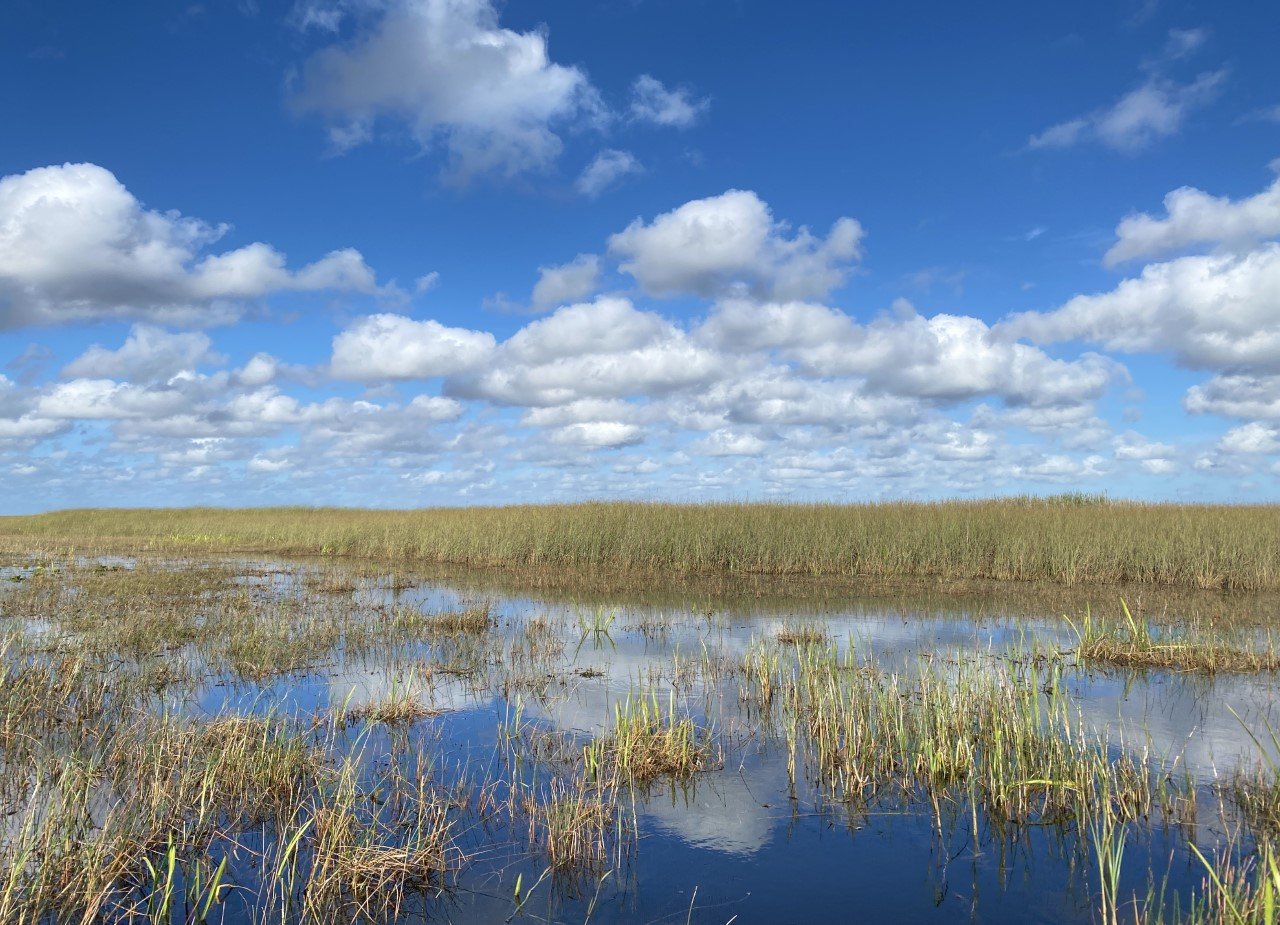
Florida is home to Biscayne National Park, Everglades National Park, and Dry Tortugas National Park. These three parks are almost entirely on water. Biscayne National Park is comprised of 95% water, while the Everglades is actually the slowest moving river in the United States. Just one search of Dry Tortugas will show you Fort Jefferson – and the other six islands that make up this incredibly unique park.
Needless to say, I had my planning cut out for me. I drove down to Florida with the sole purpose of crossing two parks off my list, but it turns out, Florida has more to offer than theme park rides and Disney characters. I didn’t fit Dry Tortugas in this trip because despite being one of the most remote U.S. national parks, there is a convenient way to access the park. The mode of transportation is a ferry that costs $190 per adult and is sold out one to two months in advance. When I researched other options, I only came up with chartering my own seaplane. As cool as this would have been, my wallet was not prepared to take that kind of heat.
Dry Tortugas was out, for now. Here’s what I explored with my time in Florida on a budget:

Our sailboat guided by the wonderful Byron with the Biscayne National Park Institute.
1. Sail around Key Biscayne National Park (and kayak and snorkel too!)
What I did love about Dry Tortugas is that the ferry works with the National Park Service. Sure there is only one way to get there, but it’s safe and maintained. Key Biscayne is similar! You can either hop on your own boat (which I do not have) or take a tour with the Biscayne National Park Institute, an organization that gives back to the very waters they sail on. Can you figure out which route I decided to take?
I opted for the latter. I booked the Sail, Paddle, Snorkel, and Island Visit tour and can’t recommend it enough. The tour is $189 a person, but for an all-day excursion in a national park that’s almost entirely on water, I found it exceptionally valuable. The tour has a maximum of six people, and with our luck, we booked a day where we were two of five.

Our instructor was extremely experienced and let me try out steering the boat a bit, while he taught others how to let down the sails. As we sailed, he told us historic tidbits about these majestic waters. From fascinating tales of the inhabitants on the very thin stretch of land I could hardly make out if I squinted enough, to all the critters that live beneath the water.
Once we docked, the tour continued via kayaks. We paddled our way through parts of the water the boat couldn’t navigate to and were able to get a closer look at what lived in the water. As we neared very shallow waters, our guide told us to gaze on the spots on the water’s ground.
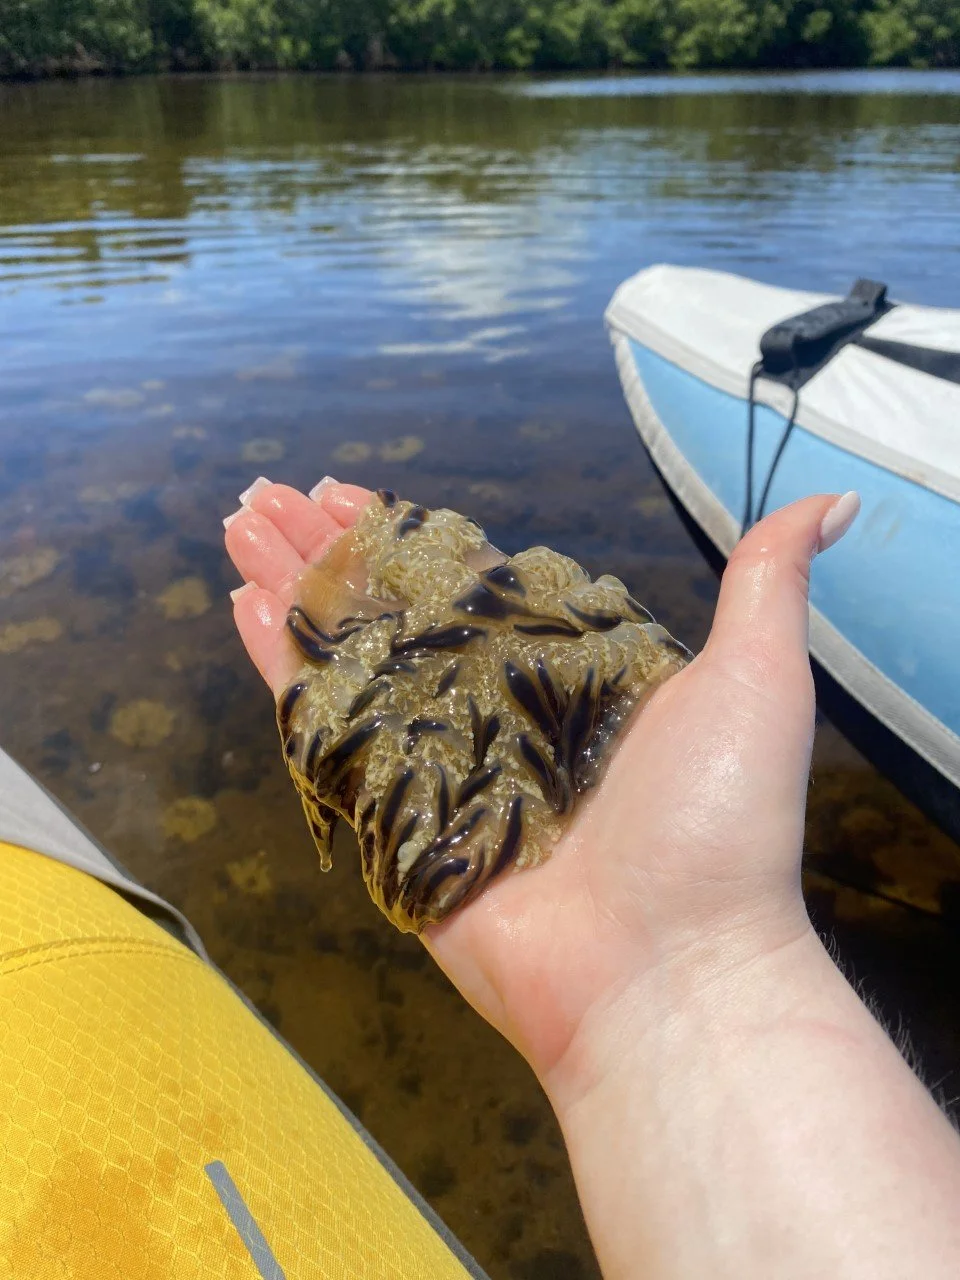
Fascinating Wildlife
Turns out those “spots” were jellyfish! He picked one up and let us touch the gooeyness. It reminded me of the middle school slime my students were obsessed with making a few years ago.

The Biscayne National Park Institute’s tour features kayaking or stand-up paddleboarding (SUP) and they supply all the necessary equipment.
When kayaking ended, we hopped (more so wobbled with flippers on) into the water for the snorkeling portion of the tour. I saw a multitude of fish that our guide had introduced to me in the stories along the morning’s ride, including gnarly-looking crustaceans if you peered into the crevices of stone and searched for daddy-long-leg-like claws. The return ride was soothingly smooth as our crew chatted about places we’ve been and places we’re hoping to venture to while laying out on the front of the boat.

Other Tours
The Biscayne National Park Institute also offers a handful of other tours, including one to a Key Biscayne lighthouse (another historic gem) that parks along the water and lets you head up the top of the lighthouse. As a lighthouse lover, this tour was next on my list if I had another day here.
2. Ride an Airboat through Everglades National Park

After Key Biscayne, I noticed geographically how easily it would be to explore the Everglades. Despite never having a desire to travel to Florida again, at the very least the state was cognizant of placing its attractions in close proximity to each other. With my homebase in Homestead, Florida, the Everglades were a short drive away.
The one thing I knew I had to experience in the Everglades was an airboat tour. Like its two sister parks in the state, majority of this park is on the water. It’s also the third largest national park in the lower forty-eight states.
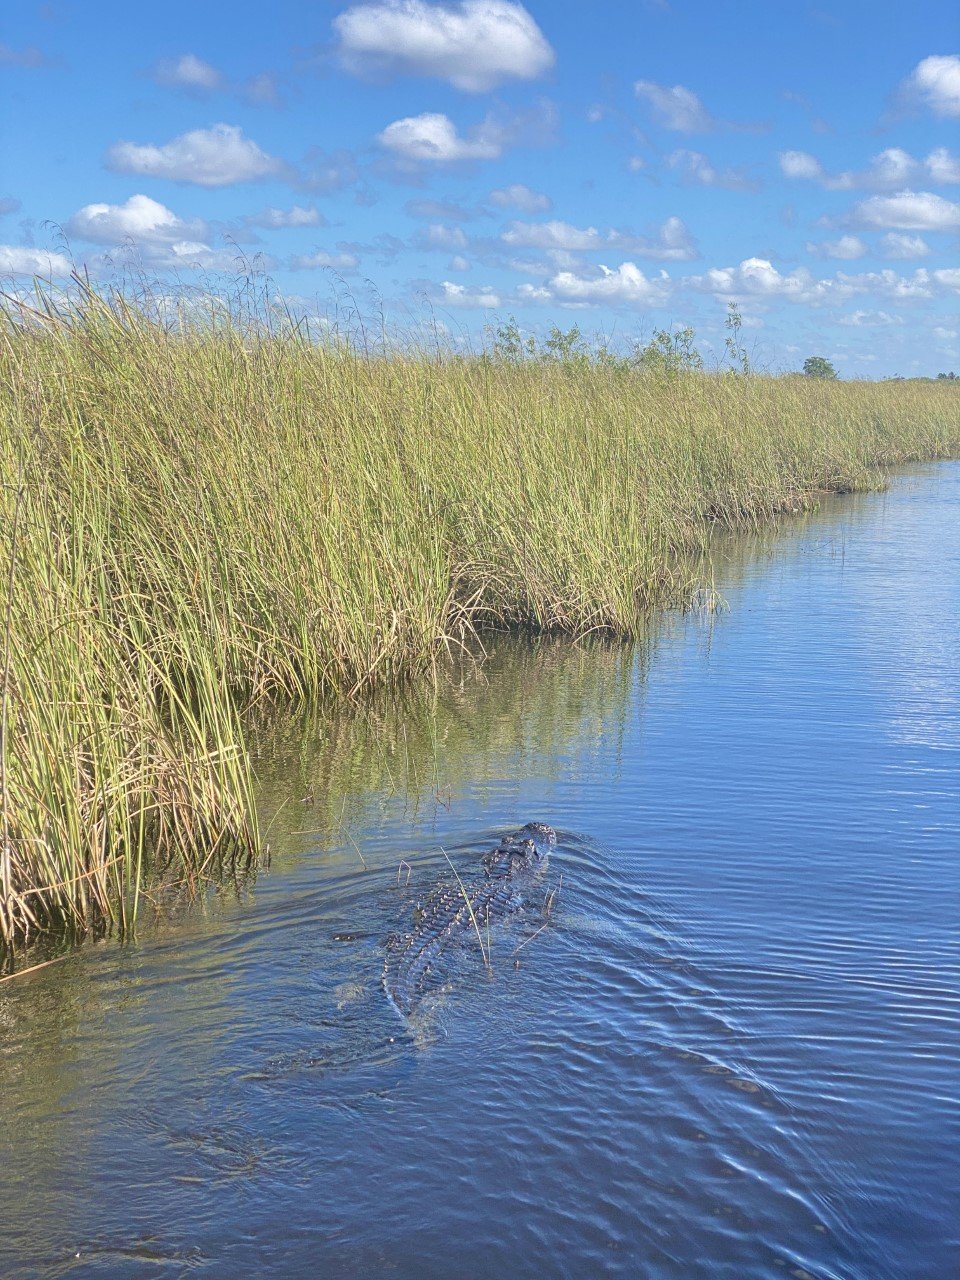
Airboats aren’t your typical boats. They’re iconic for their large fan in the rear of the boat that propels them forward. Riders feel a rush as the captain steers, making sharp lefts and hard rights. Tall, thin grass briefly slides against your arm as the boat speeds past miles and miles of the stretched sawgrass.
Along the way, the guide points out gators both in the thick of the grass and in the boat’s clearcut path. I saw about ten alligators total during the thirty-minute tour.
Like the other parks, there are designated companies that gained the seal of approval from the National Park Service to operate within the park. As you drive around the area, you’ll inevitable pass by countless companies offering airboat tours, but only the national park designated ones take you through national park waters. The authorized airboat businesses inside Everglades National Park include: Coopertown Airboats, Everglades Safari Park, and Gator Park. You can find more on these three companies here. I went with Everglades Safari Park and wasn’t too impressed with the guide, so definitely check out the other options! I wish we learned more about the history of the park as we were on the boat navigating the waters.
A beautiful day for an airboat ride through the Everglades.
Which of these experiences are you adding to your bucket list, or have already crossed off?

3 Colorado National Parks to Visit That Aren’t Rocky Mountain
Great Sand Dunes • Black Canyon of the Gunnison • Mesa Verde

This is in Colorado. I know, I was shocked too.
When you think of Colorado, what comes to mind? Almost immediately glimpses of Denver appear or the snow-capped summits of the Rocky Mountains range wander through your head. Denver and the Rockies definitely deserve the hype, but they aren’t all that Colorado has to offer you!
Next time you plan a trip out West, or one to Colorado specifically, add these lesser-known destinations to your must-see list. My biggest piece of advice is to purchase the Annual Parks Pass ($80). If you do a Southern Colorado trek, each of these parks have entrance fees of $15-$30, so it may be more beneficial to pay the one-time $80 cost. I’m all about saving money where I can! I happened to also be trekking to Moab, Utah, so I knew I’d save since I was also entering three parks there that each have an entrance fee.
Last summer on a cross-country road trip, the ultimate destination was Idaho. How to get there, however, was up for discussion. After some great Kansas City barbeque, Colorado seemed like it was just minutes away, so I planned for that state next on the itinerary.

Colorado is home to four national parks— one of which is way more popular than the others. Rocky Mountain National Park is well-known for good reason! It’s easily accessible from Denver and it’s breathtaking. I visited the park a few years ago, so I opted out of revisiting this time around.
Instead, I traversed southern Colorado exploring the other national parks this gorgeous state has to offer. And what I discovered is that they are each true gems that not many people know about!
While you need a permit now to enter Rocky Mountain National Park due to its extreme popularity and congestion (4.4 million visitors in 2021!), the remaining three national parks have so few visitors it’ll feel like you have the park to yourself at some times.
Though I love a good tourist moment like when you first lay eyes on the Rockies, or when you witness the exact point when Ol’ Faithful erupts, I also take great pleasure in those quieter moments. The ones that not many are able to experience.
Here are the national parks that you should definitely visit in Colorado:
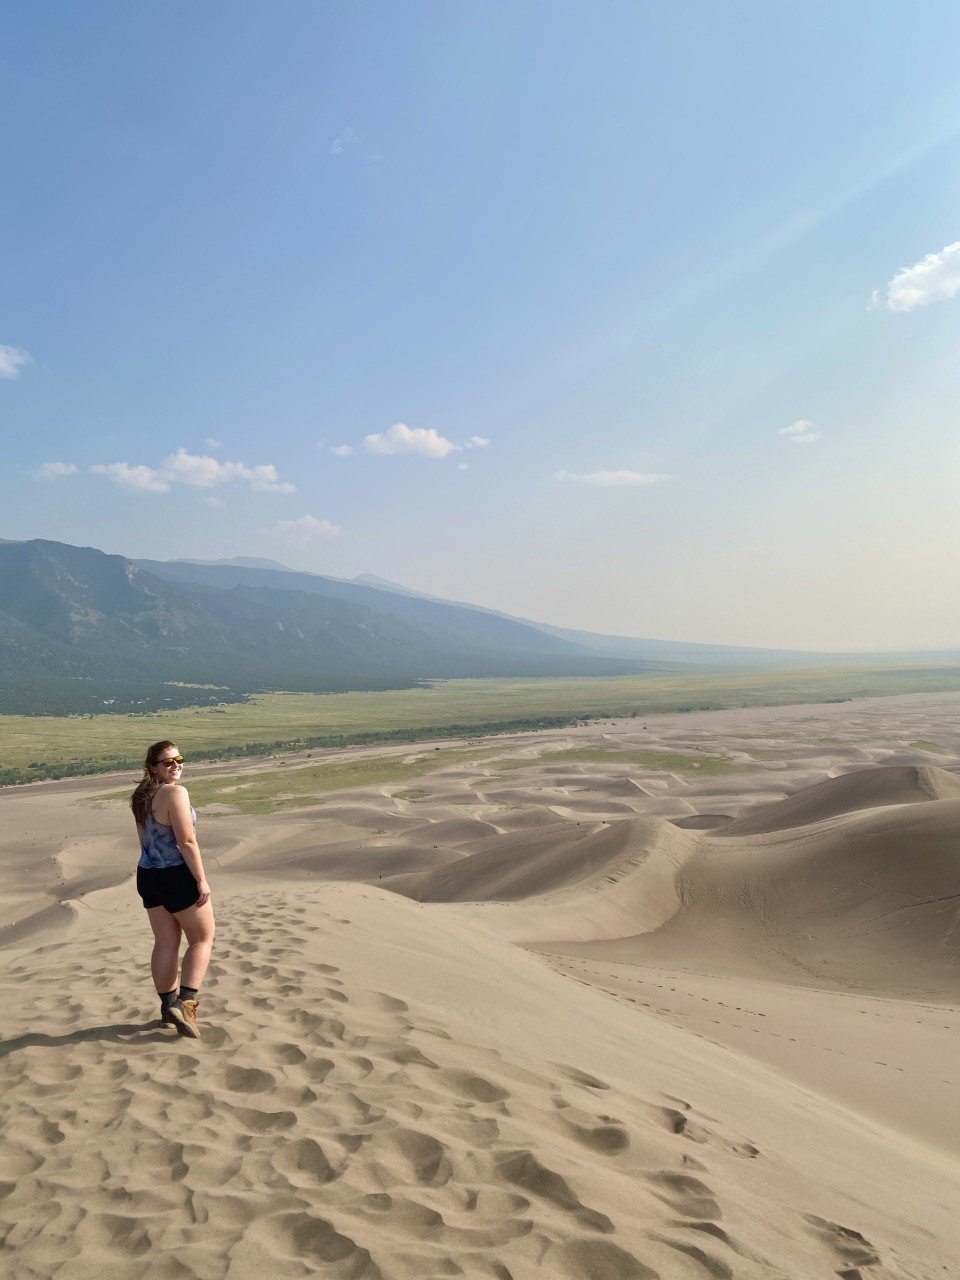
1. Great Sand Dunes National Park
We all know Colorado has the mountains, but sand dunes? And North America’s tallest ones at that?
In the southwest pocket of Colorado, in the town of Mosca, that’s exactly what you’ll find. A striking mountain range that serves as a backdrop to the sheer beauty of sand several hundred feet in the sky, seemingly out of nowhere.
There are three dunes that top all the others: High Dune, Star Dune, and Hidden Dune. For all three, park at Dune Parking just past the Visitor Center.
High Dune isn’t the tallest dune, but it is the quickest to get up. If you are only passing through the park, this is the perfect one to tackle. From the parking lot, head straight up the dunes. It’s a little under 700 feet and about three miles total.
Star Dune and Hidden Dune are the tallest – Hidden is slightly taller than Star. These two are longer treks (around 6-7 miles).
This park is one of the least visited (as are the other two on this list). In 2019, Great Sand Dunes had 527, 546 visitors. Obviously that number has risen with the increase of road trips and stateside travel, but it’s still nowhere near the looks of visitor numbers in popular parks.

Tips: Start early or go later in the afternoon. Sand can really heat up. If you’re into it, rent a sandboard from town to save yourself time once you hike up. There is a water station at the parking lot to rid yourself of sand. Though it might stick around for longer than you’d like!
Best time of year to visit: Fall or winter to see the contrast of the mountainscape behind the dunes. Summer brought welcomed warmth on a windy day at the dunes. You can’t go wrong!
Where to stay: The dunes can be a day trip, but if you want to take advantage of seeing the stars at night, I would camp within the park at the designated campground, Piñon Flats.

2. Black Canyon of the Gunnison National Park
The Black Canyon is one of the few places I’ve visited that left me in utter awe. This park truly is phenomenal. Located right by the charming, small town of Montrose, this park is a hidden gem. Considering it is one of the deepest canyons, it makes sense it isn’t visible to most people.
The drive in isn’t too captivating, but as soon as you stop at the first overlook, the jagged rock structures and sheer darkness along the canyon edges will surely give you a reason to not look away.

The Gunnison River in all its glory.
This park only had 432, 818 visitors in 2019. That blows my mind. There is truly something for every explorer at this park. World-renown fishing, incredible hikes, and stunning vistas.
I recommend driving down South Rim Road and stopping at each view along the way. Each trek is short and provides new angles of the canyon. I couldn’t get enough of its depth!

Tips:
Spend two days in this park. One day can be spent exploring all the overlooks and going on short hikes to see the true depths of this canyon. The next day can be spent with an obtained permit to go down into the canyon on the Gunnison route. This route is an incredible 2.7 mile hike with 1,700 ft elevation gain. The trail is minimally marked and a very limited number of hikers are allowed each day, fueling the intensity of this hike.

The first viewpoint from the entrance of the park opens up to this scaping view of the Black Canyon.
Best time of year to visit: Summer. This park is so infrequently visited that parking wasn’t an issue, neither was overcrowding at any lookout point. The roads are also closed in winter, so that’s something to keep in mind.
Where to stay: KOA in Montrose, CO. This KOA is very affordable and conveniently close to both the main street and the park. As with most KOAs, you can camp in a tent or stay in a cabin!
3. Mesa Verde National Park

These cave dwellings were built around the end of the 12th century. How wild is it that we can view (and walk among them) today?
I have had this park on my list from the beginning of my park journey. Famous for the cliff dwellings, this park was designated a UNESCO World Heritage Site in 1978. One of the first in the United States!
Despite how incredible this park is, only a little over half a million people visited in 2019 (556,203).
I did a self-guided exploration of this park for half a day, soaking in the cliff dwellings from every angle I could and from every lookout point possible. I suggest driving along the Mesa Top Loop. This road will give you access to neat stops like the Sun Point View and views of the cliff dwellings. If you’re short on time, definitely take a ride along this loop road to absorb as much as you can.

I love imagining what it would’ve been like to discover places like this (and Machu Picchu) for the first time. Here is a cave dwelling from an overlook point.
Tips: For guided tours, book in advance! There’s nothing worse than arriving at a new park, hopeful to see something, only to find out it’s booked. You can book your guided tour here.

Best time of year to visit: Almost every season. Seriously! I visited in August and never struggled for a parking spot. It’s very unvisited, which makes it quite the hidden gem. However, if you really want to take a guided tour, you need to visit May-October as they are not offered in the winter and spring months.
Where to stay: Cortez/Mesa Verde KOA Journey in Cortez, CO.
Have you visited any of these Colorado national parks? Which one is on your list?
Loved this post? Then you’ll love these:
Visit America's Newest National Park: The New River Gorge, WV
Experience the Best of Hawaii’s Haleakalā National Park

How I Traveled Across the U.S. for Less Than $1,000
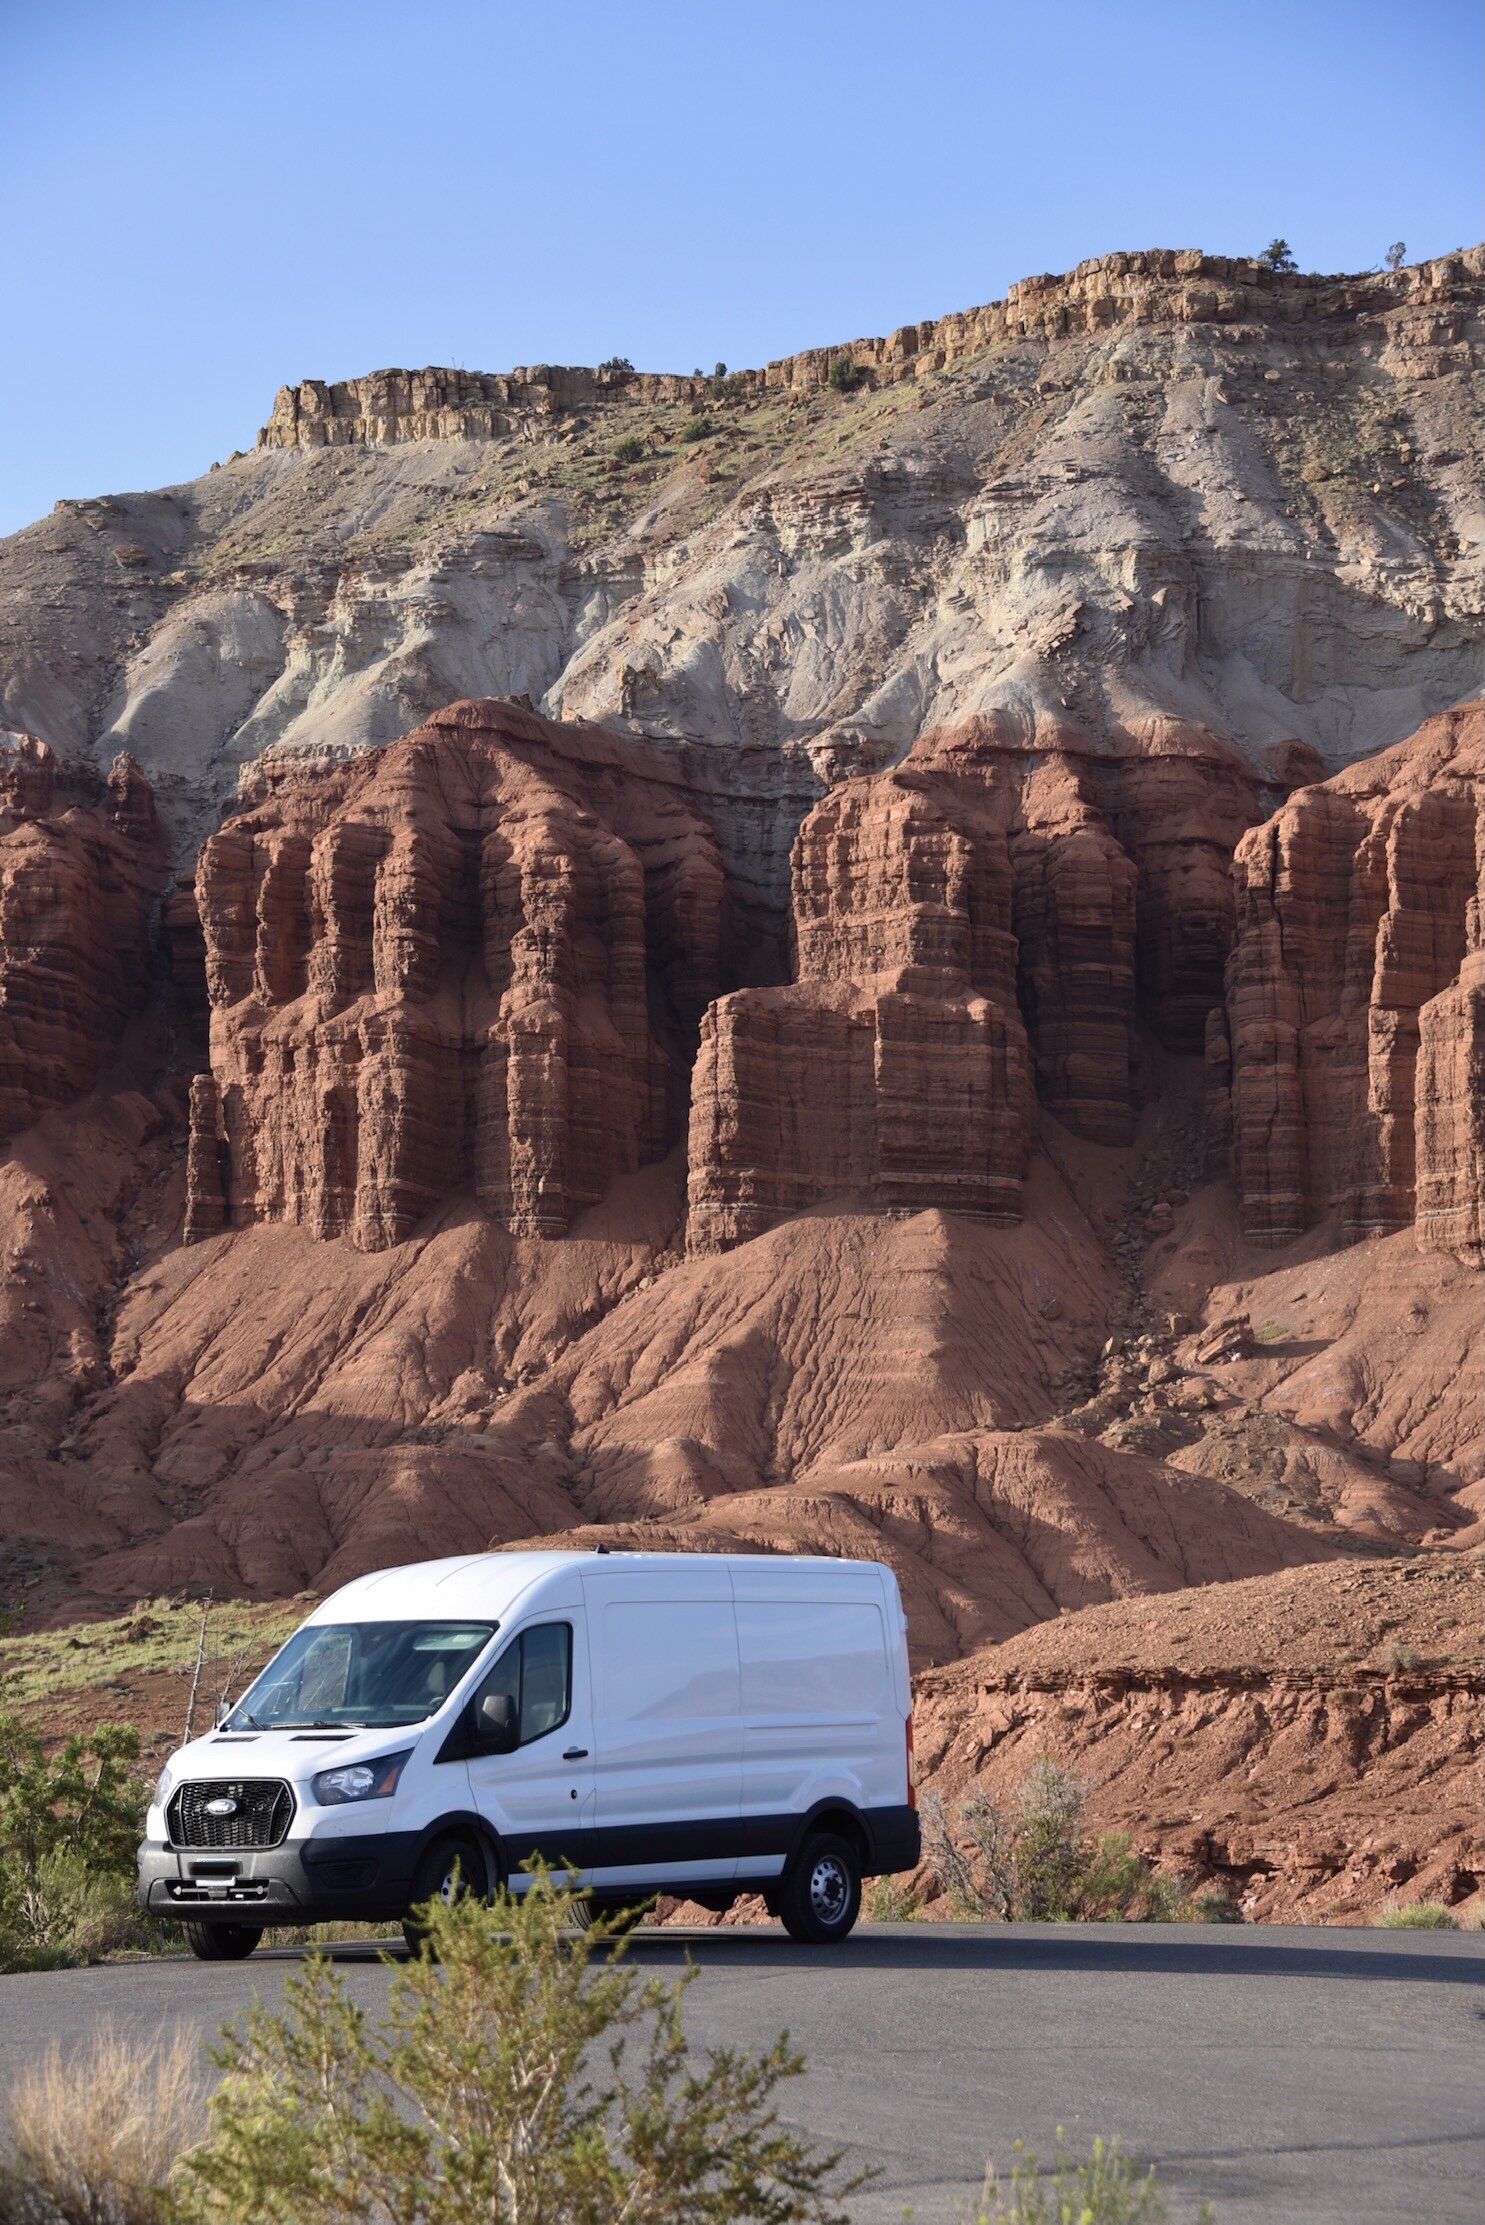
Almost anyone can rent a cargo van, throw a mattress in the back, and travel the U.S. with a little planning…

A few days into van life and still smiling!
When planning our summer road trip, we set our eyes on what we believe to be a hidden gem in this country: the Sawtooths mountain range. One glance at these peaks will leave you mesmerized. And so began our planning phase. The trip was originally going to start with a flight from Boston to Boise and back. Below is how we brainstormed from there, while remaining budget-conscious.
Our final trip took us from Western Massachusetts to Idaho and back home. Here are all the places we explored or stayed in:

Columbus, Ohio > St. Louis & Kansas City, MO > Southern Colorado > Southeastern Utah > Twin Falls, Boise, and Sawtooth Mountains, ID
How to Start Planning Your Trip
We initially wanted to fly out to Boise and try out the RV or van life via renting. Flights from Boston to Boise hovered around $500. We were going to bite the bullet: purchase the flights to Boise and rent a renovated van or small RV for around $140-$200 a day. As I started to get to the final page of payment for the van, the numbers added up. Big time.
Not only is there a charge each day of renting, there is an additional required insurance (understandable of course), as well as a hefty fee for driving more than 100 miles per day. Crunching those numbers led to a few thousands of dollars spent on housing, transportation, and flight for a two-week trip. One website we researched was Wander Vans, which for a two-person van for 14 days totaled to $2,200. Additional mileage over 125 (for this specific company) was 35 cents per mile. That total doesn’t include insurance, which was an extra requirement. These vans were sold out for the dates we wanted, but was one of the cheapest options we found. Others grew exponentially from there.
Not a bad spot to enjoy the sunset in Capitol Reef National Park, Utah.
We loved the idea of having a car and housing in one, and of course insurance and cleaning fees are part of that when renting. We tried to justify the expenses by pointing out the van is both the mode of transportation and place to crash each night, but ultimately decided there had to be a cheaper way.

The van’s traveled to some neat places so far like the Black Canyon of the Gunnison National Park in Colorado.
And thus, the road trip idea took a different turn. I used Priceline this time around to book a rental car. When selecting an option (I usually get an SUV to fit all of our camping necessities), I came across a cargo van option. I may be late to the game (or never really had to move things around), but cargo vans are an option? And cost less than an SUV? Not sure where I’ve been this entire time, but I’m glad I came across it.

Making our way through the Southeastern corner of Utah.
The total cost for a two-week rental was $612, but we added in an extra day for $60. The taxes and fees came out to $110, so the total cost for renting a cargo van in Western Massachusetts was $785. We split up travel costs, so my half came out to slightly under $400.
If you’ve read my previous post, 7 Lessons I’ve Learned Road-Tripping Across the U.S., you’ll know I never skimp out on rental car insurance. Of course it’s up to you, but it did add $500 to the total trip. Again, $250 on my end.
Where to Stay
Now that transportation was secured, we needed a place to stay everywhere we traveled. At first, as I mentioned, we looked at transportation that included a stay (i.e. an RV or van). When we threw that out the window and added in the cargo van, we considered Airbnbs. We love a good Airbnb, but for 14 nights, the cost would add up swiftly. So that was out.
With the cargo van, we knew we had two seats in the front and a large space for our needs in the back. The idea for a DIY renovated van was born. We borrowed two air mattresses and an air pump, so the sleeping aspect was covered.
Sure a renovated van with a built in bed, along with ventilation and a heating system would be ideal, but it’s very expensive. Almost anyone can rent a cargo van, throw a mattress in the back, and travel the U.S. with a little planning.
With our bed arrangement figured out, next up was deciphering places to sleep. My favorite option is Kampgrounds of America, or KOA. They are affordable (if you join their membership, you receive 10% off each time – it pays off if you utilize them!) and are all over the U.S. I’ve stayed in cabins and tent sites from the Adirondack mountains in New York to the suburbs of Ohio, to the Badlands in South Dakota. They are everywhere!
The tent sites range based on location. In Moab, Utah, for a tent site with electric plugs and water, it’s $50 a night. You do get a safe location to park, along with wi-fi, showers, and coin laundry at every KOA. For the peace of mind and convenience, it’s worth the price for me! Other not as popular locations, or tent sites without electric can be as low as $30 a night.
If you are budget-conscious as we are, we researched another option. Sure KOAs are great, but we wanted to see how affordable we could go. And that’s when we came across Pilot/Traveling J and Love’s.
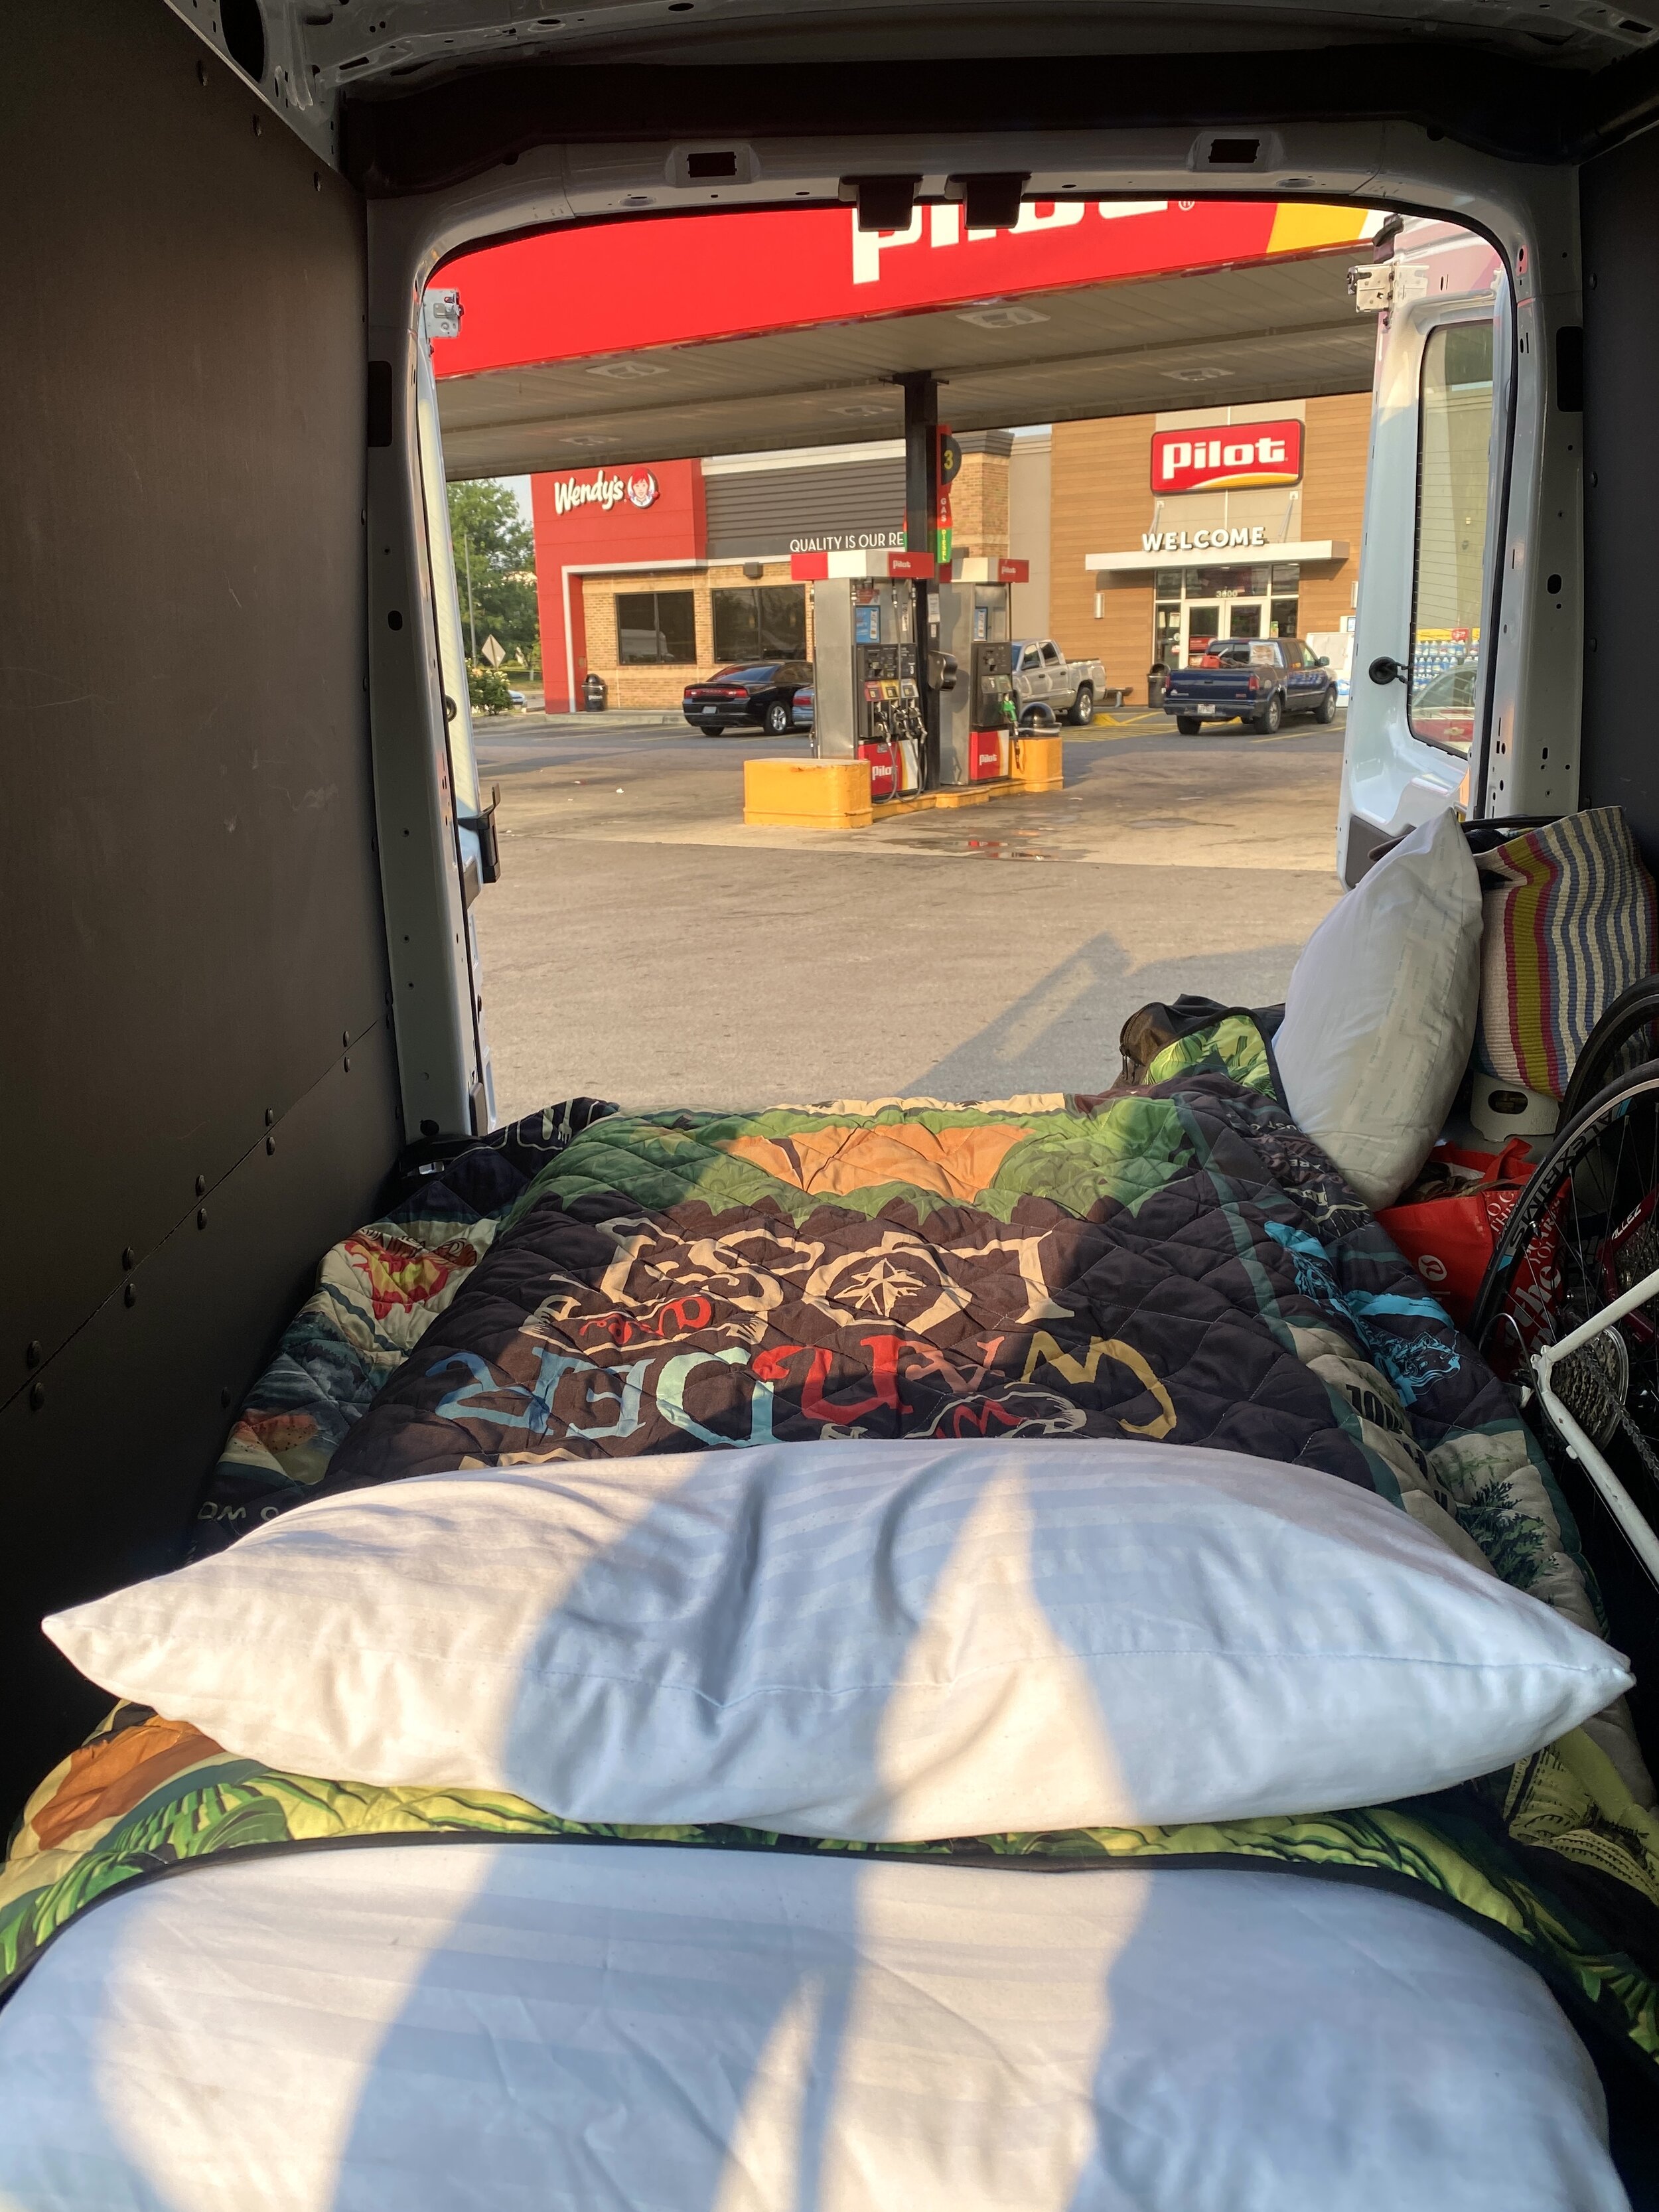
Like I mentioned, van life isn’t always Instagram-worthy, but it sure is great being on the go and saving money. Here’s one of the Pilots we stayed at.
Showers on the Road
Most people know van lifers park in Walmart parking lots overnight for a free stay, but the real gem is a Pilot, Traveling J, or Love’s traveling center. As much as I can go without a shower when on the road or on a camping trip, two weeks might be pushing my limit.
These three companies are all essentially the same: a 24-hour gas station for truckers that provides free restrooms, showers for $13-$15, and overnight parking.
The showers are extremely clean and private. One of the best parts is that it isn’t timed, and they even provide towels (though we used our own). To save even more, you can share a shower if you’re traveling with someone. One person hops in, then on the way out, you can pop in. It’s an easy way to turn a $13 shower into $6.50!
Pro tip: Download the Pilot/Traveling J app for rewards.
Costs not included: Food and Gas
The only costs not included above were food and gas. Gas prices vary based on your trip and time of year. For example, our two-week road trip to Montana last summer included wildly lower gas prices than this trip. In several places along the way we paid $4/gallon. Food can be done in a budget-friendly manner and can look like peanut butter and jelly sandwiches everyday for lunch.
We knew we’d be moving quickly between national parks in Colorado and Utah, so we didn’t always cook our own food. Food is where we splurged to try new coffee shops or the local eateries. A big money-saver is a quick Walmart trip for basics. We bring our own kitchenware, grill, and propane tank, which helps too!
The van life isn’t always glamorous, but with our budget-friendly tips, hopefully it can be accessible for everyone who wants to give it a go. Would you try it out? Do you have any questions on how to start traveling in a van?
7 Lessons I’ve Learned Road-Tripping Across the U.S.
Here’s what I’ve learned from road-tripping across the U.S.
1. Things will go wrong with…
I absolutely love travel. Maybe it’s because my parents prioritized it when I was a kid –whether it was a trip to Disney World or my dad taking us through the woods off the sidewalk path in local parks. Regardless, I love exploring new places.
I especially love being in a foreign place. A language I don’t understand, food I don’t know how to pinpoint the ingredients for, and people who look differently than I do. When it came to traveling, I often flew to new places that were walkable because I didn’t have a car myself. When I purchased my first car after graduating college, I packed up my belongings and set off on a drive from Dallas to Massachusetts with my dad.

My dad and I’s first stop on our road trip up to MA: Hot Springs National Park in Arkansas. This overlook hike is a must on your visit!
The drive itself takes a little over a day, but we split it up over a few days, staying in national parks along the way. Since then, I’ve ridden an Amtrak train from Denver back to Massachusetts, driven all around New England, and made my way around the U.S. on three longer road trips (to Missouri, Georgia, and Montana).
In all those hours spent in the car and the days spent on the road, I’ve learned a lot about preparing for a trip.

A trail view from Voyageurs National Park in Minnesota on the return home from our road trip last summer.
Here’s what I’ve learned from road-tripping across the U.S.
1. Things will go wrong with the perfect itinerary.
Anyone who knows me knows I’m a big planner. I use a color-coded Google sheet with multiple tabs varying from transportation, to housing addresses to packing lists, and sights to see. I love knowing I’ll see most of what a place has to offer by planning in advance.
However, there are things you can’t plan for. You can’t plan for forest fires to bring smoke to mountain ranges from the state over. You can’t plan for your pre-made food to go bad because the outside heat melted your ice sooner than expected. Since then I’ve learned to not pre-make several servings of mac and cheese to save time later since we ended up throwing it away.
Tip: Make a list of your non-negotiables, meaning the things you must do or places you absolutely must see. If you want to see the Mesa Arch in Canyonlands at sunrise and it’s an absolute dream of yours, then make that a priority. Maybe skip another attraction, or grab breakfast instead of cooking it if you’re short on time. Take out something in your “nice to do” bucket to ensure you fill up your “must do” bucket.

A year and a half ago, our flights to Kansas City were canceled due to the weather in Boston. We rented a car and turned the Conference Championship game into a road trip. A perfect example of how we couldn’t stick to the itinerary, yet it turned out to be an amazing weekend. We were even able to make it to Cuyahoga Falls in Ohio and the Gateway Arch in St. Louis since we drove!
2. Always add two hours to your estimated time of arrival on your GPS.
You can’t plan for NY/NJ traffic to add two hours to your drive. Okay, maybe you can because it always feels like driving through this area adds so much time.
This is just one example of something that’s gone “wrong” on my trips in the past, or not according to plan. I’ve learned to add about two hours to the GPS. You don’t realize how much time you actually spend getting gas, buying an extra snack, and using the restroom even though you thought it’d be a quick minute to use the bathroom.
3. When planning, add in filler time. Or be okay with taking a detour.
Since we’re on the topic of time and planning, it’s important to add in time for the unexpected. On one of our trips, we were driving through South Dakota and saw sign after sign for a place called Wall Drug. The signs were such a hoot, we detoured and stopped by this tiny little western town. It ended up being one of the highlights of our drive through South Dakota! Had we not planned for additional time to get to the Badlands, we would’ve felt a need to stick to the road. Thus, missing this cool little spot.

When we made it to the Gateway Arch, our only plan was to view it from the exterior, take a few pictures, and continue our drive to Kansas City. We decided to take a detour, head inside, and book the last tour of the night. The tour took us up to the top of the Gateway Arch for this incredible view for sunset and back down in forty-five minutes. Totally worth it.
4. Double check your bookings a week before your trip. Or at the very least, the night before.
You may have planned to hit the road at 10 AM as soon as you pick up the rental car. That’s part of your itinerary, so it only makes sense. That is, until, you arrive at the rental company and they tell you you booked your car for the day before and since you didn’t pick it up, they rented it out to someone else.
Turns out, you aren’t leaving at 10 AM as you planned. This could have been easily avoided if I checked with the rental company a few days earlier to confirm the dates, or reviewed the booking email confirmation. This also goes for any boat tours or planned excursions you have, along with any campgrounds you reserved. Last summer I mixed up the dates more than once, which left us car camping under the stars in the Tetons (not mad about it), but it meant our KOA campsite in Yellowstone was given to someone else so we didn’t have a home base in Yellowstone.

Here’s the view from our campsite in Yellowstone, overlooking Yellowstone Lake. Not the worst way for plans to go when you mess up reservations.
5. If you’re using a rental car, get the insurance.
Everyone tells you this and you never listen. And when I mean you, I mean me. Almost everyone I have talked to about road trips says nine times out of ten, their rental car was fine. However, there’s always that one time. Ask anyone who travels on the road and they’ll tell you the trouble they had with their car or the animal encounter they had that no one wished for.
This goes back to earlier where I mentioned you probably won’t remember paying for things you forgot to bring. You won’t look back on your road trip thinking how much money you wasted on insurance. I add in the insurance when budgeting so that I don’t get overwhelmed when it comes to the total cost of a rental.
Tip: Book your rental in advance. If possible, pay upfront so your rental is reserved if you’re late and the cost is often cheaper. I use websites like Priceline to find the cheapest option. I also always double check for two things: 1) unlimited mileage (almost all rentals are, but vans/RVs often charge over 100 miles/day) and 2) restrictions.
More on restrictions - In Maui, most rental car companies don’t cover you if you drive a specific part of the Road to Hana. On a map, that part of the road looks like it saves you a great deal of time, but the conditions aren’t ideally suitable for driving.
On the Big Island, companies also don’t cover your drive to the summit of Mauna Kea. Always read the fine print or simply ask the representative which roads or attractions may be off limits to not lead to financial issues later.
6. You will forget things. Just buy it along the way!
I used to get so stressed about forgetting something, as if there wasn’t a store along the way at some point to pick it up. In the grand scheme of your road trip, one purchase of q-tips won’t break your budget, and you surely won’t remember spending the money on it in the long run.

My very first road trip with my dad across Texas heading toward Big Bend National Park back in 2016. It’s safe to say I’ve been enjoying these drives for quite some time.
7. Embrace life on the road.
What initially was frustrating about mixing up dates and losing out on a campground in Yellowstone led to us finding out that each day Yellowstone offers first come first serve campsites. Had we had our original campground, we never would have landed a campsite directly across Yellowstone Lake, waking up to neighbors like elk casually walking past our tent.
Tip: Talk to locals or park rangers when visiting somewhere new. We pulled over to ask a ranger about campsites to snag the one I mentioned above.
These are just a handful of the lessons I’ve picked up driving across this beautiful country, and I’m sure there are plenty more for me to learn.
What lessons have you learned while traveling? Would you add any to this list?

The Best Way to See the New River Gorge Bridge in West Virginia
The absolute best way to see the New River Gorge Bridge is by walking across it. No, not walking on the road where cars are driving past. Rather, walking directly beneath those cars…

If you peer closely, you can see the catwalk directly under the road.
At the end of 2020, the New River Gorge in beautiful West Virginia was designated a national park, making it America’s 63rd national park. One of the highlights of the New River Gorge is the bridge.
Through the construction of this bridge, the commute between the mountains of West Virginia was cut down from forty minutes to one. The access this bridge provides to the locals is immense, and I love that a visit to this park includes driving across it each time.
This bridge, at the time of its creation, was the longest, steel single-span arch bridge in the world. Today, it’s the fourth. It is 3,030 feet long and 876 feet above the rapids below it. It’s taller than the Space Needle in Seattle and the Gateway Arch in St. Louis. It comes just shy of the Eiffel Tower and the Empire State Building.
While you can access these other impressive monuments and buildings by elevator or a long walk up, there is something quite unique about the New River Gorge Bridge that you simply cannot do anywhere else.

The absolute best way to see the New River Gorge Bridge is by walking across it. No, not walking on the road where cars are driving past. Rather, walking directly beneath those cars. I highly recommend a bridge walk when you visit the New River Gorge National Park. You can book a bridge walk here.
The walk is guided and costs $72 with tax. It’s completely worth it. What I also love about this guided tour is that it’s accessible. Everyone can enjoy this experience!

The catwalk is quite wide with railing alongside the entirety of the walk.
Here are a few tips for how to best enjoy your experience walking across one of the coolest bridges you’ll ever explore:
1. Book your tour in the evening – choose the 5pm time slot! The lighting is best and you may catch a glimpse of the sunset, depending on what time of year you go. West Virginia can also get hot, so it’s a great idea to avoid the midday heat if possible.

As we headed off the bridge, we watched the sun set behind the West Virginia mountains.
2. Secure your phone. This sounds obvious, and the Bridge Walk store even sells phone cases to fasten your phone around your neck for $5, but take this seriously. About 5 minutes into our walk, after we were already strapped in, a woman behind me dropped her phone. Casually down 876 feet.
You can bet I held onto my Nikon and iPhone a little tighter the rest of the way.
3. Only take what you need. You will be locked in on a harness for a couple hours, so all you need to have on you is whatever device you’d like to take photos with and remember to wear closed toe shoes.

4. Sit down along the catwalk.
The entirety of the bridge walk is spent walking 3,000 feet across the bridge. How neat is it that you can sit and dangle your feet from this incredible bridge? When your guide allows (usually once you’ve hit the halfway point to be fully above the river), take a seat!

The bridge walk was such a neat experience that is unlike any other national park adventure!
Are you adding a bridge walk to your New River Gorge itinerary? Let me know if you do!

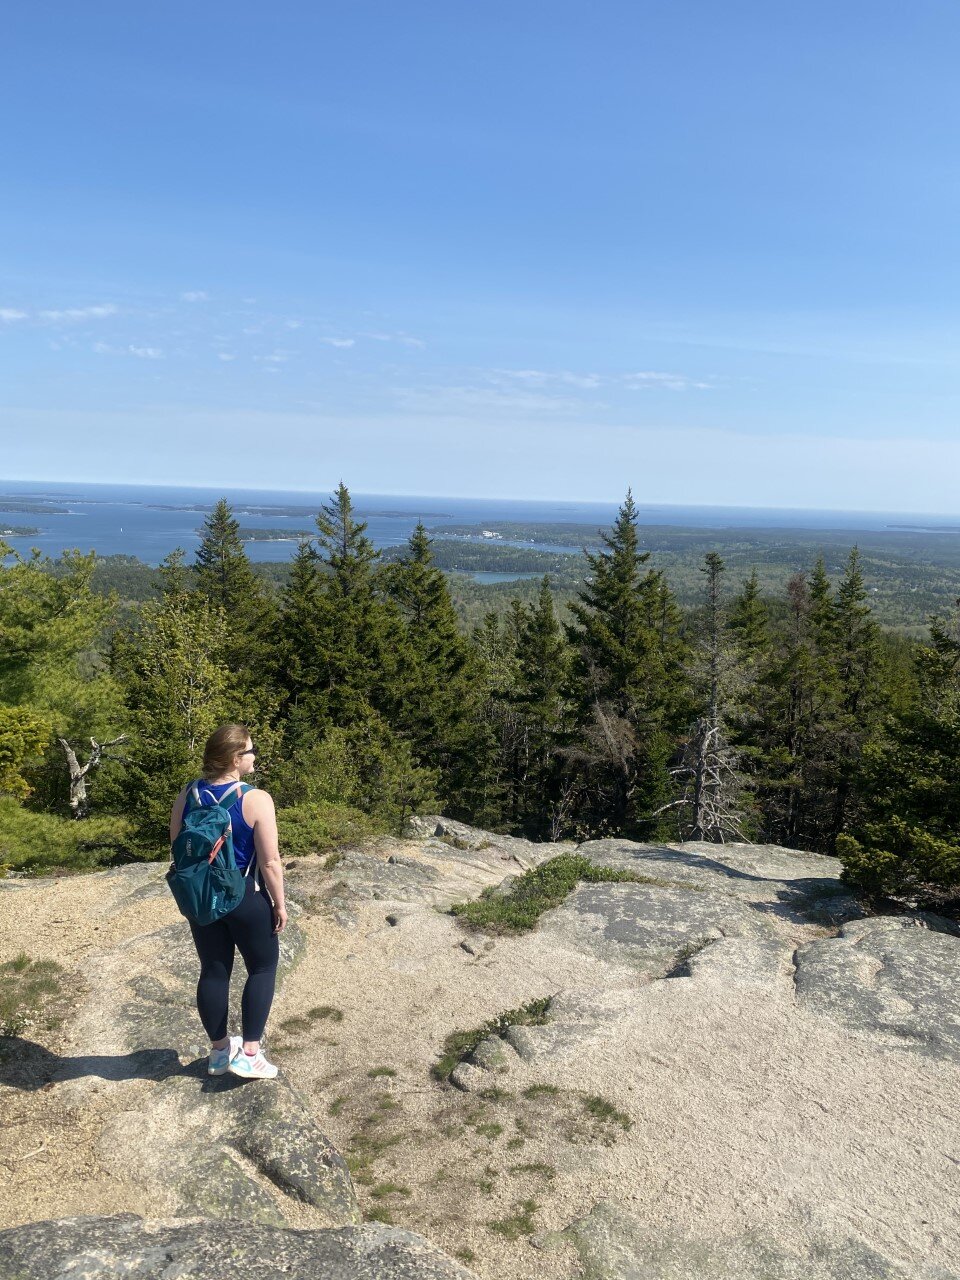
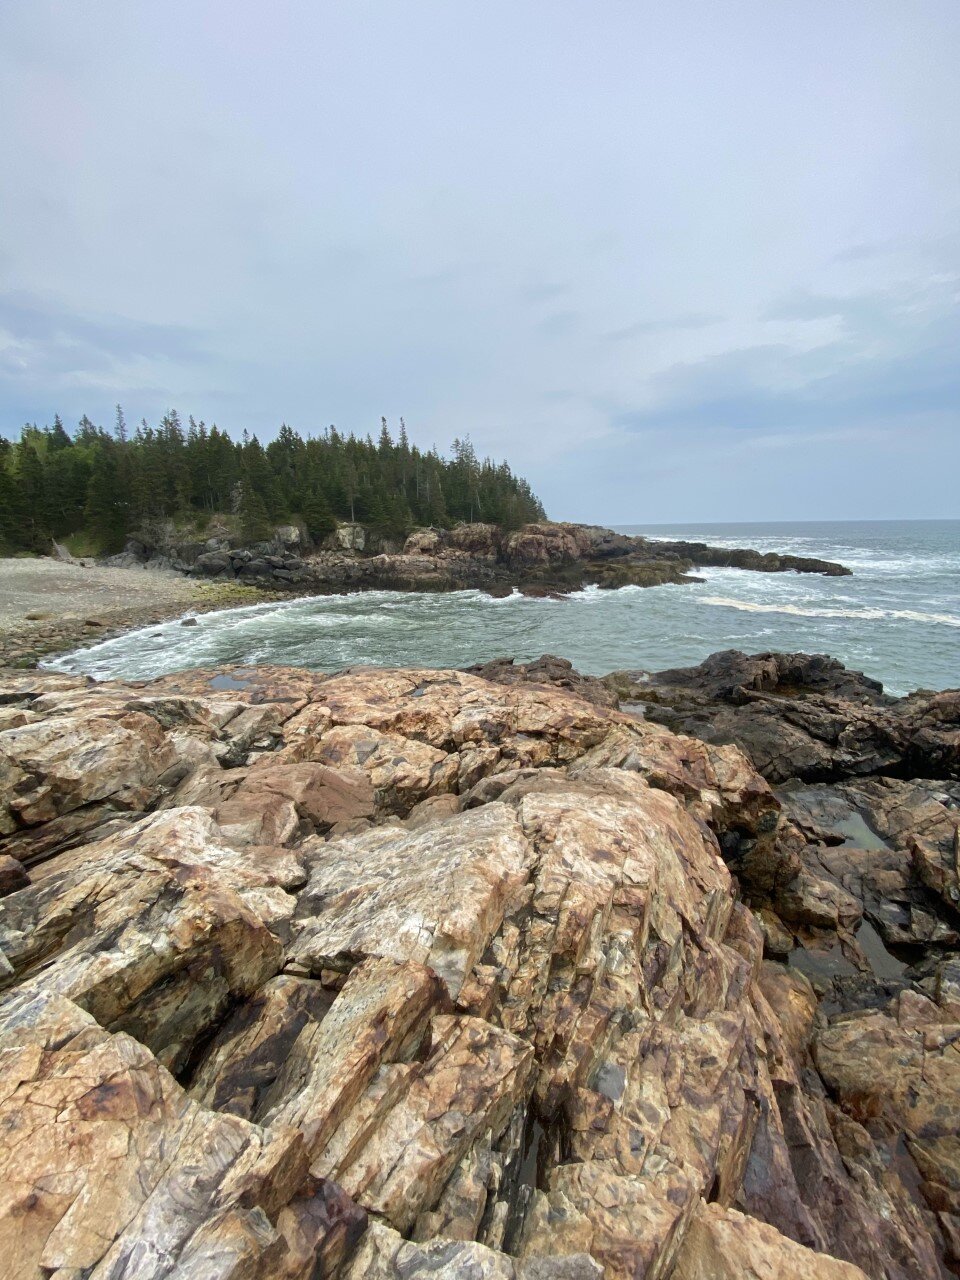
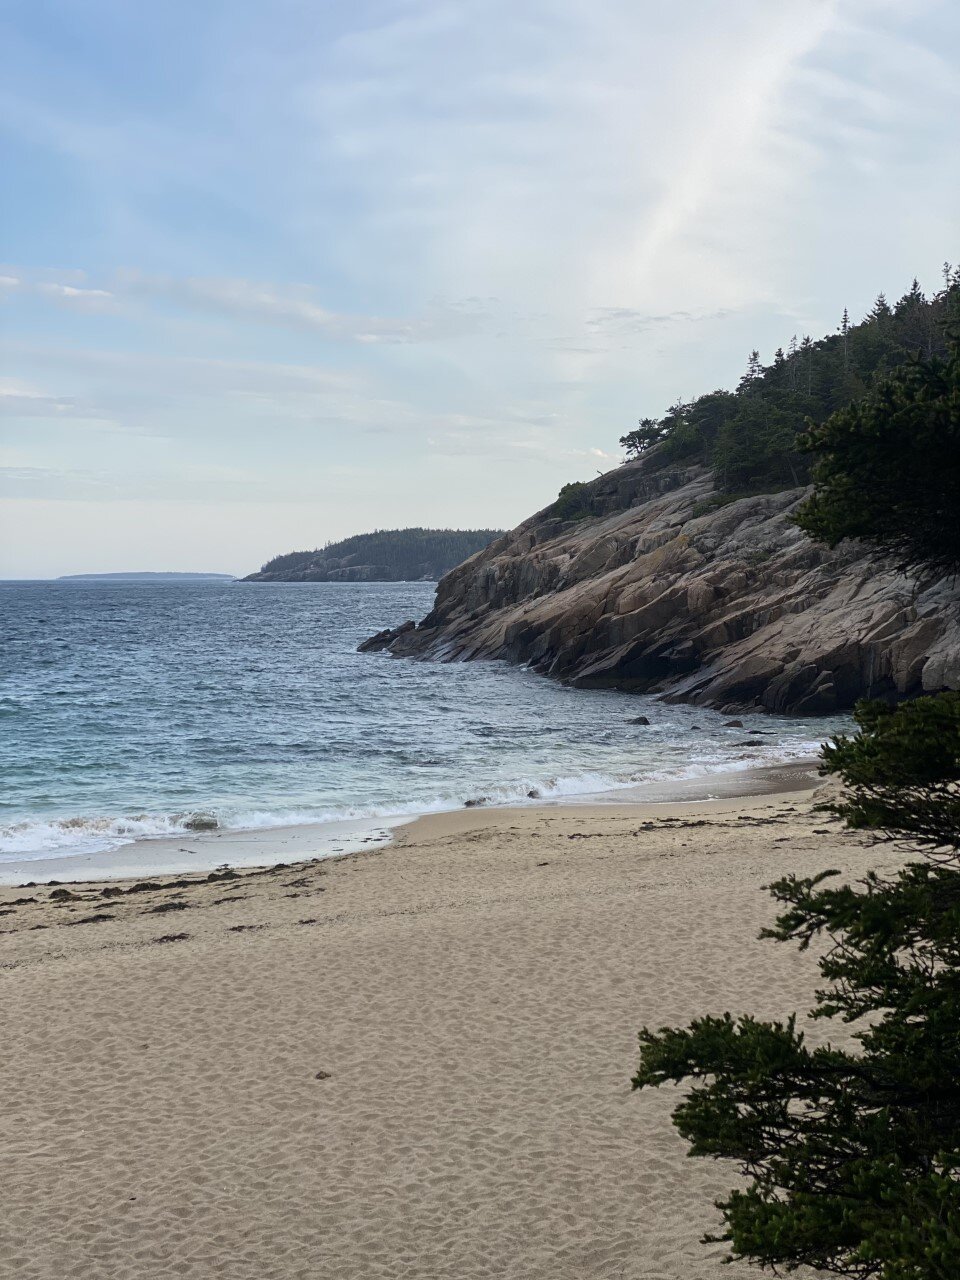
Everything You Need to See in Acadia National Park, Maine
Here’s everything you need to see and do in a weekend in Maine’s (and really, the Northeast’s) gem:
Ah, Acadia National Park — where the mountains meet the ocean. Truly, the best of both worlds.
Five years ago, I told myself I’d never run another half marathon unless it was somewhere scenic. It’s not too much to ask for to need great views when you’re running for more than two hours, right? As a result, when I came across a race in Acadia National Park, I thought to myself, this is exactly the place I would run a long race in. And so, I signed up.

I camped with a few friends on park grounds, spent the night gazing at the stars on rocks with the Atlantic breeze chilling my face. I rose the next day, ran for what felt like forever (turns out it’s a hilly course), and experienced Acadia for a brief moment.
Fast forward five years and it felt like time to revisit this spot. We stayed at a KOA (my go-to stay spot for adventures) minutes from Bar Harbor and the park. My first visit, despite running so many miles through the park, didn’t really result in me truly experiencing the park. This time around, we had an agenda full of Acadia adventures to enjoy.
New Englanders are at a slight disadvantage with the National Park system with Acadia being the only national park in the area, but a major advantage is that it’s within driving distance! For us in Western Mass, this drive is about five hours. Not rough at all considering the Adirondacks are a little over a four hour drive and I consider that a day trip sometimes.
If you find yourself looking for local adventure, or wanting to experience the beauty of coastal Maine, Acadia should move up to the top of your travel list.
Here’s everything you need to see and do in a weekend in Maine’s (and really, the Northeast’s) gem:
Hikes

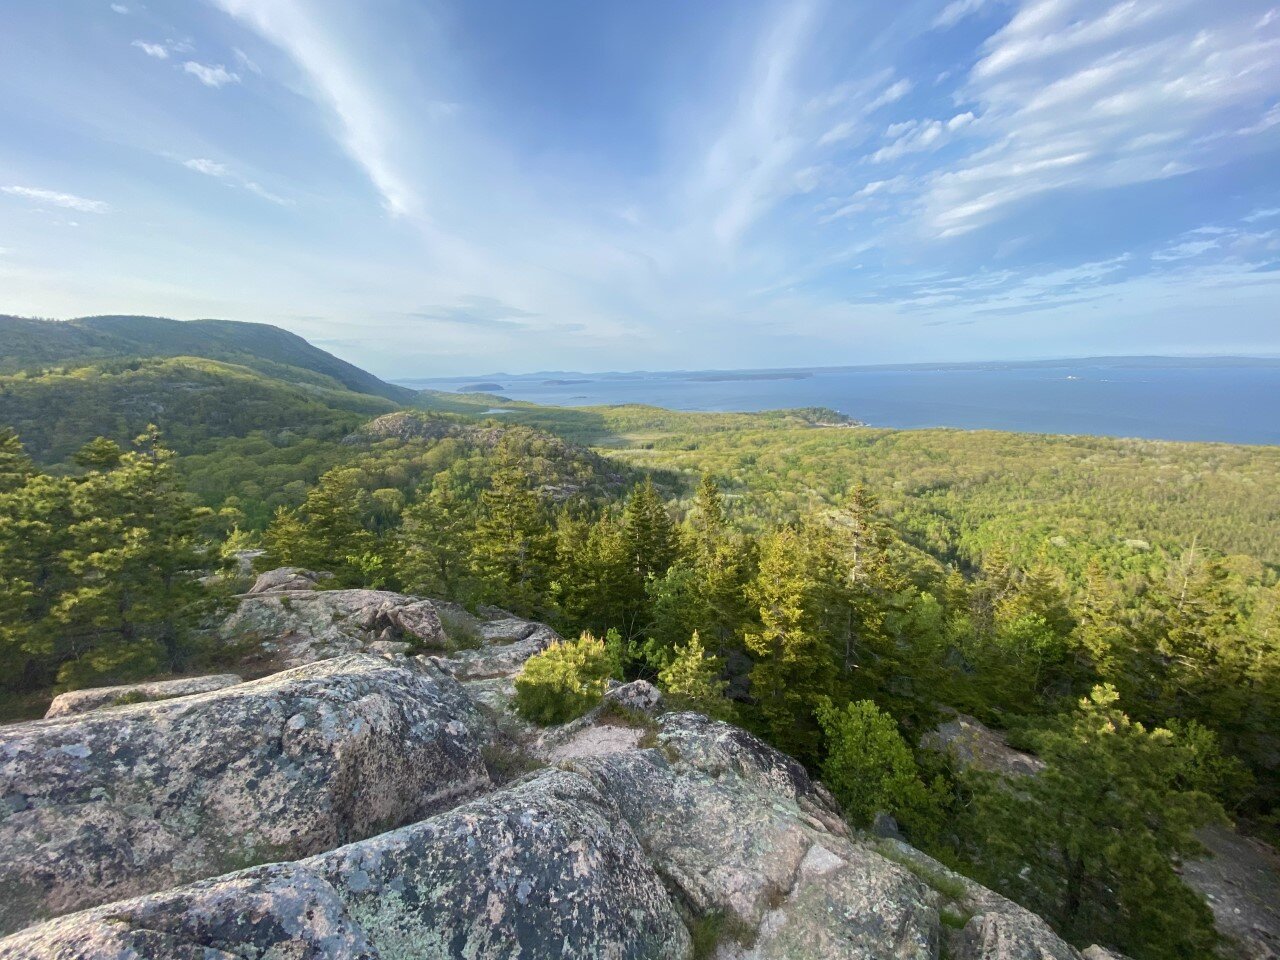
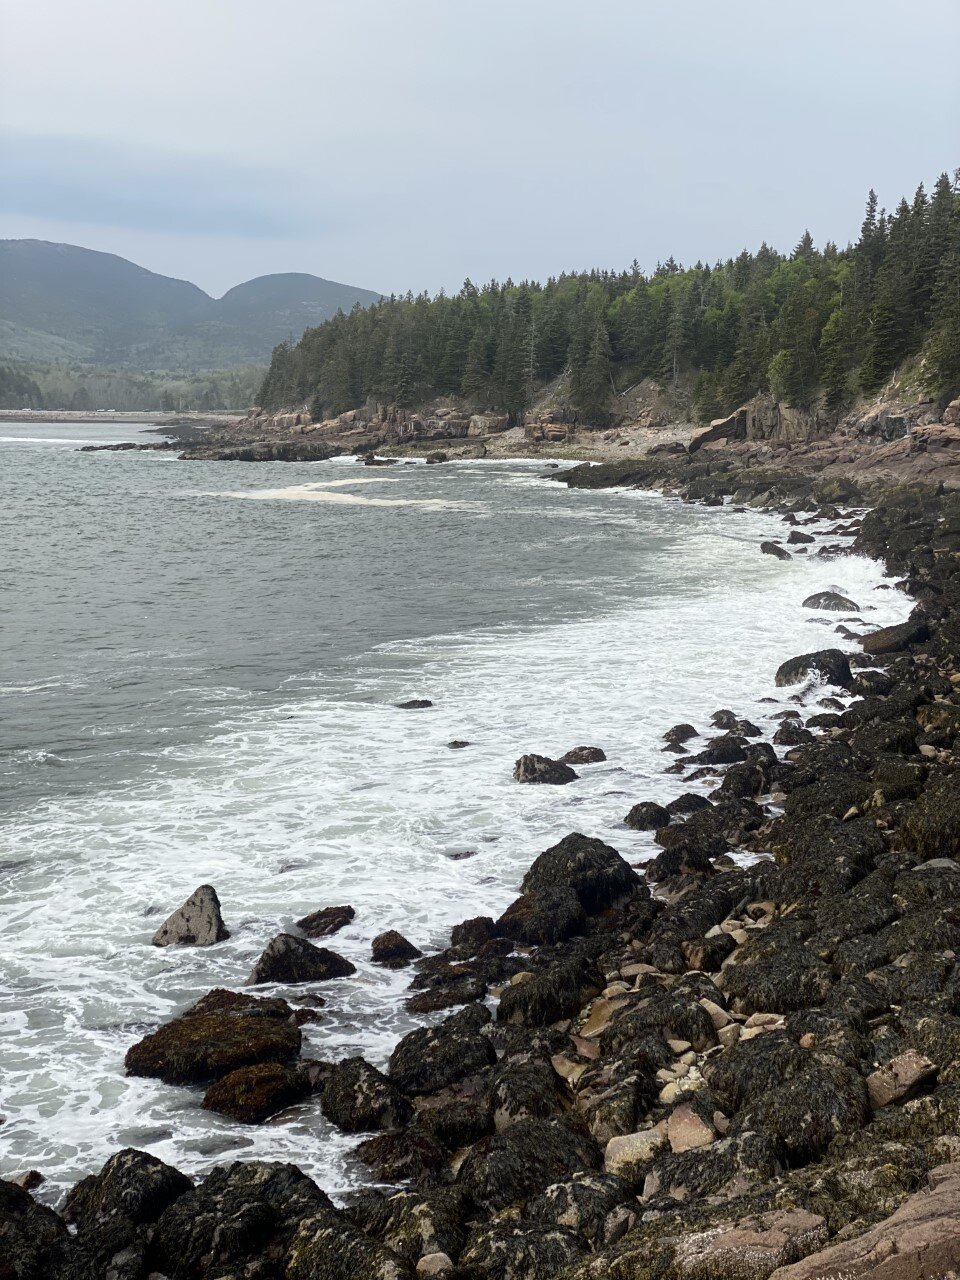
Beech Mountain
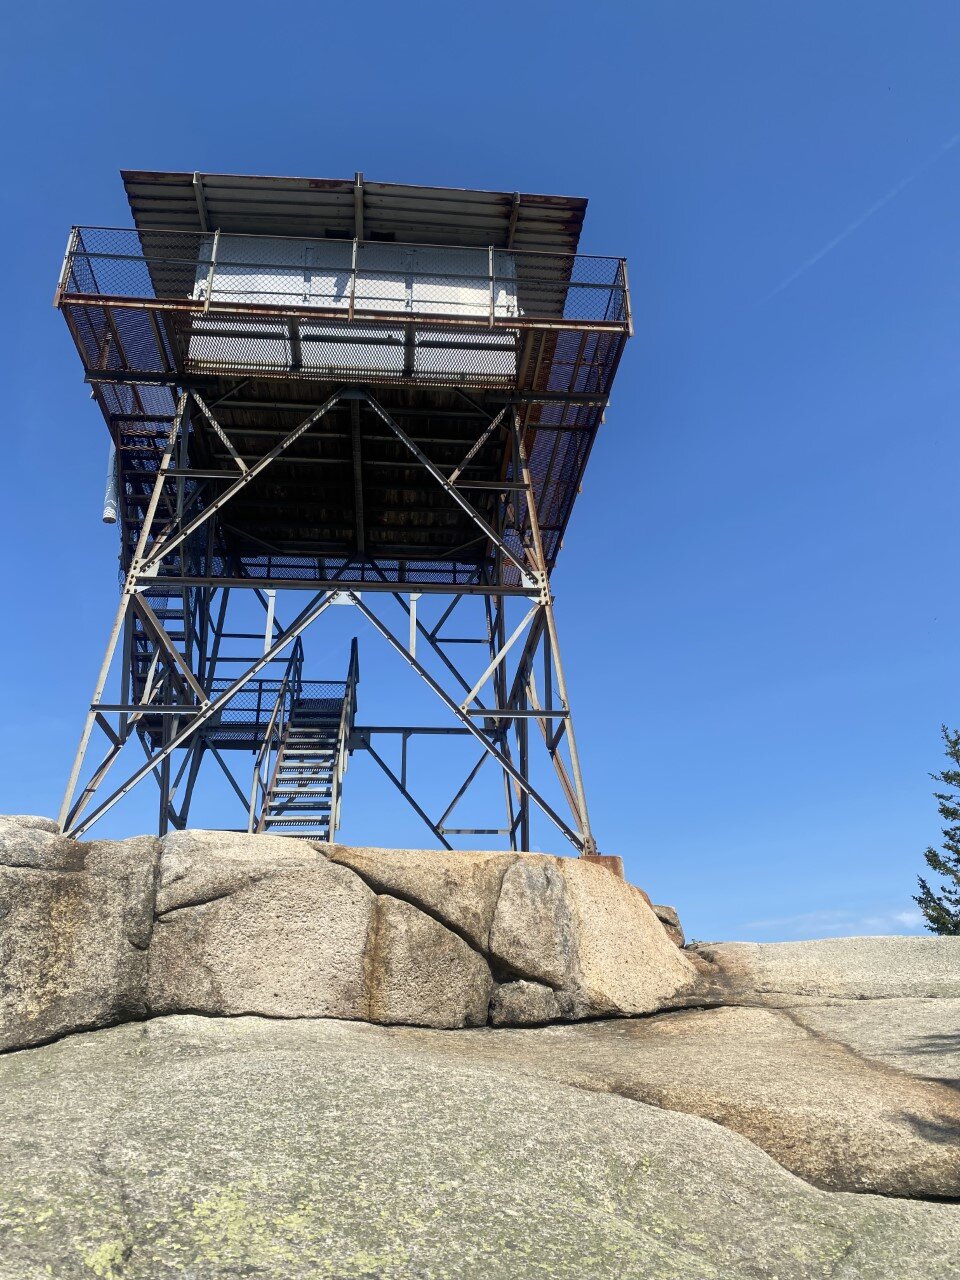
A short, somewhat rocky hike up to a fire tower with stunning views of Echo Lake and nearby peaks. The total hike is a little over a mile. I suggest hiking clockwise for the best views on this loop (along the .4 mi of the trail). You can make it about halfway up the fire tower for a better birds-eye-view. On your way down on the loop, the views get even better. I highly recommend this hike in the afternoon on a sunny day. It’s dog-friendly as well!

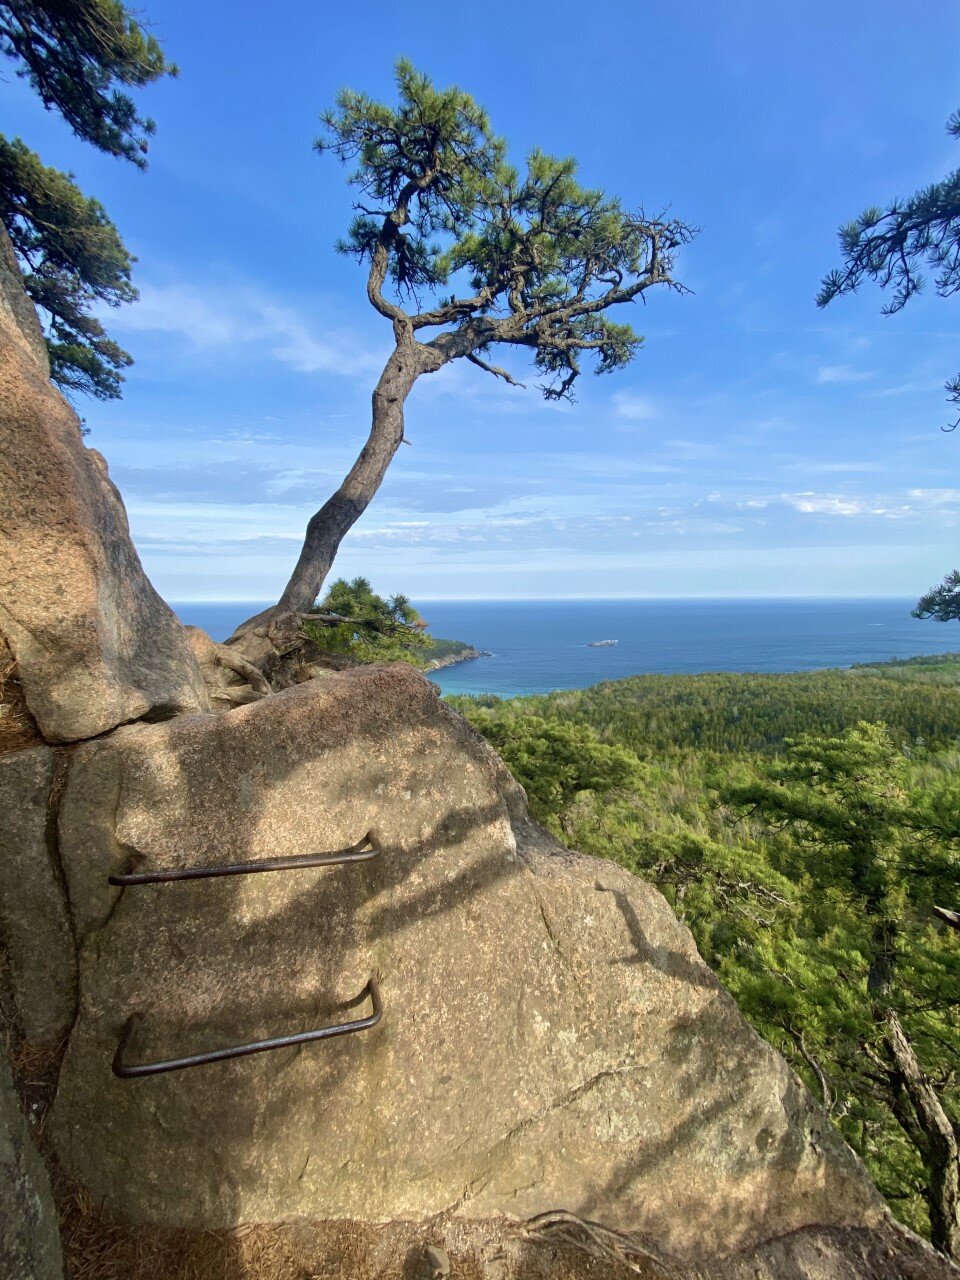
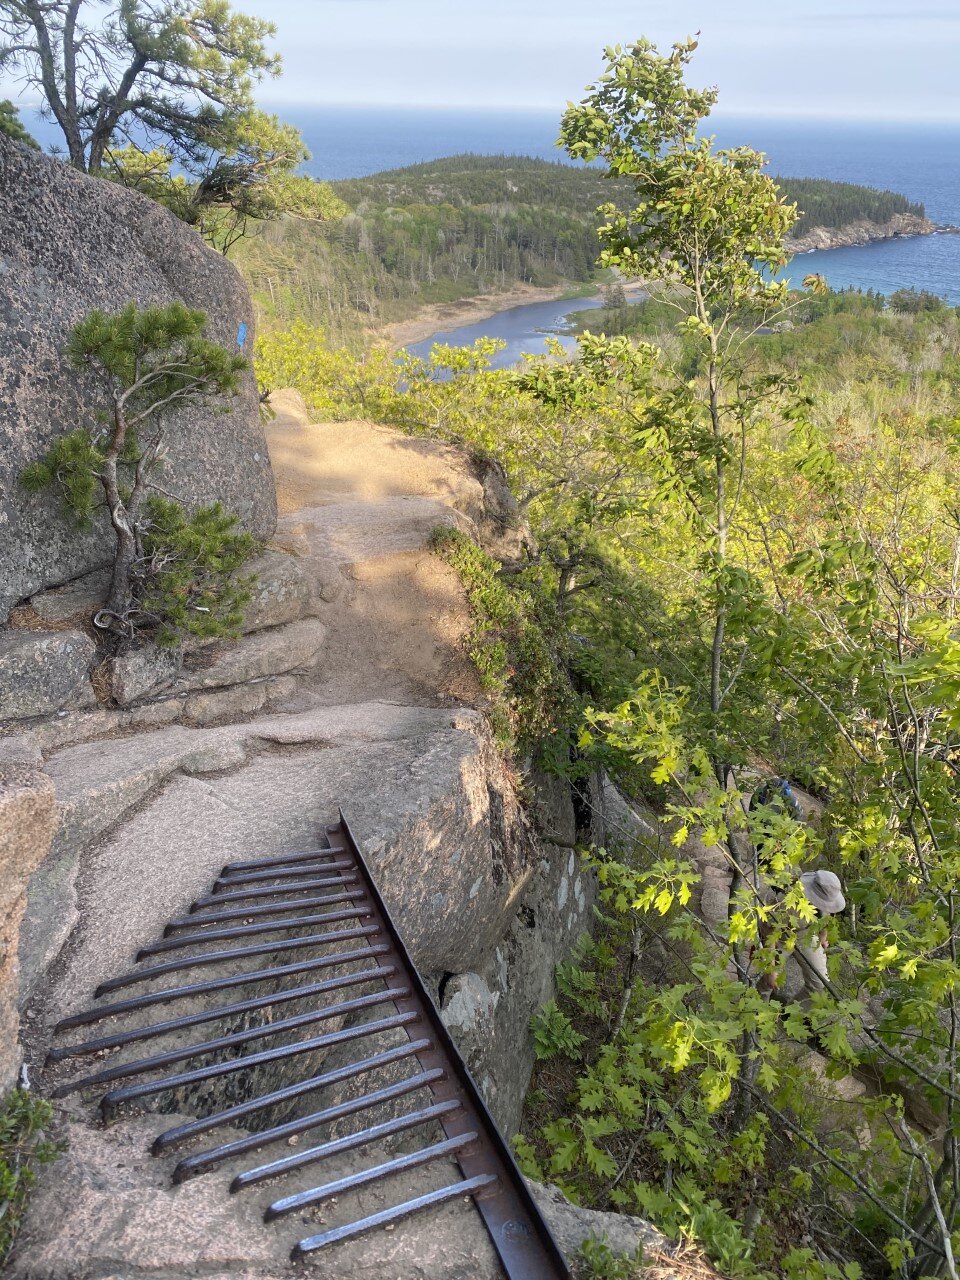
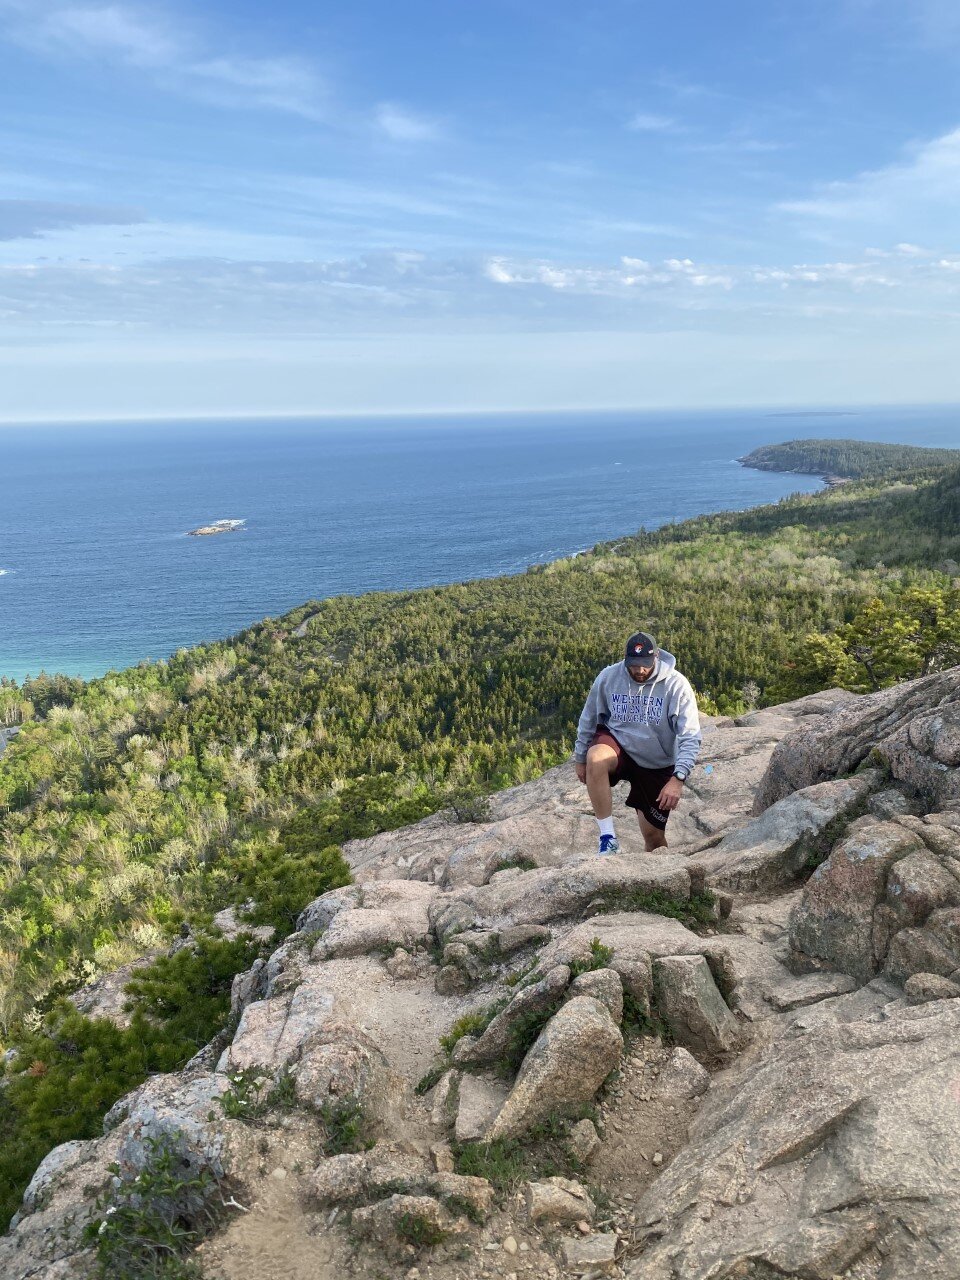
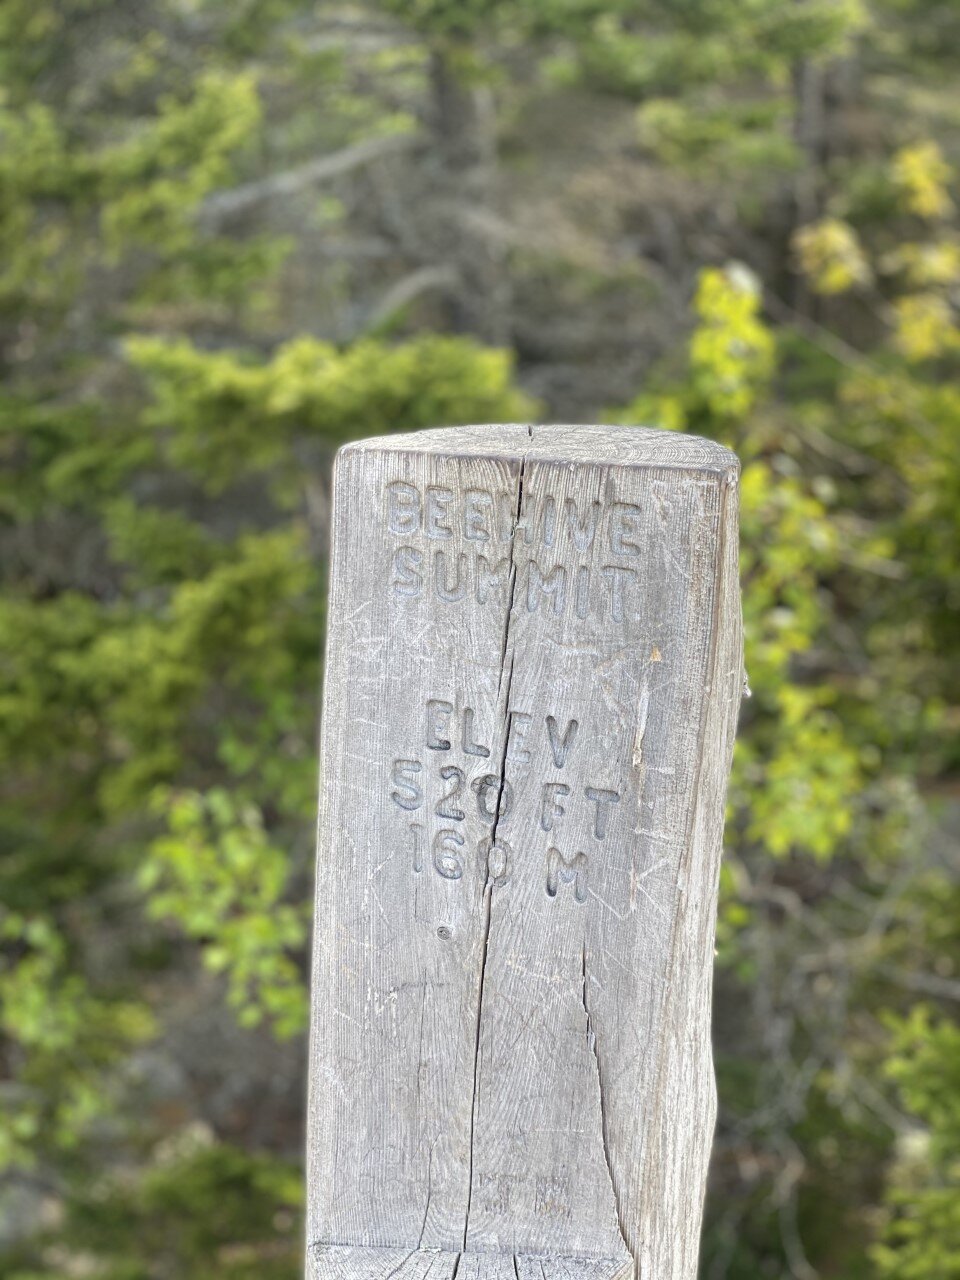
Beehive Mountain
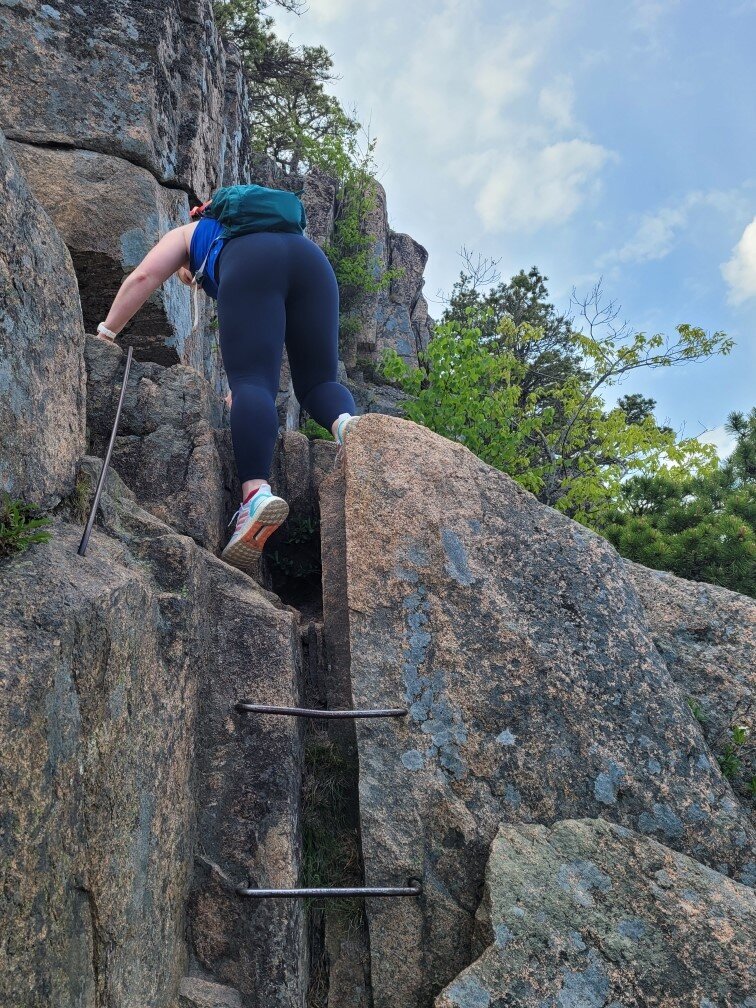
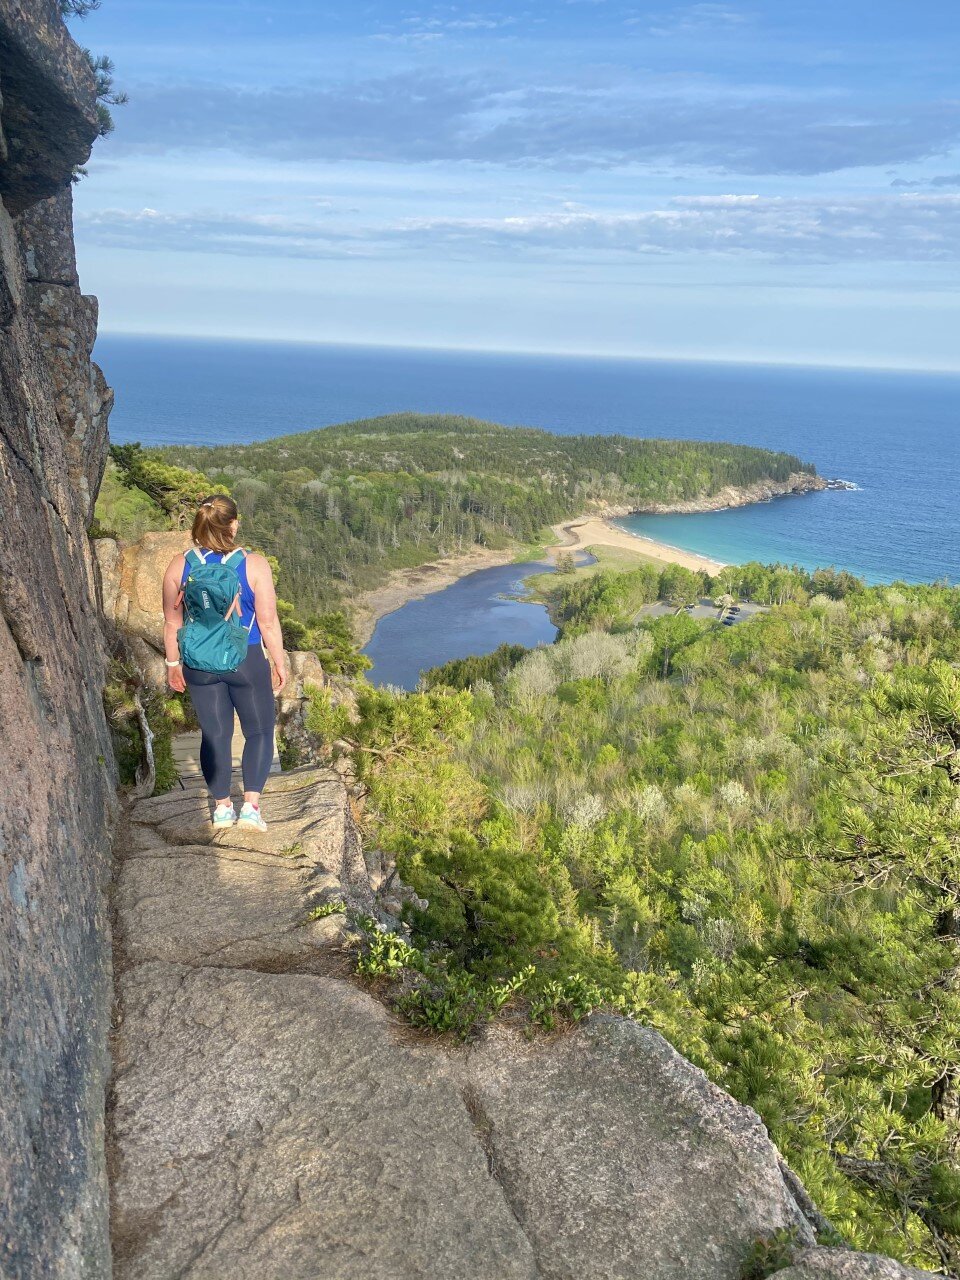
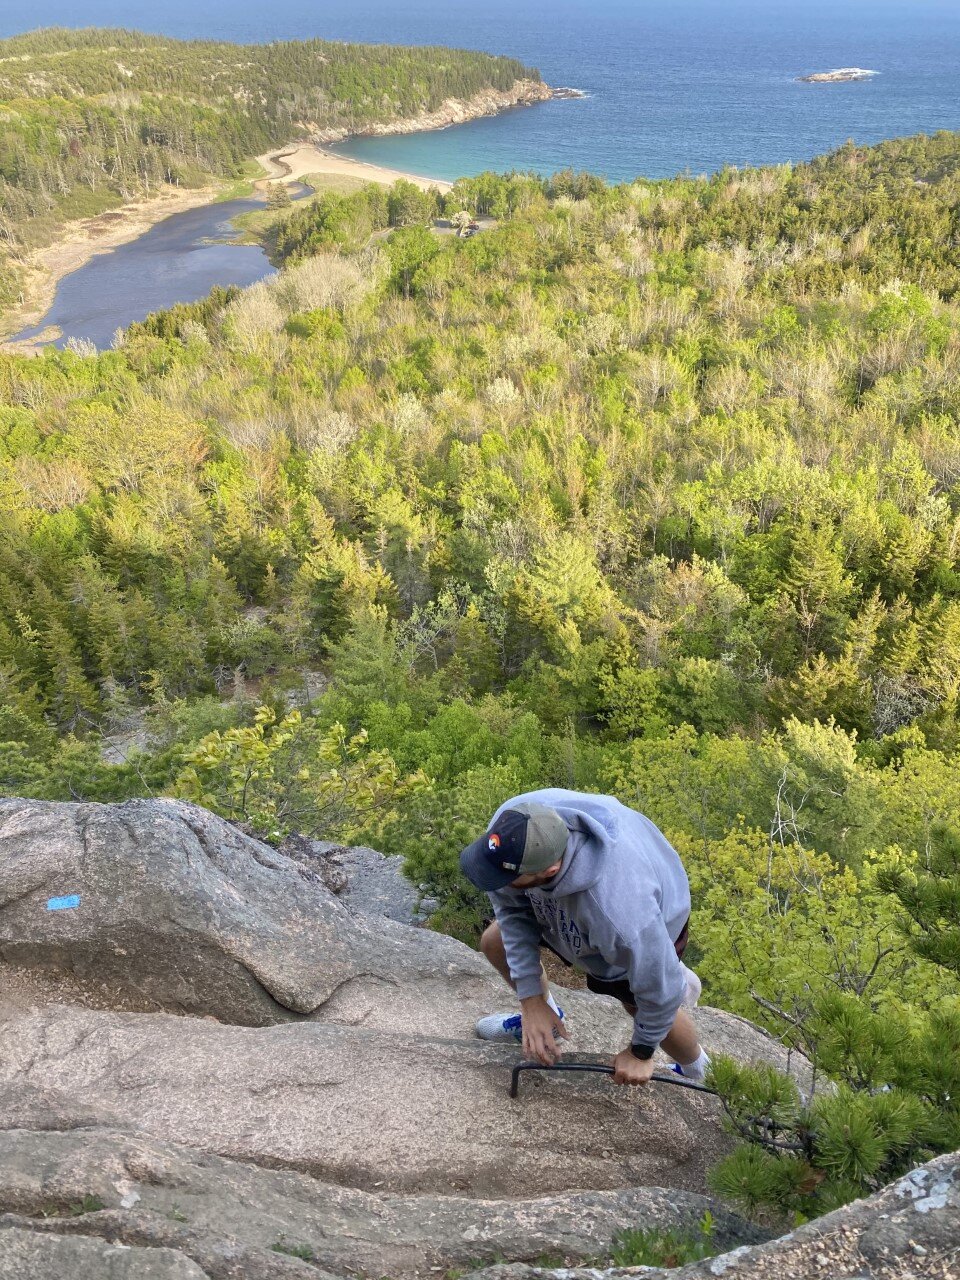
The Beehive trail has been at the top of list. I hike often, so anytime there is a little diversity in the type of terrain or trail, I jump at the opportunity to climb it. Beehive is particularly unique because of its steep incline involving rungs. I soaked it all in. One moment you’re walking along a rocky, dirt path staring up at the summit, and the next you’re climbing up rungs with your hands and gazing at the ocean and sandy beach below. Again, I’m a big fan of intriguing trails.
If you’re afraid of heights, I’d take this trail slow. It’s totally doable for all ages and completely worth it. Once you soak up the beach views, head up to the summit and immerse yourself in Norwegian-like greenery and islands. I felt like I was somewhere far away, a feeling I solemn get in New England, or the U.S. for that matter.
Precipice Trail
This trail sounds epic. More rungs, more incline, more steep drops - it’s my kind of adventure. You climb about 1,000 feet in under a mile. Unfortunately, both of my visits to Acadia have been in May and June, which is prime time for peregrine falcon nesting. This trail is often closed during late spring to summer for this reason. All the more reason for me to visit Acadia again one day in autumn!
Experiences:
View sunset at Bass Harbor Head Lighthouse.
Arrive an hour early to get a scenic spot on the rocks. Parking here is also limited. Bring a rain jacket as the waves enjoy crashing the rocks, thereby soaking you by default. Watch as the colors in the sky unfold before your eyes in vibrant orange and red hues.

Drive the 27-mile Park Loop road.
Stop along the way for hidden gems and solitude in spots like the ones below.

Watch the U.S.’s first sunrise at Cadillac Mountain. You need reservations for the busy summer months due to limited parking, so you’ll need to book a vehicle reservation to snag one of these coveted spots. If you’ve worked up an appetite since you woke up before 4 AM for this experience, head into Bar Harbor for breakfast at Jeannie’s Great Maine Breakfast. Always get a grilled blueberry muffin. Especially when in Maine.


Is Acadia on your list of places to explore? What are you most excited to see or do?

Two Best Ways to Experience Haleakalā National Park
1. Drive up Crater Road for sunset…

My 31st National Park!
I have had dreams of visiting this park for years, but was too afraid to island hop solo four years ago when I was last on Oahu. This time, with friends in tow, I would make it to see this dormant volcano. And better yet, I’d find unique ways to explore what it has to offer. With that, here are the two best ways to see Maui’s only national park, Haleakalā:
1. Drive up Crater Road for sunset.
On a clear day, if possible, drive up Crater Road. The drive alone takes you through a variety of trees and landscapes. As you make your way up the winding road, you’ll want to stop and take in the clouds. Soon enough, you’re above the clouds – an experience most of us only take part in on an airplane, not actually outdoors.

The beautiful above-the-clouds drive up Summit Road.
I had only been in the clouds once before on my trek on the Inca trail, so this was a refreshing delight. There are a handful of pull-in spots to step out safely and take a picture at an overlook.

Take advantage of all the lookout points like these.
If you are pressed for time, make your way to the summit parking lot to not miss the sunset. Once you park, head up a very short (and I mean, short) path to the viewing points of the crater. The trail we hopped onto is the Keonehe’ehe’e Trailhead, which takes you into the crater (also referred to as the Sliding Sands trail).

This isn’t what I often picture Hawaii as at all and I loved every moment of it.
You’ll stay on the trail for .1 miles and a remarkable view of the dormant volcano greets you suddenly. At this viewpoint, you have the volcano on one side, and on the other, a stunning sunset above the clouds.
Watching the sun disappear into the clouds at the summit of Haleakalā.
The road to the Haleakalā Observatory is closed, but you can make the half mile or so trek to the top. I initially wanted to do this, but my friend suggested we stay where we were and wow was I glad she said that. We had a kaleidoscope of colors setting on the crater as we turned around and watched as the clouds consumed the sunset. Had we of watched sunset from the observatory, we would have missed the crater views.

Above is the short hike up to the Observatory since the road is blocked off to car access.
2. Reserve a bike tour to cycle down from the park.
When I found out you could bike downhill from Haleakalā, I was sold. I reached out to Bike Maui via email and they were extremely helpful in assisting me in picking the right ride. They offer so many – from sunrise rides to self-guided. I booked the morning self-guided tour, which started off at 9 AM at their location near the park.

The same Summit Road, but immersed in the clouds.
Our incredible tour guide, Kimo, drove us to our drop-off location just outside the park. He provided great commentary and humor along the way, and mapped out our ride for us back to the bike shop.

He also had a keen eye for photography, and took this silly shot for us.
I would highly recommend Bike Maui for your tour company! The equipment was clean and comfortable and the staff was extremely friendly and helpful.
We biked down some of the winding road we had just driven up the previous night for sunset, and stopped along the way for some scenic vistas. The ride overall was comfortable, beautiful, and quick. My Garmin logged the ride at 22 miles with a gain of 236 ft. The entire experience took 5-6 hours with the set-up and drive time with the guided tour on the way. The ride down is entirely up to you and your speed, but it is also almost entirely downhill, so there’s no way it’ll take you hours. All in all, an awesome way to experience Haleakalā aside from seeing it at sunset.

Our ride took us under the clouds and through more of the beauty this park has to offer.

Three Must Visit Lakes in the Grand Tetons
When we first planned out our trip to Grand Teton National Park, I was stoked to find out there were several short hikes. From taking a gander at Jenny Lake, to short walks, you are bound to enjoy your time in the Tetons no matter how you spend your time.
The best part? The Tetons also have an incredible bike path (very few national parks do) that takes you from Jackson Hole into and throughout the park. The bike path is paved and lengthy, ending at Jenny Lake. You can also continue along roadside. We were thrilled.

We parked inside the park and biked from there. We brought our own bikes, but there are several places in town to rent from. If cycling isn’t your thing, you can also explore these scenic lakes by foot or by car.

Check out the three lakes I recommend spending your Teton time at:
Taggart & Bradley Lake
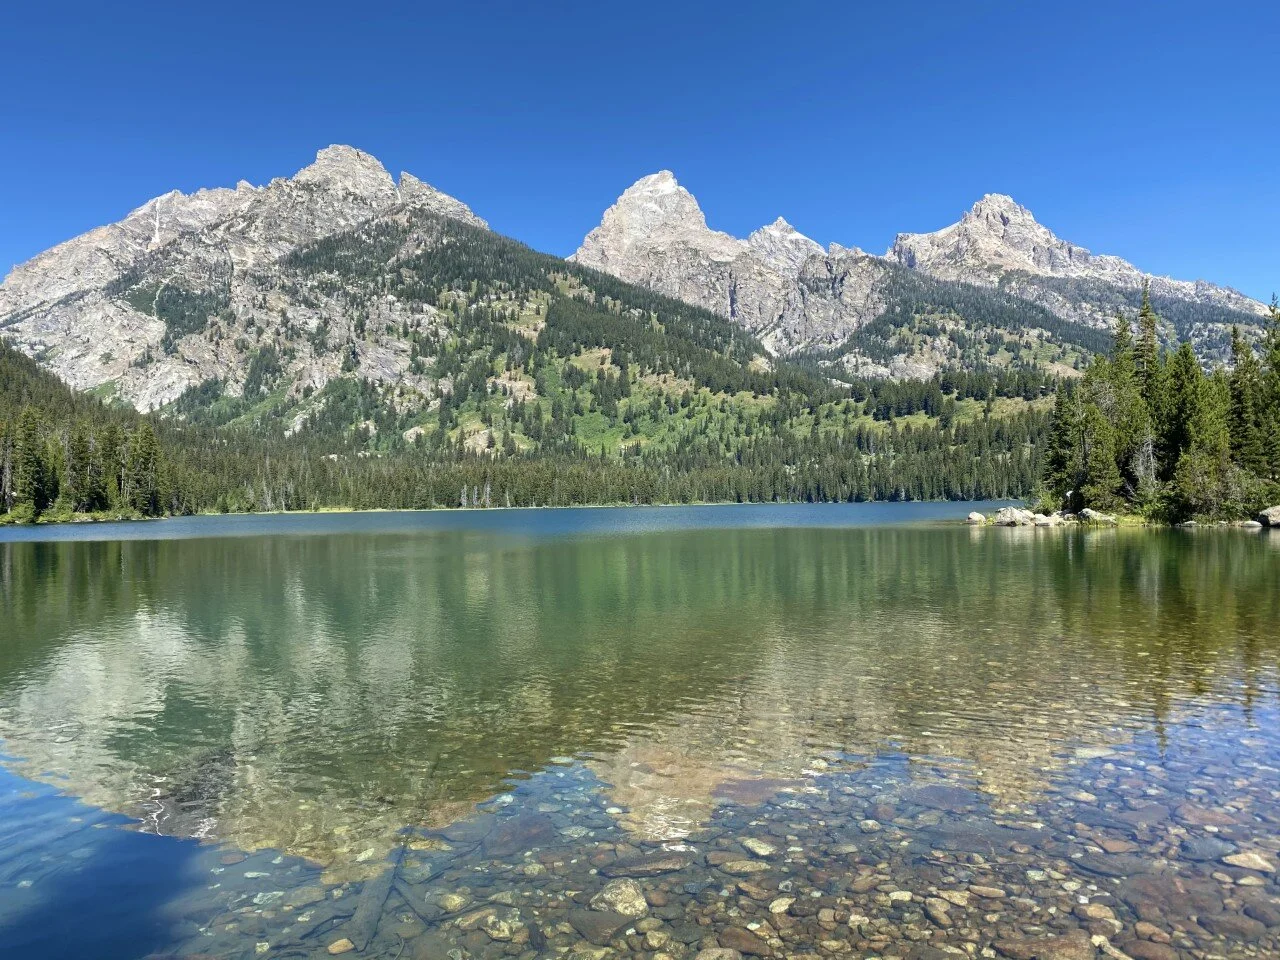
Taggart and Bradley lake are everything you imagine about the Tetons and more. As soon as you park at the trailhead, you are greeted with inspiring views of the Tetons. Just the trailhead parking lot alone is a sight to take in. Arrive early because this parking lot caters to hikers of all types: those who are tackling the grands, those who are going for a leisure stroll, and those who needed a quick pee stop.
We scored the last available parking spot at the Taggart Lake Trailhead (only a few miles in from the national park entrance) and began our hike to Taggart Lake. At a little over two miles, while gazing almost entirely at the Tetons above, we reached Taggart Lake.

Another 1.5 miles on the trail led us to Bradley Lake, which was easy to miss at the junction. This lake was less crowded, and just as stunning as Taggart. A little over two miles led us to complete the loop at around 5.5 miles and 500 feet elevation gain total.

Jackson Lake
This national park is quite large, but we were determined to see as much of it as we possibly could. From hiking to a couple lakes, to biking alongside the road, we also explored the northern part of the park by car. This drive brought us to Jackson Lake, where the summer blue sky seamlessly blended into the shimmering crystal waters.

I could stare at this view forever. It’s the perfect spot to eat your packed lunch, stop for a break, or simply relax. Plenty of viewpoints to pull over for with ample parking to take in this dreamy view.
What’s your preferred way to see the lakes - bike, hike, or drive up to the view?

Best Day Hike in Glacier National Park
Glacier is Montana’s gem. Truly. From the summer wildflower fields to the grazing wildlife, to the glaciers. Oh my goodness the glaciers! I left part of my heart in Glacier and I cannot wait to go back.
With initial plans to hike to the Grinnell Glacier, only to find out the night before that that part of the park was closed (summer 2020), we swiftly searched our NPS map for other hikes. The maps that the park service provides are jampacked with information about wildlife need-to-knows, safety measures to take, and hikes to explore. I highly recommend grabbing a map when you arrive (or check out GNP’s breakdown by regions of the park here).
Turns out, Grinnell Glacier can also be reached from the skies. Lucky me! Instead of reaching the glacier from the ground-level, we’d be hiking up to the lookout spot surrounded by the peaks. In hindsight, part of the park’s closure worked out in our favor because I never would have experienced this trail otherwise.
We set out early in the morning. Early in Glacier summers means 3:30 or 4am with the peak tourism. You would think a park in the furthest part of Montana would be kept as a hidden secret, but alas, the secret’s out. Glacier is a gem no one wants to miss out on.
With only one road to the trail’s access point, we quickly found ourselves in traffic. Shuttles that usually run throughout the park were shut off. Parking was full at Logan Pass, but we were fortunate to snag a spot half a mile away alongside the road in a designated parking spot.

Hiking along the Highline Trail…
Moments later, we embarked on the Highline Trail and I kid you not, every step had mountainscape views. Wildflowers and even some wildlife (deer, marmots, and mountain goats) along the trail as well. My first experience with a marmot is one I’ll never forget. As soon as I set my eyes on this adorable, sunbathing creature, a screech was let out that sounded like someone was being attacked. Turns out this adorable little thing has a fiery side to him. We quickly hiked on.

Even if you only have a couple hours to spare, hiking the Highline Trail is completely worth it. We gave it the day to see the glacier, so we made our way up the majority of the hike’s ascent to the Grinnell Glacier Overlook. The sign lies to you when it says .6 miles away. Trust me.


Closer to a mile of what felt like an endless uphill, we reached shimmering, aqua blue waters outlined by ice. It looked surreal.

With time to spare, we decided to make our way to the Granite Park Chalet, not too far from the start of the ascent to the glacier overlook. Glacier originally had over ten chalets built to mimic the vibe of Switzerland – ultimately, to promote tourism. Why go to Switzerland, when you can have it all right here in Montana? Sadly, various situations led to many of them no longer standing. The Granite Park Chalet is one of two remaining in the backcountry.

The views from this chalet are phenomenal. The fact that this trail is extraordinarily stunning and leads you to a homey chalet just tops it. Bookings fill up swiftly, for good reason, so plan ahead if you’re hoping to snag a spot at this dreamy stay. We did an out-and-back from the chalet, adding up to 3,700 elevation gain in 18 miles of trekking.
The Granite Park Chalet also has a campground below it, not too far away. It’s the perfect entry into the backcountry if that’s your thing. My heart was completely full after this hike. If you only have a day to devote to hiking, this is your trail for a taste of all the delights that Glacier offers.
